Providers
There are two types of providers Click on the "Providers" icon in the menu ribbon to configure your provider information. You can enter the information manually, or you can use the Billing Profile Wizard.
 Using the EDI Billing Profile Wizard
EDI Billing Profile Wizard
The Providers section of the Accounting application
Open the Accounting application, go to the Maintenance tab, and then click the Internal Providers button.

You can open the EDI Billing Profile Wizard by clicking the Add button in the EDI Billing Profiles section or clicking the Run Wizard button.
Red exclamation points denote errors that require your attention. Hover your cursor over the red exclamation point to view the error.

Add an EDI billing profile
- Select Use Information Defined Below.
- Under EDI Billing Profiles, click the Add button. The Billing Profile Wizard appears. If you do not wish to enter profiles using the Wizard by default, clear the checkbox Run this Wizard when adding new Profiles. If you wish to run the wizard in the future, you can click the Run Wizard button above the Service Location section.
- Make the appropriate selections in each step of the wizard, clicking the Next button to move through the screens.

- When you are finished, click the Finish button.
- In the Selected Profile section, type a name for the EDI profile in the Profile Name text field.
- (Non-default billing profiles) In the Payers Associated with Selected Profile section, click the Add button to add the payers that will be associated with this EDI billing profile. The Select Payer Address dialog box appears.
- (Non-default billing profiles) Select a payment source from the Payment Source drop-down box. To see all payment sources, select ALL.
- (Non-default billing profiles) Select the payers you wish to associate with the billing profile, and then click the Select button.
- Click the Save button to save the billing profile.
NOTE:
The "Default" EDI billing profile applies to all payers by default. If you wish to create a different profile for specific payers, you must add another billing profile.
You can add or delete a profile by selecting the profile and clicking the Add or Delete buttons. Note that you cannot delete a default profile before specifying a different profile as the default.
Edit an EDI billing profile
- Select the billing profile you wish to edit in the EDI Billing Profiles section. The information for that profile appears.
- Make your changes, and then click the Save button.
Change the default billing profile
- Check the Default box next to the billing profile you wish to use as your default billing profile.
- Select the new default profile, and then add payers to associate with the profile.
- Click the Save button.
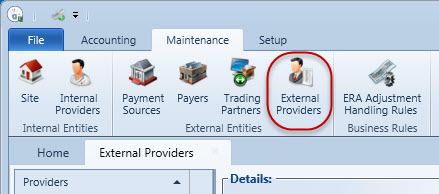
Add an External Provider
When you add an external provider, you make their name available for selection when editing DME charges in the Transaction Details screen of Front Desk.
- Open the Accounting application, go to the Maintenance tab, and then click the Internal Providers button.
- Complete the information in the form.
- Click Save. The provider you just entered appears in the list on the left.
