Front Desk Setup
Your Front Desk application is configurable so that you may set your standards for how patients are handled. You can set the requirements for checking out a patient and set how you want this screen to display certain optional information.
Configure Your Front Desk
Click Setup in the upper right-hand corner of the Patient Flow screen.

Required Tasks for Check Out
ChiroTouch can be configured to require that certain tasks be completed before a patient is checked out. Set these requirements by using the Charges, Diagnoses, and Chart Note drop-down menus. By using these options, you can have the system warn you that these tasks are not completed, or require the provider to complete these tasks prior to checking out the patient.
- If you set a task to Optional, you are not be notified if the task has not been completed.
- If you set a task to Warning, ChiroTouch issues a warning if the task has not been completed.
- If you set a task to Required, you are required to complete the task before you can check out the patient.
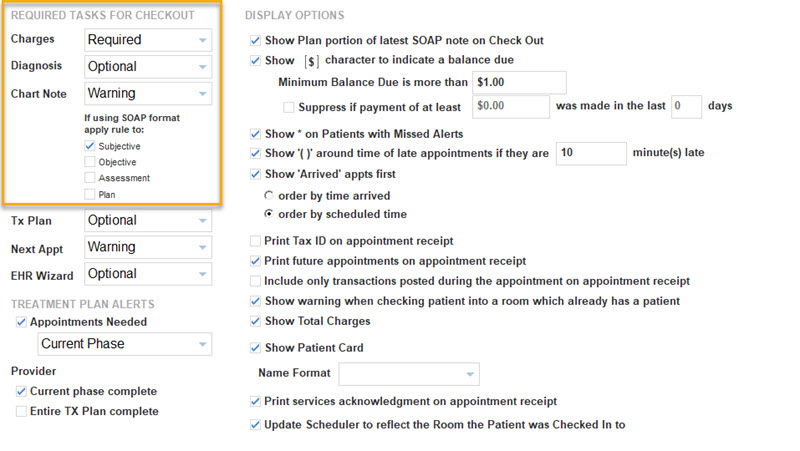
Treatment Plan Alerts
Treatment plan alerts for single phase and multi-phase treatment plans can help notify staff and providers about the status of the patient's treatment plan. Use the drop-down here to select which conditions must be met for a treatment plan alert to display.

- For the provider: Select Current Phase Complete or Entire TX Plan Complete to alert the provider upon opening a patient's record that they have completed one of these options.
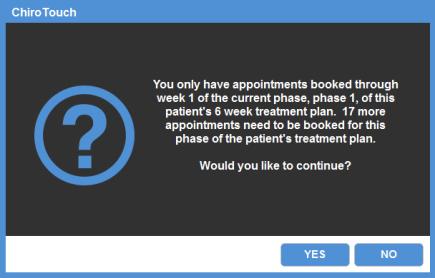
- For staff: Select the “Appointments needed” checkbox. This checkbox activates treatment plan alerts for staff during patient checkout. Select an option from the drop-down menu to choose whether to display alerts to staff that the patient is missing appointments for their entire treatment plan, or only for their current phase.
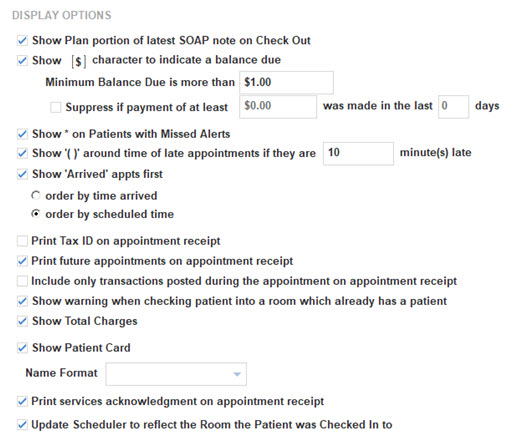
Display Options
In this section of the setup screen, you can select which patient information you want displayed, and what conditions must be met for this information to display.
| Field Name | What It Does |
|---|---|
| Show Plan Portion of latest SOAP note on Check Out | Select this option to show the patient’s treatment plan upon check out. If the provider entered a treatment plan during the patient's appointment, selecting this option displays the patient's treatment plan to the front desk upon patient check out. The check out screen appears when you choose a patient from the Patients Checked-In column and click the Check Out button. Check Out a Patient for more information on the patient check out screen. |
| Show full treatment plan if multi-phase | Select this option to show the entire multi-phase treatment plan upon checkout. |
| Show __ for balance due | Select this option and enter a character to display next to a patient’s name if they have a balance that needs to be collected at the time of check out. This option allows you to specify the minimum outstanding balance that needs to be met for the character to be displayed. This minimum balance refers to the patient balance only, not insurance or account balances. |
| Suppress if payment of at least _____ was made in the last _____ days | Select this option if you would like to suppress the designated balance character if a payment of at least the specified dollar amount was made within a specified number of days. |
| Show ‘*’ on Patients with Missed Alerts | Select this option to show an asterisk (*) next to patients whose have stored alerts in the system that have not been viewed by their intended audience. For example, a patient may incur a missed alert if they were mistakenly never checked-out after their appointment. Any alerts for that patient that were scheduled to appear to the front desk at checkout on that day would then be missed, and an asterisk would appear next to that patient's name next time they appeared in the Patient Flow screen. |
| Show '()' around time of late appointments if they are _____ minute(s) late | Select this option and the enter the number of minutes late to count before parentheses are placed around the names of those patients. |
| Show “Arrived” appts first | Select this option to show patients who have arrived in the office at the top of the Today’s Appointments column. These patients can be sorted by either the time they arrived, or by their scheduled appointment time. |
| Print Tax ID on appointment receipt | Select this option to have the provider’s tax ID printed on the patient’s receipt. This can be helpful for patients if they are submitting their receipt to their insurer for repayment. |
| Print future appointments on appointment receipt | Select this option to print all of the patient’s future appointments on their receipt. |
| Include only transactions posted during the appointment on appointment receipt | Select this option to include on the transactions posted during the appointment on the appointment receipt. |
| Show warning when checking patient into a room which already has a patient | Select this option to have ChiroTouch warn you when you are placing multiple patients in the same room. By default this feature is NOT turned on. You must check this box to activate this feature. |
| Show Total Charges | Select this option to show the monetary total of today's charges to the right of the patient's name when the patient is moved to the Patients Seen Today column. |
| Show Patient Card | Select this option if you want the Patient Card to appear on the right of the Patient Flow screen. The Patient Card shows an overview of the selected patient's information, notes, ledger, and future appointments. |
| Name Format | Select the patients' name format (First Last or Last, First). |
| Print services acknowledgment on appointment receipt | Select this option to add the following text to the bottom of the patient appointment receipt: "I acknowledge that the products and services noted above were provided". Note: The patient will only see this text upon previewing or receiving a printed receipt. The receipt is not visible to the patient prior to signing the receipt. |
| Update Scheduler to reflect the Room the Patient was Checked In to | Select this option to update the room view on the Scheduler to reflect the room the patient was checked into from CT Sign-In or manually in the Front Desk or Provider applications. |