Options
This section contains options for configuring the ChiroTouch system. You will use this section to:
- Assign a color to each appointment purpose of visit type
- Set a duration for each appointment purpose of visit type
- Maintain your billing address
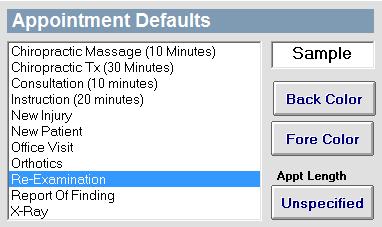
- Configure your merchant services
- Configure your Cash Practice® settings
- Choose how to handle your insurance payments
- Set up your email account
- Select your Report By provider options
- Configure option to allow patient self check-in subjective to be used by any provider
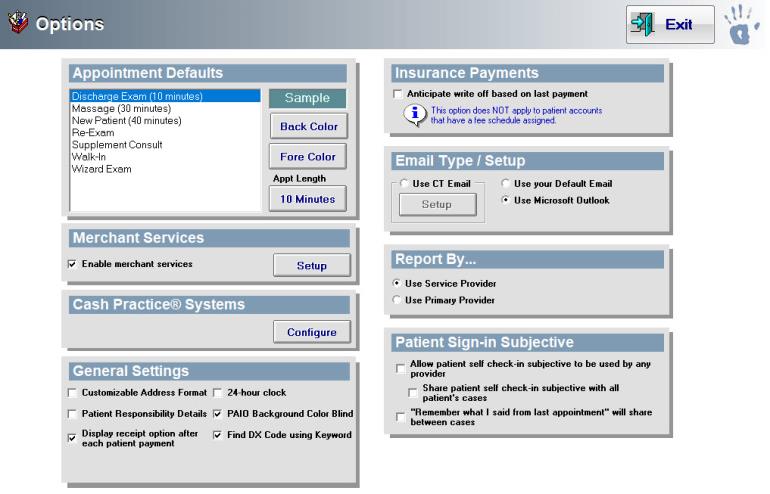
You can color code your appointments by purpose of visit in a similar way to how you color coded your providers’ schedules.
To assign colors to your appointment purpose of visit type:
- Select an appointment purpose of visit from the Appointment Defaults list.
- Click the Back Color button to select the background color for this appointment type.
- Select a color from the existing color options in the Color dialog box, or define a new custom color.
- Click OK. The background color will populate in the Sample field.
- Click the Fore Color button to select the font color for this appointment type.
- Select a color from the existing color options in the Color dialog box, or define a new custom color.
- Click OK. The font color will populate in the Sample field.
Set up and test the connectivity of your merchant service account here by clicking the Setup button. See CTPayments for further information.
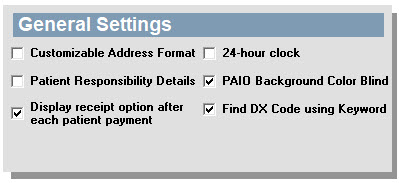
In the General Settings section, you can
- Enter a customizable address format
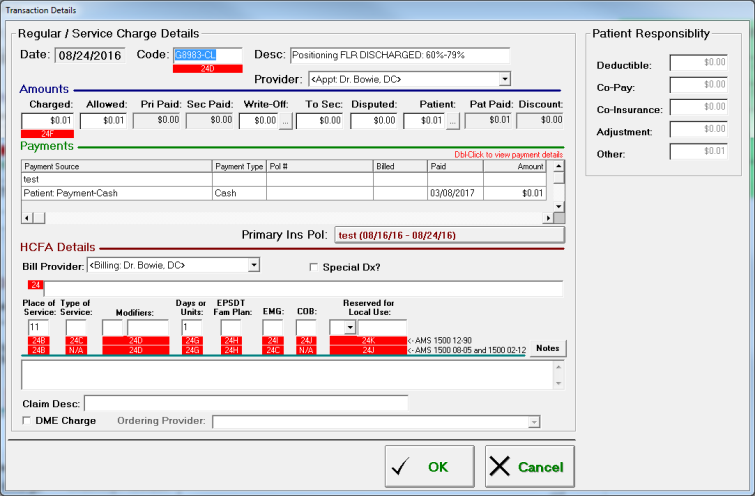
- Activate Patient Responsibility Details (see patient responsibility stratification example below)
- Enable/disable "Display receipt option after each patient payment" (selected by default).
- Switch the ChiroTouch system to a 24-hour clock (selected by default).
- Remove the background color in the Charges and Diagnosis boxes in Provider All-In-One (PAIO Background Color Blind)
- Enable diagnosis search of the entire description when using the "Find" button. If disabled, the software will search the first word in the description.
To view patient responsibility stratification details for a charge:
- Open the patient's ledger.
- Double-click the line item for the desired charge.
- Patient responsibility details are listed on the right.
Save time and effort by setting appointment duration values that will automatically populate in your new appointment based on the appointment visit purpose you select.
To configure appointment duration by purpose of visit:
- Select an appointment purpose of visit from the Appointment Defaults list.
- Click the button under Appt Length.
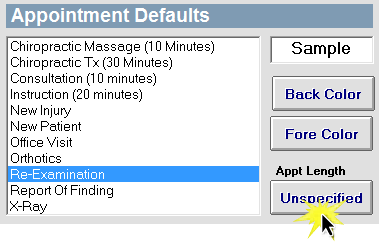
- Select an appointment length and click OK.
Use this checkbox to tell ChiroTouch whether or not to anticipate a write off based on the last payment. Selecting this checkbox tells the system to anticipate a write off amount based on how the last charge was reconciled. Over time, ChiroTouch learns how payments are posted and starts anticipating the calculated write offs for these payments.
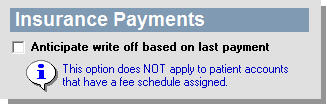
NOTE:
Note that this option does not apply to patients that already have a fee schedule assigned.
When you export information in ChiroTouch, you can send the exported information as an e-mail attachment. The type of e-mail service that automatically opens when you choose to export your information as an attachment depends on the options you choose here.
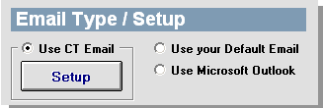
CT Email
Send e-mail from your ChiroTouch application using your website.
To use your ChiroTouch e-mail account:
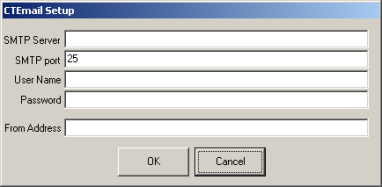
- Select Use CT Email, and then click the Setup button.
- Enter your Simple Mail Transfer Protocol (SMTP) server name. Delivery of a message is initiated by transferring the message to a designated SMTP server.
- The SMTP port should already be filled in with the default location. The originating SMTP server communicates with the destination SMTP server directly through Transmission Control Protocol/Internet Protocol (TCP/IP) on port 25.
- Enter your system Username and Password.
- Enter your personalized From Address. The system does not validate this address; it only displays this information to your recipients.
- Click the OK button to complete the setup for CT Email.
Using Your Default Email
If you have a default e-mail account (such as Yahoo!, Hotmail, etc.) configured on your computer, you can use it instead of CT Email.
To use your default e-mail account: Ensure that your default e-mail service is set up properly through your Internet Options and select Use your Default Email.
Using Microsoft Outlook
If you have Microsoft Outlook, you can use it to send e-mail to your patients.
To use your Microsoft Outlook e-mail account: Select Use Microsoft Outlook.
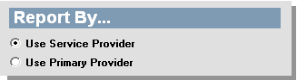
When generating transaction activity reports, you have the option to sort the reports according to the patient’s service provider, or according to the patient’s primary provider.
Click the radio button beside your preferred option:
- If the service provider selected, the service provider receives credit the transaction.
- If the primary provider is selected, the primary provider receives credit, even if the associate doctor saw the patient.
Select this option if you wish to allow patient self check-in subjectives to be used by any provider. For more information, Entering Chart Notes.