Chart Notes
The ChiroTouch chart notes have been redesigned to allow for greater flexibility and customization. Now with text modification and quick editing properties, ChiroTouch chart notes allow you an even faster option for creating unique, patient-specific notes, which lets you focus more time on the health and wellness of your patients.
ChiroTouch supports various documentation techniques, such as voice dictation and macro sets, while supporting different documentation formats, such as SOAP notes. ChiroTouch Macros are an easy-to-use chart notes tool, with many advanced features and setup options.
The chart notes screen can be launched from both the Provider All-in-One Application or the ChiroTouch Basic application.
To access the Chart Note Editor:
- From the Provider All-In-One main screen: double-click a chart note.
- From the ChiroTouch Provider application: click the "Chart Notes" button; then click an option under Add/Modify Note.
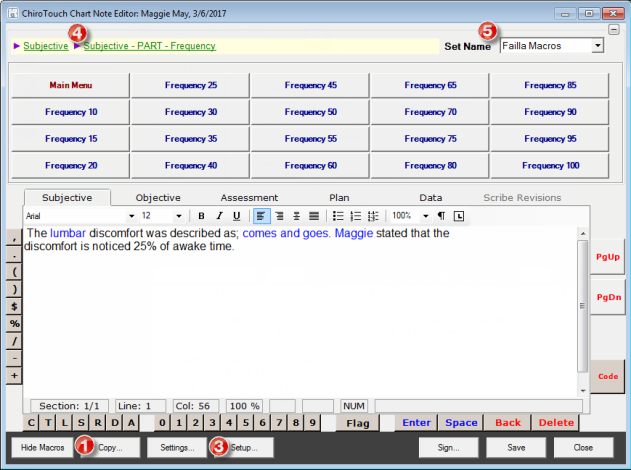
Navigating the Chart Note Editor Screen
Macros Section
![]() Click the "Copy" button to copy a chart note from a previous appointment. A list of your existing notes appears. You can view them by date or by doctor by clicking one of the option buttons. Click a date to view the chart note text.
Click the "Copy" button to copy a chart note from a previous appointment. A list of your existing notes appears. You can view them by date or by doctor by clicking one of the option buttons. Click a date to view the chart note text.
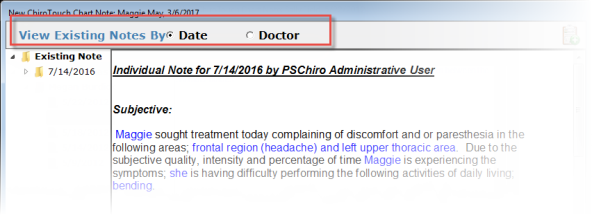
Subjective, Objective, Assessment, and Plan check boxes appear below the list. Select the check boxes for the fields you wish to copy to the new chart note and click the "OK" button.

NOTE:
If you are copying a SOAP note into a single note, all portions will be added and combined. If you are copying a single note to a SOAP note, all fields will be entered in the Subjective portion.
![]() Click the "Hide Macros" button to hide the macro buttons and allow for more note space. You can also hide the macro buttons by clicking
Click the "Hide Macros" button to hide the macro buttons and allow for more note space. You can also hide the macro buttons by clicking  in the upper-right corner. To view the macro buttons again, click the "Show Macros" button or click
  .
.
![]() Click the "Setup" button to open the Macro Setup Tool screen.
Click the "Setup" button to open the Macro Setup Tool screen.
![]() Breadcrumb navigation links appear above the macro buttons. Click any link to go quickly to that menu.
Breadcrumb navigation links appear above the macro buttons. Click any link to go quickly to that menu.
![]() If you have multiple macro sets, you may switch between them by selecting a macro set from the Set Name drop-down menu.
If you have multiple macro sets, you may switch between them by selecting a macro set from the Set Name drop-down menu.
Entering Chart Notes

![]() Save - Click the "Save" button to save and close the chart note.
Save - Click the "Save" button to save and close the chart note.
![]() Close - Click the "Close" button to close the chart note. You will be prompted whether you wish to save the note before closing.
Close - Click the "Close" button to close the chart note. You will be prompted whether you wish to save the note before closing.
![]() Sign - Click this button to add an electronic signature to your chart note. You can choose to provide a signature now if a signature pad is connected, or you can use a signature already stored on file. Enter a signature and click the "OK" button to close the signature capture. A timestamp appears at the bottom of the screen.
Sign - Click this button to add an electronic signature to your chart note. You can choose to provide a signature now if a signature pad is connected, or you can use a signature already stored on file. Enter a signature and click the "OK" button to close the signature capture. A timestamp appears at the bottom of the screen.

![]() Delete - Click this button to delete the chart note. You will be prompted whether you are sure you wish to delete it.
Delete - Click this button to delete the chart note. You will be prompted whether you are sure you wish to delete it.
![]() Text Field - Type your notes here. Click macro text buttons to enter the macro text in your chart notes. Format the text using the formatting buttons above the text field. You can also switch between Subjective, Objective, Assessment, and Plan by clicking on any of these tabs above the formatting buttons.
Text Field - Type your notes here. Click macro text buttons to enter the macro text in your chart notes. Format the text using the formatting buttons above the text field. You can also switch between Subjective, Objective, Assessment, and Plan by clicking on any of these tabs above the formatting buttons.
To edit the text of an inserted field:
Click the blue text to bring up that field's dialog box and make your edit.
To update patient information fields:
- Click the blue text of the patient information field. The Update Patient Information dialog box appears.

- Select either "This Field Only" or "All Patient Fields" and click the "OK" button.
![]() Character Buttons - Click the buttons to the left of and below the text field to enter characters. To hide the character buttons, right-click them and click "Character Buttons". To view character buttons again, right-click below the text field and click "Character Buttons".
Character Buttons - Click the buttons to the left of and below the text field to enter characters. To hide the character buttons, right-click them and click "Character Buttons". To view character buttons again, right-click below the text field and click "Character Buttons".

![]() Chart Note Flags - Chart note flags can be used to highlight important notes. To flag your chart note, click the "Flag" button and select a color. The "Flag" button appears colored, and your chart note appears colored in the Chart Notes list.
Chart Note Flags - Chart note flags can be used to highlight important notes. To flag your chart note, click the "Flag" button and select a color. The "Flag" button appears colored, and your chart note appears colored in the Chart Notes list.

![]() Pg Up/Pg Down - Click these buttons to scroll up or down in the chart note text field.
Pg Up/Pg Down - Click these buttons to scroll up or down in the chart note text field.
![]() Code - Enter diagnoses and charges during note-taking by clicking the new Code button in the lower right-hand corner of the Chart Note Editor. Diagnoses entered here are saved automatically immediately after entry.
Code - Enter diagnoses and charges during note-taking by clicking the new Code button in the lower right-hand corner of the Chart Note Editor. Diagnoses entered here are saved automatically immediately after entry.

Double-click a code to add a diagnosis or charge code. Any existing diagnosis or charge codes added to this appointment will appear in this screen. Use the Add and Remove buttons to adjust the charge and diagnosis codes entered during this note session.

Setting Up Macros
The macros menu holds up to twenty macros for each Subjective, Objective, Assessment and Plan notes function. The macro menu buttons are labeled in red and link to subcategories that display macro text buttons related to that category. The macro text buttons are labeled in blue and do not contain subcategories. When you select a macro text button, the system inserts the text that has been programmed into the macro in your chart note and any charges or diagnoses associated with it.

To open the Macros Setup Tool:
Click "Setup Macros" on the left navigation pane.
Creating a New Macro Set
To create a new macro set:
- Click "New Macro Set".

- Type a name for your macro set. To copy macro buttons from an existing set, select "Copy From", and then select a macro set.
- Click the "OK" button.
To create a new macro menu button:
- Click any blank button to create a new menu button. The upper-left button serves as the main menu button by default. Select the menu that you wish to display or type a name for a new menu.
- Click "Save". You can add text buttons under the new menu button, create another menu button, or create standalone text buttons around the menu button.
To create a standalone macro text button:
- Click any blank button other than the main menu button (the upper-left button).
- Type the caption you would like to appear on the button.
- Type the text you wish to appear in your macro. If you wish to format the text, select the "Formatted Text Macro" check box.
- Click "Save" to save and return to the Macro Setup Tool.
To create a macro text button within a menu:
- Click the menu button in which you wish the text button to appear.
- Click "Open Menu" on the left navigation pane.
- Click a blank button where you'd like your text button to appear.
- Click "New Text Button" in the left navigation pane.
Inserting an Advanced Macro Field
You can insert advanced macro fields in your macro text buttons that prompt you for information based on the patient you are seeing.
To insert an advanced macro field:
- Click the macro text button for which you would like to insert a field.
- In the text field, click where you would like the field to be inserted.
![]()
- Click "Advanced" in the left navigation pane. The Macro Field Details list appears.
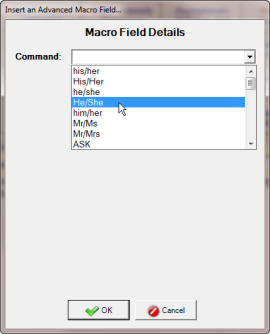
The following options are available:
-
his/her, His/Her, he/she. He/She, him/her, Mr/Ms, Mr/Mrs - These commands insert the appropriate term into the chart note based on the patient’s gender and marital status.
-
ASK - This command prompts the provider with a question and asks the provider to enter the answer. Type your question in the Question text field.
-
CHOOSE ONE/CHOOSE ANY - This command prompts the provider with a multiple choice question and enters the selected answer into the chart note. Type your question in the Question text field and select from a list of choices from the drop-down menu.
To create a new list of choices for this question:- Click the "Setup" button. The Choices Setup dialog box appears.
- Select "Create a NEW list of choices" and click the "Next" button.
- Type a name for your list of choices.
- Click the "Add Choice" button. A text field appears for you to enter a new list item.
- Type a name for your new list item.

- Repeat steps 4 and 5 until you have completed your new list items; then click the "Next" button to return to the Choices Setup dialog box.
To edit an existing list of choices for this question:
- Click the "Setup" button. The Choices Setup dialog box appears.
- Select "Edit an existing list of choices" and click the "Next" button.
- Select the list of choices you wish to edit.
- Click the "Add Choice" button to add a choice. To remove a choice, select the choice and click the "Remove Choice" button.
- When finished, click the "Next" button to return to the Choices Setup dialog box.
To delete a list of choices:
- Click the "Setup" button. The Choices Setup dialog box appears.
- Select the option "Delete an existing list of choices" and click the "Next" button.
- Select the list you wish to delete; then click the "Next" button. You will be prompted whether you are sure you wish to delete the list. Click the "Yes" button to delete the list, or click the "No" button to return to the Choices Setup dialog box.
- DATE - This command prompts the provider for a date and enters it in the chart notes. Type the question text that prompts for a date and click the "OK" button.
- NUMBER - This command prompts the provider for a number and enters it in the chart notes. Type the question text that prompts for a number and click the "OK" button.
- REGION (A–E) - This command prompts the provider for a region of the body and enters the region in the chart notes. Type the question you would like to be presented with and click the "OK" button.
To edit the description of a region:
- Click the "Setup" button below the Question field to open the Macro Choices Setup dialog box.

- Select a region and make changes to the text as desired, or click the "Copy From" button to copy a Region macro from another set.

- SPINE - This command prompts the provider for a spine segment and enters the segment in the chart notes. Enter the question you would like to be presented with. When click this macro in your chart notes, a Macro Input dialog box appears prompting you to click the spinal segments to add them to your chart note.

- SPINE-LR - This command is similar to the SPINE command. It prompts the provider to select a left, right, or complete spine segment and enters the segment in the chart notes. This command is helpful if you want to be precise about the location of spinal subluxations when you are reporting your findings. Enter the question you would like to be presented with.
- The following commands prompt the provider to enter specific patient information into the chart notes:
FIRST_NAME - first name
LAST_NAME- last name
BIRTH_DATE- birth date
AGE - age
SEX - sex
ADDRESS - address
PHONE - phone number
EMAIL - email address
MAR_STATUS- marital status
EMP_STATUS - employment status
OCCUPATION - occupation
EMPLOYER - employer
INIT_DX - initial diagnosis
CURR_DX - current diagnosis
INJURY_DATE - date of injury
REFER_PHYS - referring physician
When finished inserting fields in your macro button, click "Save," and then click the "Close" button to return to the Chart Note Editor screen.
Adding Charges and Diagnoses to Macro Buttons
You can automatically post charges and diagnoses by adding them to macro text buttons.
To add charges to a macro text button:
- Click the macro text button you would like to add charges to. The Macro Charges list appears.
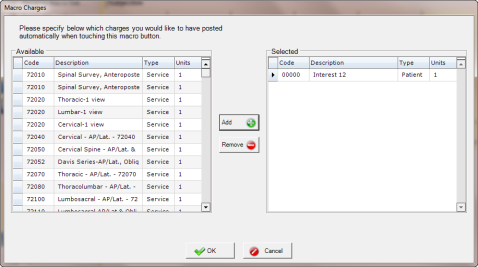
- In the Macro Charges list, click the charge and click the "Add" button to move it from the Available column to the Selected column. You can also double-click a charge to add it.
- To remove a charge from the Selected list, select the charge and click the "Remove" button.
To add diagnoses to a macro text button:
- Click the macro text button you would like to add diagnoses to. The Macro Diagnoses list appears.

- In the Macro Diagnoses list, click the diagnosis, and then click the "Add" button to move the diagnosis from the Available column to the Selected column. You can also double-click a diagnosis to add it.
- To change the order in which a diagnosis appears, click the diagnosis, and then click the "Move Up" or "Move Down" buttons.
- To remove a diagnosis from the Selected list, click the diagnosis, and then click the "Remove" button.
When finished adding charges and diagnoses, click "Save", and then click the "Close" button to return to the Chart Note Editor screen.
Importing and Exporting Macro Sets
Under the Actions menu in the Macro Setup Tool are options for importing and exporting macro sets.

To import a macro set:
Click "Import Macro Set" and select a macro file to import from your computer.
NOTE:
To see a growing list of additional macro sets available for download, log in to your MyChiroTouch account and navigate to the Library section.
To export a macro set:
- Click "Export Macro Sets".
- Select the macro set you wish to export.
- Choose a location where you wish to save the file.
- Enter a file name, and then click the "Save" button. The macro set will be saved as an .xml file.
When finished imoprting or exporting, click the "Close" button to return to the Chart Note Editor screen.
Printing Macros
Under the Actions menu in the Macro Setup Tool is the option to print macros.
To print macros:
- Click "Print". The Print Macros dialog box appears.
- Select "Macro button definitions" to print all buttons, or select "Macro set choice definitions" to select specific definitions to print. A print preview appears.
- Click the "OK" button to print the macros.
When finished, click the "Close" button to return to the Chart Note Editor screen.
Editing Macros
From time to time, you may need to edit your macros to accommodate new procedures and treatments.
To edit an existing macro:
- Click "Select Macro Set" and select the macro set you wish to edit.
- Click "Setup Macros" to open the Macros Setup Tool.

- To rename or delete a menu, select a menu from the "Select a Menu" list.
- Click "Rename Menu" to rename the menu.
- Click "Delete Entire Menu" to delete the menu.

- To edit a menu button, click the menu button you wish to edit. You can select a different menu to display or enter a new name for the menu. When finished, click "Save" to save the button or "Cancel" to cancel.

- To edit a text button, click the text button you wish to edit. Type the text you wish to appear in your macro. To format the text, select the "Formatted Text Macro" check box. You can also insert fields, charges, and diagnoses by clicking these options in the left navigation pane.
When finished editing your macros, click "Save", and then click the "Close" button to return to the Chart Note Editor screen.