Setup Options
The Options dialog box is a crucial tool in customizing the Provider All-In-One. It shows the flexibility of what Provider All-In-One can do to manage patient flow and the documentation process.
The information contained in the Options dialog box is referenced throughout this chapter. Please pay close attention to this section, as it explains the application's behavior, and the patient selection functions discussed in later sections.
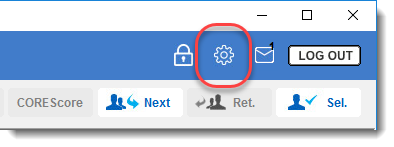
Click the icon in the upper right to access the various setup options:
Next Patient Options
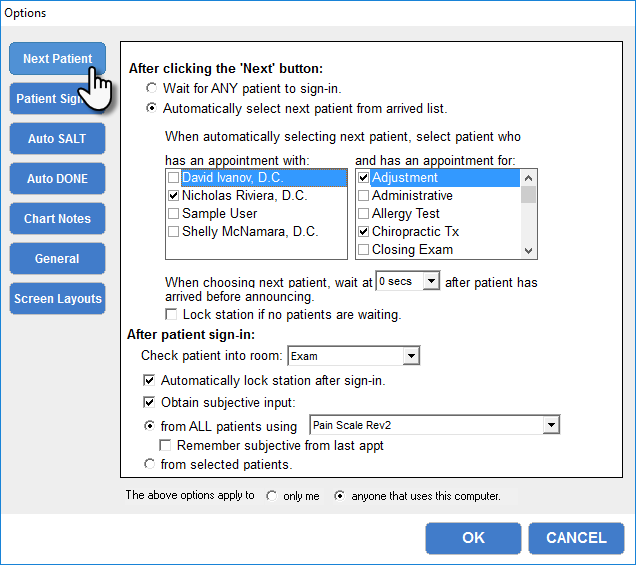
The Options dialog box opens in the Next Patient section. There you can choose:
- How to direct waiting patients to the treatment room when using the Next button
- Which providers and appointment purposes to include with automatic selection
- Which room to assign your Provider All-In-One computer
- Subjective screen options for patients signing in.
"Next" Button Options
Use the Next button to update the patient’s status to “checked in”. First, determine how you want the system to react when you click the Next button on the toolbar. You have two choices for checking in the next patient:
- Wait for any arrived patient to sign in
- Automatically select the next arrived patient in line
Wait for Any Patient to Sign In
Choose this option to tell the system that when you click the Next button, you want the system to bring any waiting patient back to the treatment room, regardless of the arrival time.
Automatically Select Next Patient from the Arrived List
If you choose this option, you are telling the system that when you click the Next button, you want the system to bring back the next patient in line. This means those patients who arrive first are selected first, regardless of their scheduled appointment time.
Automatic Selection – Providers and Appointment Purposes
If you configure Provider All-In-One to automatically select the next patient in line, indicate which providers and appointment purposes to display in the selection lists. When you click the Next button, Provider All-In-One only selects those patients who have an appointment with specific providers and for specific appointment purposes.
If you select a provider’s name, Provider All-In-One recognizes and accepts patients waiting whenever that provider clicks the Next button. If you select an appointment purpose, Provider All-In-One recognizes and accepts patients who are scheduled for that appointment purpose whenever you click the Next button. If patients are waiting for providers and appointments that you do not select, they are not recognized as waiting in line and are not called back to your treatment room. This is a way of making your Provider All-In-One application more discriminating when it is automatically selecting the next patient in line.
Automatic Selection – Waiting Time
The next option is to select a period of time. This represents the amount of time that must pass after that patient is marked as “arrived” by the system before the CT Announcer application directs that patient to a treatment room. This amount of time may be used to allow the patient time to move down a hallway, enter the waiting area, or otherwise settle in before moving to the treatment room.
To select a period of time, click to open the drop-down menu, then select a time value. When that amount of time has elapsed, the CT Announcer directs that patient to a room, and the Patient Status Bar notes that a patient is waiting.
NOTE:
If you click the Next button before this time has passed, Provider All-In-One displays a message box that reads “Waiting for the next patient to arrive”, after which it may lock the screen. To avoid this, select a shorter amount of time, wait until the Patient Status Bar displays text that a patient is waiting, or deselect the option to lock your screen in the Options dialog box.
Lock Station if No Patients are Waiting
This option is tied to the option to automatically select the next patient in line. If you select this option, the screen automatically locks whenever you click the Next button and no patients have been marked as arrived. If you do not select this option, the screen continues to display the message box that reads “Waiting for the next patient to arrive” until you close the box.
After Patient Sign-In
You can assign the Provider All-In-One computer to a certain room by selecting that room from the Check Patient Into Room drop-down menu. The menu contains the complete list of rooms that you set up in the system. If you click the Next button, the patient is automatically checked in to this room. If the doctor moves the computer into a different room, simply make the adjustment here. Be sure that the room you have assigned to the Provider All-In-One computer to is being monitored by the CT Announcer.
You may want to obtain the patient’s subjective analysis at this computer, if you prefer to have patients enter this information in the privacy of the treatment room. If selected, the subjective complaints screen appears in the same manner as in the CT Sign-In application. The resulting subjective analysis is automatically loaded into the Chart Notes section of the Provider dashboard screen.
If you click Next, Provider All-In-One displays a sign-in screen for the patient. After the patient signs in, the subjective screen appears for the patient to complete. The patient’s file is displayed on the dashboard.
This subjective screen overrides any previous subjective analysis. If you are having your patients complete a subjective screen at the Provider All-In-One computer, and the patient already completed a subjective screen when using CT Sign-In, the patient’s newest subjective note is the one entered in the doctor’s chart notes for this appointment.
To assign a subjective screen, check the obtain subjective input option. Then, determine whether to obtain subjective input from all patients or from only selected patients.
- If obtaining subjective input from all patients, assign the same subjective screen for all patients. Using the drop-down menu, select the subjective screen of your choice.
- If obtaining subjective input from only selected patients, you don’t need to select a subjective screen here. The subjective screen that is assigned to the patient in the Patient Information screen in the ChiroTouch application is used.
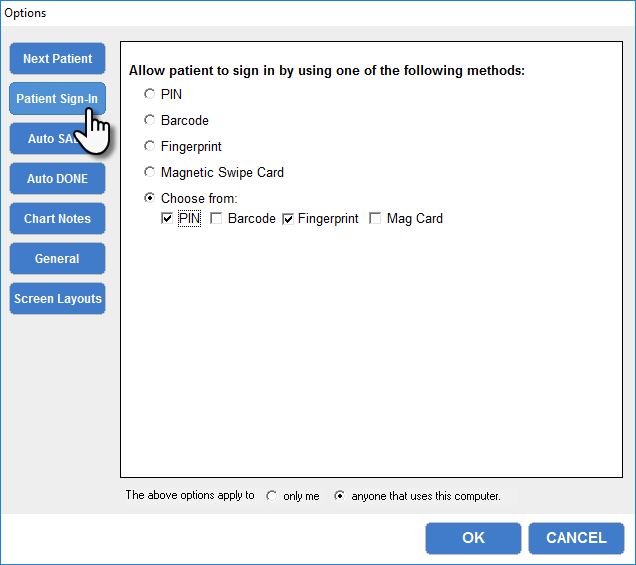
Patient Sign-In Options
The next section in the Options dialog box is Patient Sign-In. It allows the doctor to choose the sign-in methods that the patient uses the Provider All-In-One computer. This is only necessary when obtaining subjective input from a patient in the privacy of a treatment room.
The sign-in options are used only when you click the Next button to check the patient in. The sign-in options are displayed to the patient in a pop-up screen. For security and patient identification purposes, at least one sign-in method must be chosen here, and the patient must sign in after entering the room. Using the computer located in the treatment room, the patient signs in and, if you selected the option in the Next Patient section, enter subjective notes.
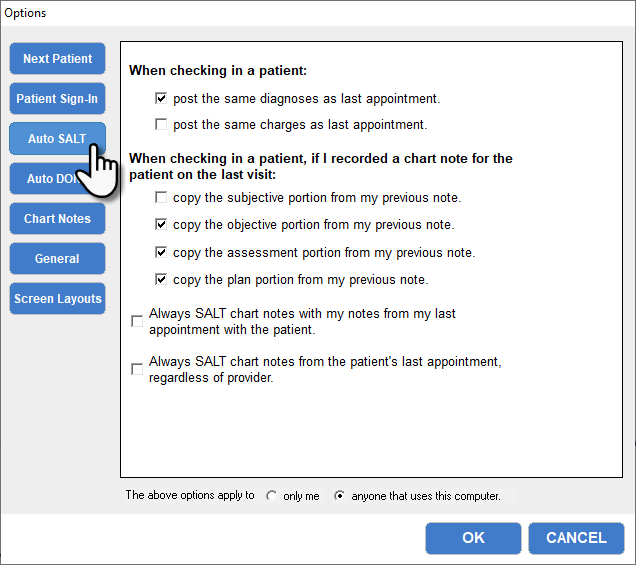
Auto SALT Options
SALT stands for Same As Last Time. This feature allows you to apply the same notes, diagnoses, and charges as the patient’s previous appointment. You can always change these entries while you are working in the patient’s file. If you do not select to SALT your patient's file automatically, you may still manually SALT a patient's file by clicking the Copy button when entering a chart note.
The Auto SALT option allows you to load various sections of the Provider All-In-One dashboard screen automatically based on a patient’s prior appointment (see Selecting Auto SALT Methods below to learn which kind of prior appointment can be used) . You can Auto SALT your patients’ diagnoses, charges, and portions of your chart notes. This feature is a useful time saver in documenting the patient’s visit when nothing has changed. It can also be used to reference details of the last appointment.
When enabled, the Auto SALT feature is applied whenever you open a patient’s file and the patient is also checked in for a current appointment. You can always change these automatic entries when you are working in the patient’s file. The Auto SALT process repeats with every patient visit until you adjust this function.
Configuring the Auto SALT feature
Select each option that you want the system to Auto SALT. You can apply Auto SALT to all or only a portion of your chart notes.
When selecting Auto SALT functions and copying the subjective portion of chart notes, any subjective complaints entered by the patient overwrite the automatic copy. Only the patient’s current subjective complaints, if any, appear in the doctor’s chart notes.
Selecting Auto SALT Methods
The original (default) Auto SALT method SALTs your chart notes only if you were the provider for the patient's last appointment. You also have the option of choosing between two other methods in lieu of the original:
- SALT your chart notes from your last appointment with the patient, even if the patient's most recent chart notes were entered by another provider, or
- SALT from the patient's last appointment, regardless of the provider
NOTE: By leaving both boxes unchecked, you are using the original Auto SALT method.
Selecting one of lower check boxes disables the other option. One must be deselected before selecting the other.
Auto SALT from your last appointment with the patient, regardless of who entered chart notes last:
- From the Provider All-In-One application, click the Options icon. The Options dialog box appears.
- Click Auto SALT in the left navigation pane.
- Select the option "Always SALT chart notes with my notes from my last appointment with the patient."
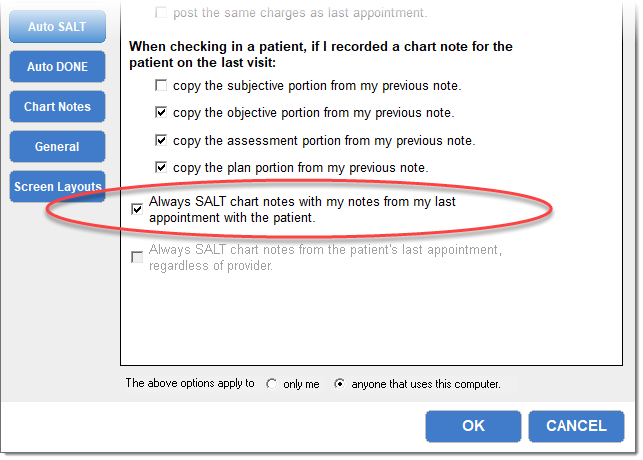
- Click OK.
Auto SALT from the patient's last appointment, regardless of the provider:
- From the Provider All-In-One application, click the Options icon. The Options dialog box appears.
- Click Auto SALT in the left navigation pane.
- Select the option "Always SALT chart notes from the patient's last appointment, regardless of provider."
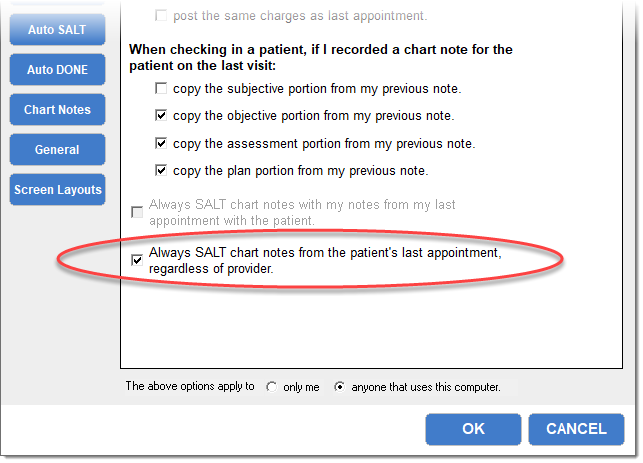
- Click OK.
Auto DONE Options
The Auto DONE function allows you to choose certain tasks which, after completion, automatically move the patient to a virtual “Done” room, changing the patient’s status to “done”.
If you complete the tasks associated with Auto DONE, and you click Delete, Return, Next, or Select; the patient’s status is automatically changed to “Done”.
Any task that you select here must be completed before the patient’s status may be changed to “Done”, regardless of whether you click any toolbar button to remove the patient from the screen.
If you do not complete every task associated with Auto DONE, and you click any toolbar button to remove the patient’s file from the screen or even call the next patient, the patient’s status remains as “Checked in” until the patient is checked out through the Front Desk.
Because Auto DONE is an optional feature, you do not need to have the system place the patient in the virtual “Done” room. If you leave this section unchecked, no visual status indicator displays to the Front Desk.
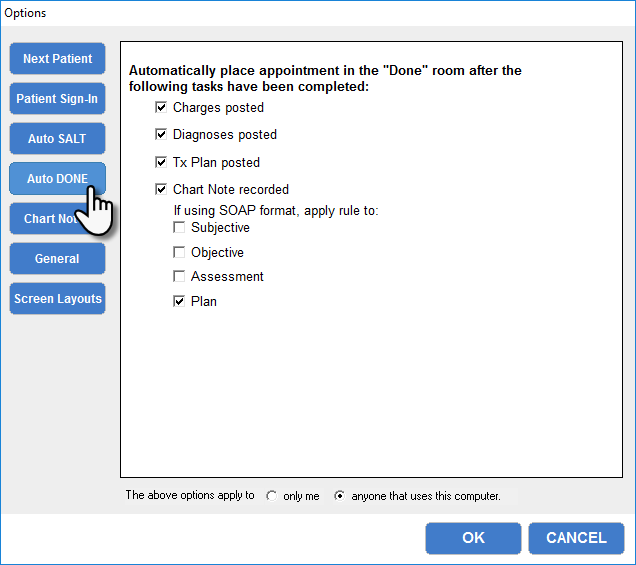
Chart Note Options
Configure your chart note preferences here. Click Setup to set up your macros from this screen.
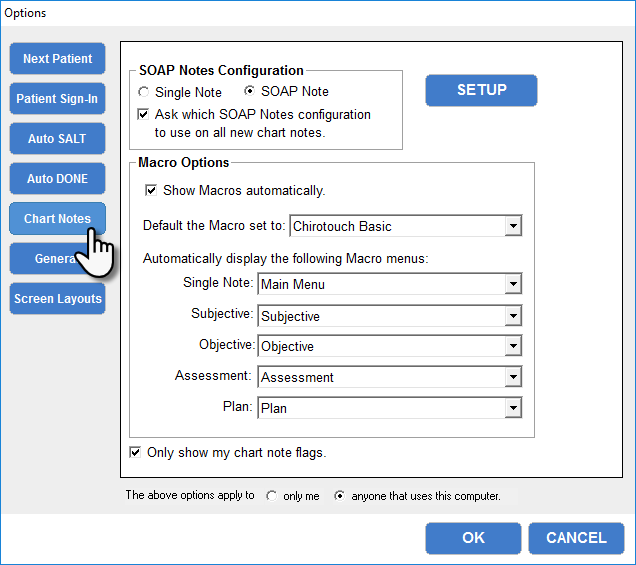
SOAP Notes Configuration
Single Note - Select this option to enter one continuous note for a patient.
SOAP Format - Select this option to categorize your notes into four sections: Subjective, Objective, Assessment, and Plan.
Select the "Ask which SOAP Notes configuration to use on all new chart notes" option if you would like to be asked which SOAP notes configuration to use on all new chart notes.
Macro Options
In the macro options section, select Show Macros Automatically in the Chart Notes dialog box to show the macros in the Chart Notes dialog box every time you add notes; if you select not to show macros automatically, you can still click Show Macros in the Chart Notes dialog box.
- Select a Default Macro Set to appear every time you use macros. ChiroTouch comes with preloaded macro sets; however, if you have created new macro sets for your office, you can select an alternative default set here.
- Select a Default Macro Menu to appear with your notes. You can select a macro menu for Single notes and for each section of your SOAP notes. Each of these macro menus will lead to a sub-menu of additional macro menus and buttons.
- Check the Only show my chart note flags box if you only want to see the chart notes you have flagged, and not the flags of all providers.
Finally, you can select whether the above options apply to only you or to anyone that uses the computer.
NOTE: If you would like to use Dragon™ Medical Practice Edition voice dictation system, you can enable it through Provider (Basic)'s setup Options, explained here.
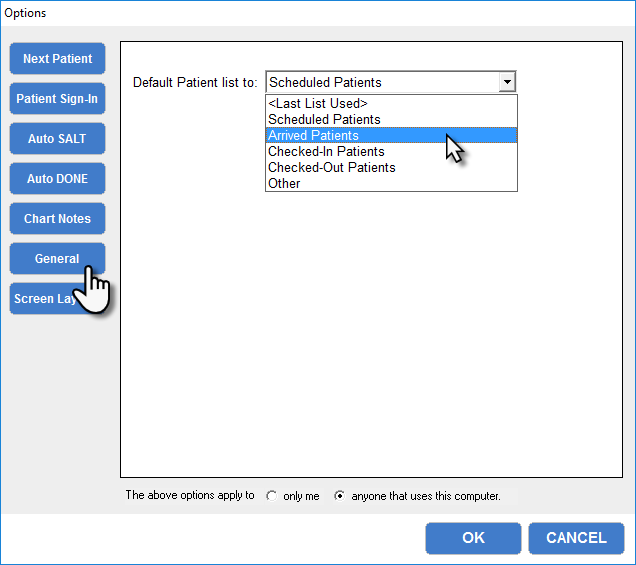
General Options
Select your patient list default from the General section of this dialog box. Select the default for which patient list you want to view when you open the Select Patient dialog box.
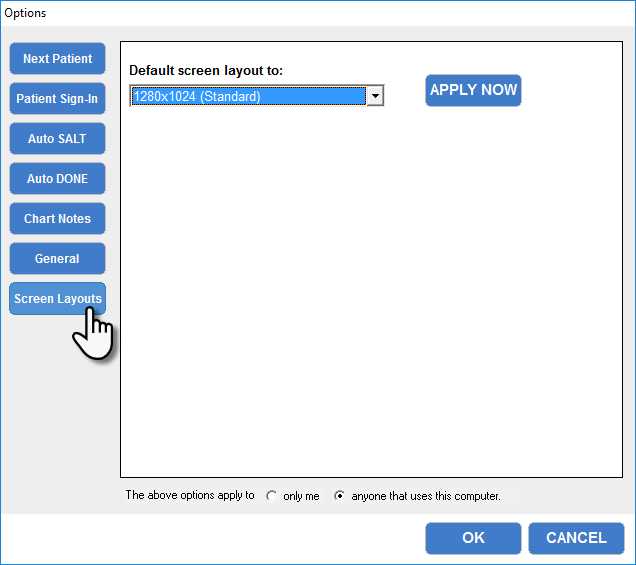
Screen Layout Options
Select a screen layout from the available screen layouts and click Apply Now. This ensures that the application displays properly on your screen.
IMPORTANT: Although a resolution may appear in the dropdown when you open Options for the first time, there is no resolution set until you click Apply Now. Simply clicking OK will not save the setting.