Patient Statements
The Patient Statements feature in the Accounting application allows you to create and export patient statement information to print or to send to your clearinghouse.
Statements Management
To open the Statements Management screen, launch Accounting from the CT Launcher and then click the Patient Statements button on the Accounting tab. There are two components of the Statements Management screen.
- Create New Batch is where you specify your statement batch criteria.
- Manage Batches displays a list of all the statement batches you create.
You can always return to the Statements Management screen to export, print, preview, save as, or delete previously created statement batches.
Creating a New Batch
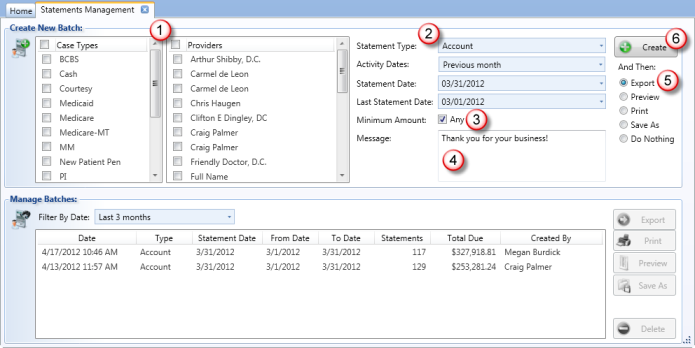
The Create New Batch area displays various options for creating a new patient statement batch.

![]() Filter the data by case types or providers by selecting the desired check boxes, or leave them cleared to include all case types and providers.
Filter the data by case types or providers by selecting the desired check boxes, or leave them cleared to include all case types and providers.
![]() Select options from the drop-down menus to define your criteria:
Select options from the drop-down menus to define your criteria:
- Statement Type - Select the type of statement you would like to create.
- Activity Dates - Select the activity date range you would like to include in the statement batch. Select Custom to enter specific dates.
- Statement Date - Select the statement date. All outstanding balances will be aged according to this date.
- Last Statement Date - Select the last statement date. The batch will include accounts that have not had a statement since that date.
![]() To specify a minimum amount, clear the Any check box and type the amount.
To specify a minimum amount, clear the Any check box and type the amount.
![]() In the Message field, you can edit the message that appears on the patient statements. The message you enter will only be used during the current session's batch creation. To change the default message, see Patient Statements.
In the Message field, you can edit the message that appears on the patient statements. The message you enter will only be used during the current session's batch creation. To change the default message, see Patient Statements.
![]() Select one of the options under And Then. This is the action you want to happen once you create your statement batch.
Select one of the options under And Then. This is the action you want to happen once you create your statement batch.
![]() Click the Create button to generate the patient statement batch. Your batch will be saved as an .xml file in the location you specified in Interchange Options. You can send this file to your clearinghouse to allow them to print statements and mail them to the patient(s).
Click the Create button to generate the patient statement batch. Your batch will be saved as an .xml file in the location you specified in Interchange Options. You can send this file to your clearinghouse to allow them to print statements and mail them to the patient(s).
Managing Batches
The Manage Batches area allows you to search for previously-generated batch files. Use the Export, Print, Preview or Save As options to recreate your batch files. Use the Filter By Date drop-down menu to quickly search for batch files by creation date.

![]() Select an option from the Filter By Date drop-down menu to quickly view previous files by creation date.
Select an option from the Filter By Date drop-down menu to quickly view previous files by creation date.
![]() Select the desired file from the list, then click one of the option buttons on the right.
Select the desired file from the list, then click one of the option buttons on the right.
Export - Exports the batch statement to the location you specified in Interchange Options.
NOTE:
The statement export feature will only be available if you correctly entered the identifier value.
Print - Prints the statement batch.
Preview - Opens a preview of the batch statement. From the preview, you can print, export to Excel, or save the file as a PDF.
Save As - Lets you save the file as a PDF or an Excel file.
![]() To remove a statement batch from the Manage Batches list, select the file and click the Delete button.
To remove a statement batch from the Manage Batches list, select the file and click the Delete button.
BEST PRACTICE: See here to learn about using ePay for Patient Statement Batches.