Trading Partners
Trading partners are the organizations that you send claims to and receive electronic remittance from.
Most likely you will only have one trading partner, which is also your clearinghouse. If you are submitting your claims directly to a payer, that payer is also considered a trading partner.
Click the Trading Partners icon from the menu ribbon under the Maintenance tab in the Accounting application. Select a trading partner from the trading partner drop-down menu, or click the New button to enter a new trading partner.
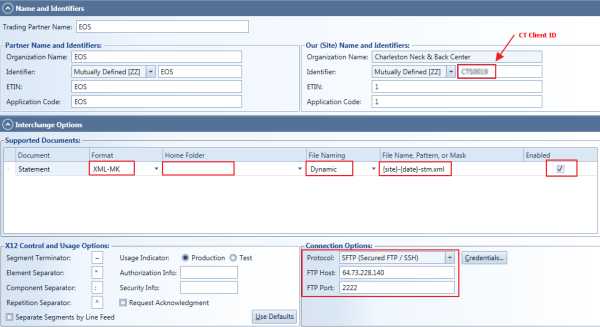
If you are signed up for CTStatements, you will see the trading partner EOS in the Trading Partners tab. The options in this tab are automatically configured when you sign up for CTStatements as shown below; you can change them if you need.
By default, both the destination folder and the file name mask are set to {ask}, meaning that ChiroTouch will ask you to specify the folder and file name each time you export. You can specify a folder to use (for example, EOS\Out) and different file naming/masks by changing the values in the Home Folder, File Naming, and File Name, Pattern, or Mask drop-down menus. We suggest selecting Dynamic from the File Naming drop-down menu and we suggest your file name include a date value. Read more about the Trading Partnersin this window for guidelines and valid tokens.
Entering Your EOS Credentials
- Click the Credentials... button.
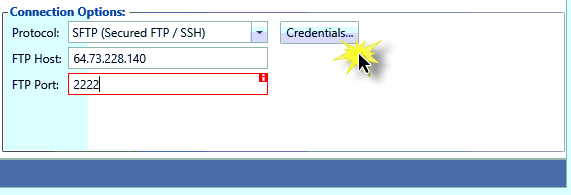
- Enter your ChiroTouch client ID in the Client ID field.
- Enter the password EOS emailed to you in the welcome email you received after you signed up for CTStatements in the Password field.
With the 6.3 release, SFTP had been enabled for Gateway EDI. This means that you can easily import files from Gateway EDI/Trizetto. Start by configuring ChiroTouch and then setting up your Trizetto Portal.
IMPORTANT: Gateway EDI is now Trizetto Provider Solutions. Any reference to Gateway EDI also refers to Trizetto Provider Solutions.
- Open the Accounting application from CT Launcher.
- Go to Maintenance > Trading Partners.
- From the Trading Partner drop-down, choose Gateway EDI. If Trizetto or Gateway are not an option, select New and add them as an option before continuing.

- In the Partner Name and Identifiers section, make sure that the Identifier is the ISA08 Interchange Receiver ID with the number 263923727000000.
- C R I T I C A L
If this field contains anything other than 263923727000000, the SFTP connection will fail. - Expand the Interchange Options section.
- In the Connection Options section, select SFTP (Secured FTP / SSH) from the Protocol list and make sure that your settings look like this.
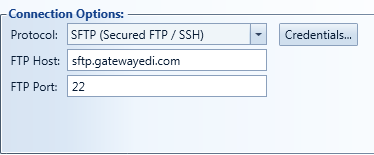
You'll need to enter your Site ID and SFTP in the credentials just like you do for Verify. Your SFTP can be found in Admin > CT ProClear or on the CT ProClear page in MyChiroTouch.com. - N O T E
Notice that when you switch to SFTP, your home folders are automatically set up for you.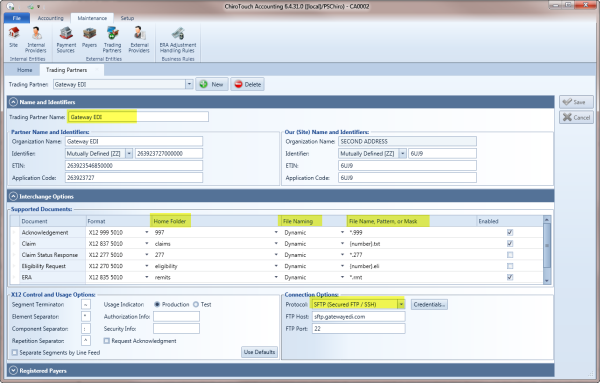
- Click Save.
- Log into your Trizetto Portal using your login information.
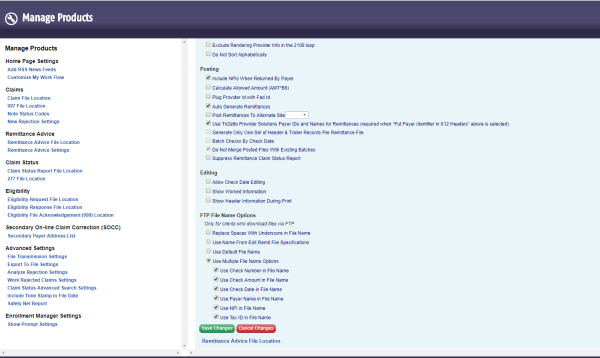
- Go to My Account > Manage Products > Remittance Advice Settings.
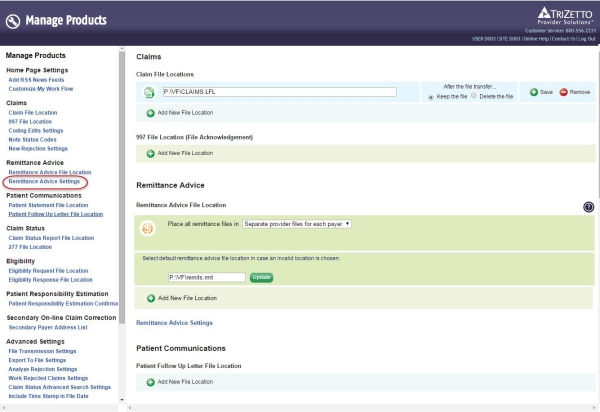
- Configure the remittance advice settings as follows:
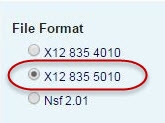
- File Format: Select X12 835 5010
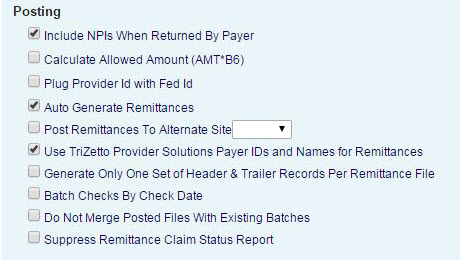
- In the Posting section, check these options:
- Include NPIs When Returned By Payer
- Auto Generate Remittances
- Use TriZetto Provider Solutions Payer IDs and Names for Remittances.
- In the FTP File Name Options section, select Use Default File Name.
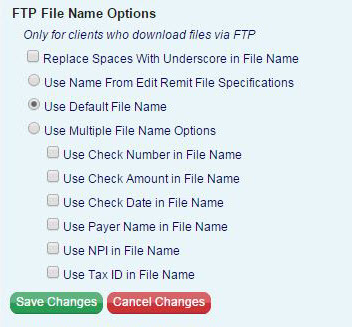
Clients have the ability to change the file name for their ERAs. This will allow you to identify $0 pay or differentiate between particular payers, etc. This can be adjusted in the “FTP File Name Options”. Simply click “Use Multiple File Name Options” and include whatever you'd want in the file name brought over into ChiroTouch
- File Format: Select X12 835 5010
- Click Save Changes.
To view the Gateway Payer list, navigate a web browser to https://mytools.gatewayedi.com/Resources/Payerlist.aspx?Type= and log in to and log in to your Gateway Account.
If your trading partner is not Gateway EDI, consult your trading partner companion guide to find information such as your ETIN and Identifier. Many of the fields in this Accounting application have roll-over tips to help you understand how your trading partner may define these fields.
With the 6.3 release, SFTP had been enabled for Blue Cross Blue Shield of Michigan. This means that you can easily import files from BCBSM.
- From the Trading Partner drop-down, choose BCBSM.

- In the Partner Name and Identifiers section, set the following information:
- Organization Name: BCBSM
- Identifier: Select Mutually Defined (ZZ) and make sure that the Identifier is the ISA08 Interchange Receiver ID with the number 382069753.
- C R I T I C A L
If this field contains anything other than 382069753, the SFTP connection will fail and the Connections Options section will be blank. - ETIN: 00710
- Application Code: 382069753
- In the Our (Site) Name and Identifiers section, set the following information:
- Organization Name: Whatever your organization's name is
- Identifier: Select Mutually Defined (ZZ) and make sure that the identifier is the BCBS-issued Provider ID number. It always begins with c0 and then has 3 trailing digits. For example: c0123
- ETIN: Enter your BCBS-issued Provider ID number. This is the same as the Identifier you just entered.
- Application Code: Enter your BCBS-issued Provider ID number. This is the same as the Identifier and ETIN that you just entered.
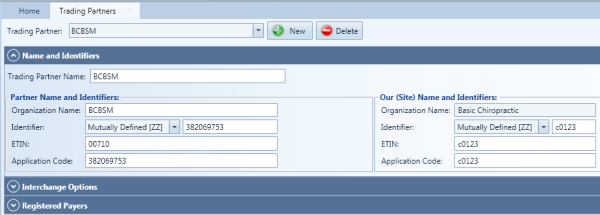
- Expand the Interchange Options section to reveal the Supported Documents, X12 Control and Usage Options, and the Connection Options.
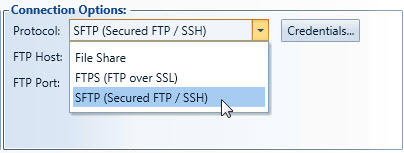
- In the Connection Options section, select SFTP (Secured FTP / SSH) from the Protocol list.
- N O T E
Notice that when you switch to SFTP, home folders fields remain blank for the BCBSM setup, as there are no subfolders required for this transfer. Do not change this unless directed to do so by CT Support.
- Click Save.
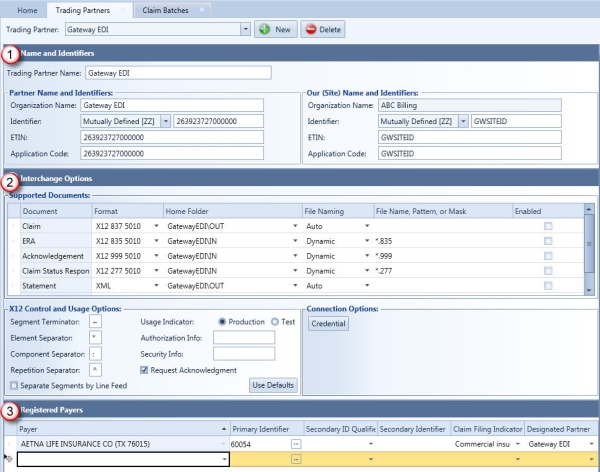
This example shows Gateway EDI. If you add another trading partner, be sure to use that partner's information. Gateway is shown here as an example.
- Enter the Trading Partner name. This name is for internal use only.
- Enter the Partner Name and Identifiers. This information can be found in your Companion Guide (which can be acquired from your trading partner).
Once your practice is registered with a trading partner, you will receive a submitter identifier from that trading partner.
NOTE:
The statement export feature will be enabled only if you enter the Identifierfield value correctly.
The Interchange Options section contains the following columns:
- Document - This column lists the type of document supported.
- Format - This column lists the format of the supported transaction. The remaining columns define the settings for each type of transaction.
- Home Folder - Select the sub-folder where you would like to place files. Using two different folders (such as "Outgoing" and "Ingoing") can help you manage your claim files. This folder will be generated under the located at C:\Program Files\(PSChiro or CTData) path on your server.
- File Naming - Define the file naming syntax for your outgoing files. Each file must have a unique name when submitting claims to your trading partner. There are three file naming options: Auto, Fixed, or Dynamic. The Auto option allows the system to generate a unique name for each file. The Fixed file name allows you to enter the file name in the subsequent column. The Dynamic file name allows you to create a mask to generate file names.
- File Name, Pattern, or Mask - This column defines the tokens you can use to generate file name items. Outbound files can use patterns with the following tokens:
- {date} - Inserts date time in the format YYYMMDDhhmmss
- {partner} - Inserts the partner identifier
- {site} - Inserts the site identifier
- {number} - Inserts the file number
- {code} - Inserts file extension including interchange code
Example: {number}.{code}
Inbound files can use the star symbol (*) to define a file mask.
Example: *.835, 835*.A, *.RMT
- Enabled - This column controls whether the particular document is enabled.
These options are pre-filled with defaults. If your trading partner requires you to send test files before submitting production files, select the Test radio button and change fields as necessary if required by the trading partner. Select the Production radio button when you are prepared to begin production.
Request Transaction Acknowledgment
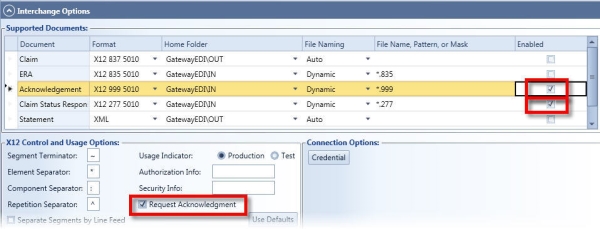
Select the Request Acknowledgment check box to enable importing and viewing of EDI transaction acknowledgments (TA1, 999, and 277).
NOTE:
You must also select the Enabled check box in both the Acknowledgment row and the Claim Status Response row of the Supported Documents section.
Click the Credentials... button to enter credentials for web services such as the Gateway EDI payer ID lookup or the Verify service. Enter your site ID and password. Select "Remember Me" if you want the system to retain your login credentials.
Gateway EDI clients - Contact Gateway EDI at (800) 969-3666 to obtain your FTP Password. You will need to reference your CT ProClear or Gateway EDI Site ID (4 digit alpha numeric value). If you do not know your Gateway EDI Site ID, you can use your Tax-ID number or other provider specific information to obtain this information from Gateway EDI.
CT ProBill or CT ProClear clients - Contact CT ProBill at (619) 546-4586 to obtain your FTP Password. You will need to reference your ChiroTouch Client ID or CT ProClear Site ID.
You must register the payers associated with each trading partner in order to send claims to those payers. The identification numbers associated with each payer are specific to each trading partner. Enter the registered payer and payer identifier for each registered payer associated with your trading partner(s). Each trading partner maintains its own registry of payers with which it is associated, and its own unique list of identifiers for those payers. As each registered payer has a unique ID for each trading partner, you must list your payer and its unique Primary and Secondary ID here in order to send claims to these payers through this trading partner.
The Payer column in the Registered Payers section is read-only, once changes have been saved. The read-only data appears with a blue background. When you add a new Payer, the Payer field is editable. After you click the Save button, the payer field becomes read-only.

The Payer column in the Registered Payers section is read-only, once changes have been saved. The read-only data appears with a blue background. When you add a new Payer, the Payer field is editable. After you click the Save button, the payer field becomes read-only.
in the Designated Partner column, you must define the payer that is the designated partner for each trading partner. The designated partner is the trading partner (or in essence, the clearinghouse) for that payer. For example, if Aetna claims must be routed through Gateway EDI, then you would choose Gateway EDI as the designated partner. These associations can also be made through the Payers tab—click the Payers icon in the menu ribbon under the Maintenance tab.
Once you select a value in the Designated Partnercolumn, the EDI option is automatically enabled for all insurance policies associated with that payer. The changes take effect when you click the Save button. If you wish to disable EDI for any specific patients, you can disable the EDI option in the patient's Insurance screen.
Searching for a Payer's Primary Identifier
- Click an ellipsis in the Primary Identifier column. The application will open the Search window.

The application will auto-populate some of the fields in this window.
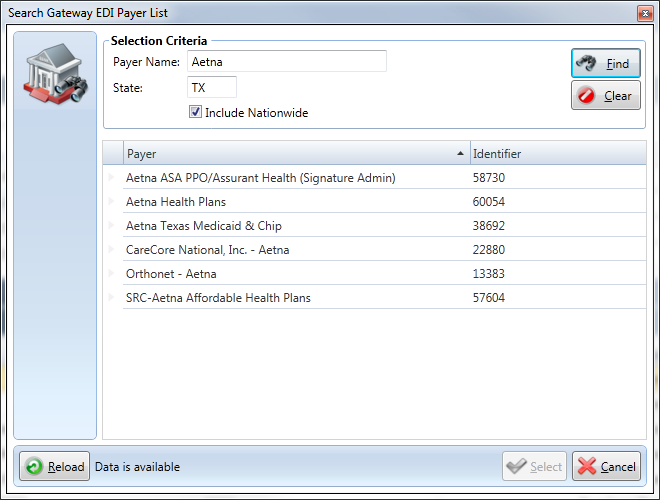
- Edit the search fields if you need, and select the Include Nationwide check box to include nationwide payers.
- Click the Find button. The payer search results appears, along with the ID in the right column.
The list is updated weekly. To check for new data manually, click the Reload button.
You may only delete trading partners who do not yet have posted transactions associated with them.
