Cash Practice Payment Processing
Once you have your Cash Practice ID, key codes, and credit card swiper set up, log in to the ChiroTouchFront Desk application. You are now ready to process transactions inside ChiroTouch.
To access the Payment screen from the Ledger:
- From the Patient Flow screen, click Patient Mgmt.
- Select your patient from the list and click Ledger.
- Click New and select Payment from the drop-down menu.
To access the Payment screen when checking out a patient:
- Select a patient who is checked in and click Check Out.
- From the Patient Check Out screen, click Payment.
-
On the Payment screen, click the Credit Card transaction type. This will activate the "Process Payment Online" option.
NOTE:
When using credit card processing, DO NOT enter credit card information in the ChiroTouch interface. This information must be entered in the Virtual Terminal.
-
Select the "Process Payment Online" option.
- Click the Amount Collected field.
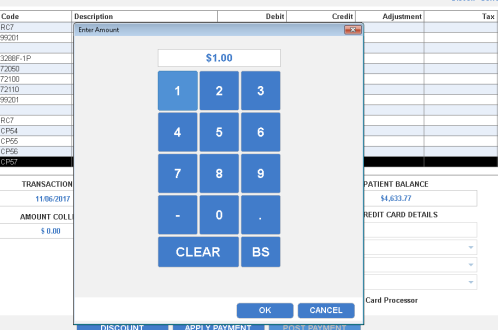
- Enter the payment amount and click OK.
- Click Post Payment.
- If you selected to choose your transaction type on a payment-by-payment basis, you are prompted for your transaction type. If you chose a default transaction Type the Setup screen, this dialog box does not appear.
- Choose transaction type:
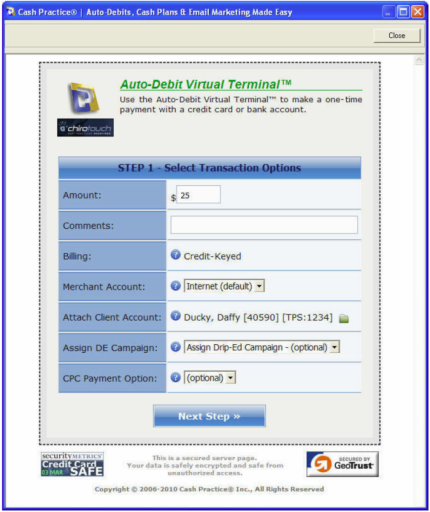
- Select the Virtual Terminal - Credit Keyed option.
- Optional comments are not viewed by your clients. The comments can be reviewed on the Posted Payments Report™.
- Optional- Assign drip education email if applicable ( requires the Drip education system module)
- Optional- CPC Payment option: If this transaction is for an existing Cash Practice plan created with the Cash Plan Calculator System, indicate the payment option (i.e. Option 1, 2, or 3).
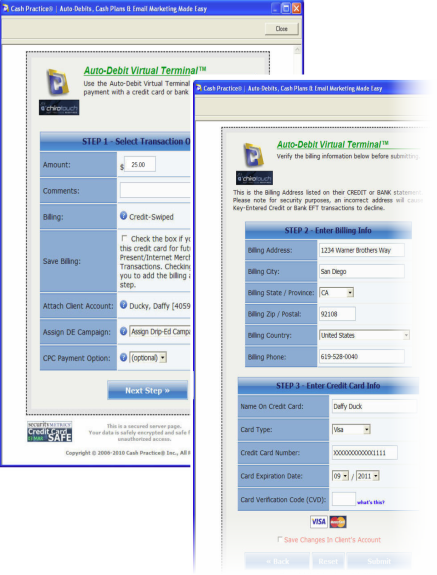
- Click the Next Step and enter the patient's billing information.
- (Optional) Enter the CVD code. If the code is not entered, the transaction processes without it.
- Any changes made to this information automatically check the "Save Changes in Client's Account" checkbox. If you do not want this information saved, uncheck this box.
- Click the Submit to submit this payment.
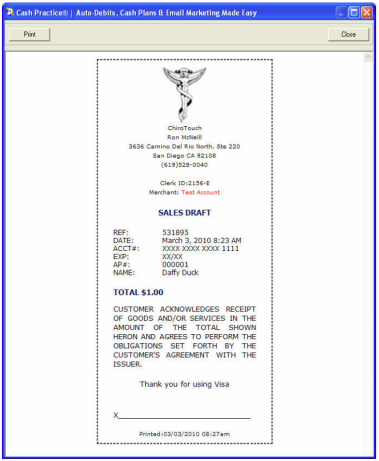
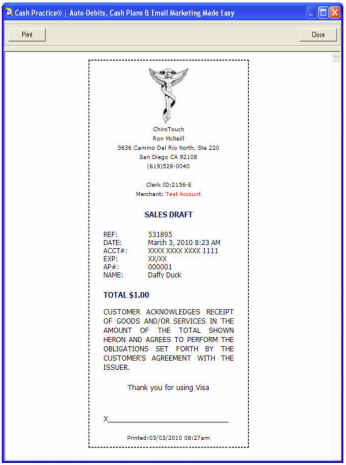
- The patient's receipt displays on the next screen. Click Print to print this receipt, or Close to close this dialog box.
- This payment is reflected in the patient's ledger.
-
 Virtual Terminal - Credit Swiped - credit card swiped using the Credit Swiped Virtual Terminal also allows you to send out a Cash Practice Drip educational campaign if you have the Cash Practice Drip Education System Module.
 -
- Select the Virtual Terminal - Credit Swiped option.
- Optional comments are not viewed by your clients. The comment can be reviewed on the Posted Payments Report™.
- Optional- Assign Drip education email if applicable (requests the Drip education system module).
- Optional- CPC Payment option: If this transaction is for an existing cash plan created with the Cash Plan Calculator System, indicate the payment option (i.e. Option 1, 2, or 3).
- Click Next Step and enter the patient's billing address.
- Swipe the credit card through your card reader.
- The patient's receipt displays on the next screen. Click Print to print this receipt, or Close to close this dialog box.
- This payment is reflected in the patient's ledger.
-
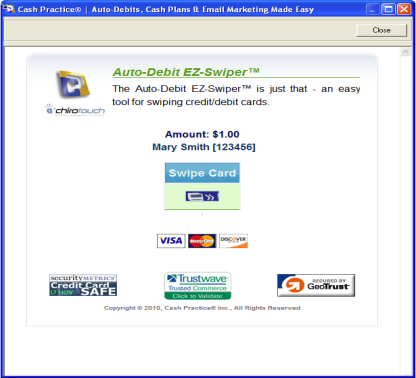
 EZ-Swiper™ - credit card swiped, no data entry required. Use this option to quickly swipe cards with no additional data entry required.
 - Select the EZ-Swiper™ option.
- Swipe the credit card through your card reader.
- The patient's receipt displays on the next screen. Click Print to print this receipt, or Close to close this dialog box.
- This payment is reflected in the patient's ledger.
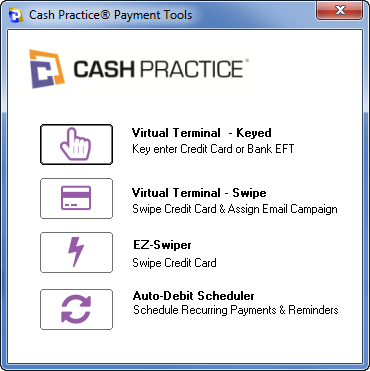
Virtual Terminal - Keyed
Entering card information by hand or pulling stored billing information from the Credit Keyed Virtual Terminal requires a billing address. Using the Virtual Terminal also allows you to send out a Cash Practice Drip Educational Campaign if you have the Cash Practice Drip Education System module.
NOTE:
If this is a new transaction and a client account has not been created inside Cash Practice, the Add New Account screen appears. Client demographic information from ChiroTouch automatically pre-populates this section. Confirm the information and hit the save button at the bottom of the pop up screen. Then repeat the steps to process the payment.
NOTE:
If this is a new transaction and a client account has not been created inside Cash Practice, the Add new Account screen appears. Client demographic information from ChiroTouch automatically pre-populates this section. Confirm the information and click Save at the bottom of the pop up screen. Then repeat the steps to process the payment.
NOTE:
If this is a new transaction and a client account has not been created inside CashPractice, the Add new Account screen appears. Client demographic information from ChiroTouch automatically pre-populates this section. Confirm the information and hit the save button at the bottom of the pop up screen. Then repeat steps to process the payment

The Cash Practice Auto-Debit System Lite does not come with direct debit card processing unless you request it. This is because the merchant account that is required to process these transactions has additional monthly fee minimums.
In most circumstances, offices that only use the Basic version use the credit-swiped transaction option. To avoid accruing fees for an option you may not use very much in your practice, this feature is optional. Contact Cash Practice Systems to add Direct Debit Bank EFT Processing.
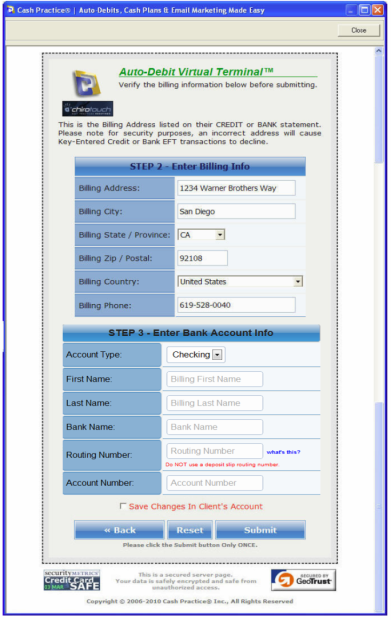
Follow this method to enter a debit card payment into the system. In order to process Electronic Fund Transfer, the client must provide the name of their bank, their bank routing number, and their bank account number.
To access the Payment screen from the Ledger:
- From the Patient Flow screen, click Patient Mgmt.
- Select your patient from the list and click Ledger.
- Click the "New" button and select Payment from the drop-down menu.
To access the Payment screen when checking out a patient:
- Select a patient who is checked in and click Check Out.
- From the Patient Check Out screen, click Payment.
- On the Payment screen, select the "Direct Debit" transaction type. This activates the Process Payment Online option.
- Select the Process Payment Online option.
- Click the "Amount Collected" field.
- Enter the payment amount and click the "OK" button.
- Click the "Post Payment" button.
- Enter transaction options in the Auto-Debit Virtual Terminal dialog box and click the "Next Step" button.
- Click the "Next Step" button.
- Enter the client's billing information and bank account information.
- Any changes made to this information automatically check the "Save Changes in Client's Account" checkbox. If you do not want this information saved, uncheck this box.
- Click the "Submit" button.
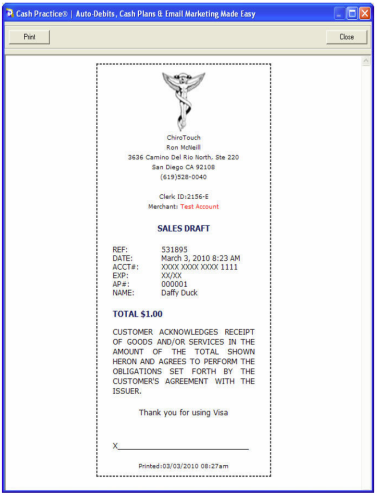
- The patient's receipt display on the next screen. Click the "Print" button to print this receipt, or "Close" button to close this dialog box.
- This payment is reflected in the patient's ledger.

The Posted Payments Report Generator™ is the report that show all the transactions that run through the system and should be reviewed daily. This report is where you may also void or refund a transaction performed inside ChiroTouch. To review this report, log into Cashpractice.com
On the top-right of the home page, the Auto-Debit System Posted Payments Status Summary is displayed. It shows “how many” and the “dollar amount” of your Accepted, Declined, Returned & Pending transactions. If needed, the "[CLICK HERE TO REVIEW]" prompts you to review the report.
When you click it, the Posted Payments Report Generator™ produces the Posted Payments Report. The following message is displayed, giving instruction to your staff as to what they need to do with the report.

At any time you can review a list of the posted transactions by going to the Posted Payments Report Generator™. You can view all transactions on the report by clicking “Search” or use the search options as report filters. To return to the Posted Payments Report Generator™ after performing a search, scroll to the top of the report and return to the "Search Options" tab.

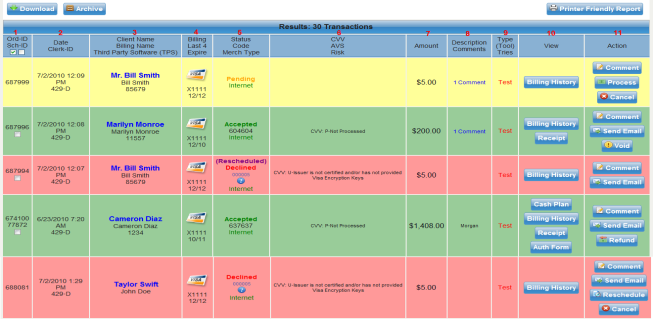
The colors of the Posted Payments Report Generator™ rows are indicators of the transactions status:
- Green-Accepted
- Yellow- Pending
- Red- Declined
The "Printer Friendly Report" link can be clicked for a printed copy of the report. It displays all the comments & changes.
- Archiving Transactions, Order-ID & Schedule-ID
- Archiving Transactions: The first column allows you to archive a transaction. Only transactions that are accepted and have no action have a box
 . Check the box
  and click
  to archive the transaction. The transaction is stored.
 - N O T E
At the end of each business day, archive the transactions. This way the next business day you only see new transactions. Failure to follow this procedure results in a report that becomes unmanageable. You can retrieve the archived transactions by selecting Archive from the Search Option’s Storage selector. - Order-ID: This is the unique ID number for the transaction.
- Schedule-ID: If the transaction was the result of a scheduled auto-debit, the Sch-ID of the auto-debit is listed.
- Archiving Transactions: The first column allows you to archive a transaction. Only transactions that are accepted and have no action have a box
- Date & Clerk-ID
- Date: Lists the date and time the transaction was processed.
- Clerk-ID: This is the unique ID# for the Account User logged in at the time the auto-debit was created. We highly recommend you create logins for each employee under My Account>Add New Account User. Create a Clerk-ID ending in either -D (Admin) or -E (Account User).
- Client Name, Billing Name & Third Party Software
- Client Name: This is the name of the Client Account. By clicking the [Client Name], you are directed to View Client Record. If sorting your Attach Account [Auto-Debit Setup] > [Step 4] by Company Name, the Company Name is listed with the Client Name.
- Billing Name: This is the name used on the billing. Either the name on the credit card or bank account.
- Third Party Software : This is a unique identifier generated by the TPS system used in the office ( if you do not use a TPS, this does not appear).
- Billing, Last Four & Expire lists either Bank (Bank EFT) or Credit (Credit/Debit Card).
- Credit: The last four digits of the credit card account number and its expiration date. If the card expires the same month as the next scheduled payment, the expiration date is displayed in yellow. If the card expires before the next scheduled payment is due, the expiration date is displayed in red.
- Bank: The last four digits of the bank account number are listed with either PC (Personal Checking) or BC (Business Checking).
- Status & Merchant Account Type
- Status: Indicates the result of the transactions.
- Accepted means the transaction was successful: The approval number is listed as well.
- Pending means the transaction is waiting to be processed. This occurs when a previously declined transaction gets rescheduled. A Pending transaction can be processed immediately by clicking the “Process now” Button or is automatically processed that night with all the other auto-debits.
- Declined means the transaction was declined. The Error Code(s) are listed. You can look up their definition by clicking the error code and downloading the Error Codes Manual.
- Returned occurs when a Bank EFT is returned. This is similar to a bounced check. Since the report has the original payment as accepted, a new entry is made with the Returned Status along with the original Ord-ID that was returned.
- Failed means the transaction failed. It lists the original Ord-ID that failed. This indicates that the payment did not process (usually a technical issue).
- Cancelled means the transaction was cancelled. This occurs when either a Pending or Declined transaction gets cancelled.
- Refunded means the transaction is a refund for the Ord-ID listed with it.
- Merchant Account Type
- Internet: The transaction was processed with your Internet Merchant Account.
- Retail: The transaction was processed with your Retail Merchant Account.
- Status: Indicates the result of the transactions.
- CVV/ AVS Risk
- CVV Response Code: This indicates if the provided CVV code was accurate. Although not required, some (not all) banks will downgrade the rate charged to a higher fee if it is missing or inaccurate (One-Time Payments using Credit-Keyed with Internet Merchant Account).
- AVS Response Code: The Address Verification Service (AVS) verifies the billing address. Both the Street Address and Zip Codes are verified. If either of them are No Match, a bank downgrades to a higher rate. If both are No Match, a bank downgrades to an even higher rate. If you would prefer to have a payment Decline as a result of either of those two scenarios, please notify Cash Practice and they will update your AVS setting to decline the payments (One-Time & Recurring Payments using Credit-Keyed with Internet).
- Risk Response Code: This code is only triggered when a "Risk" occurs. For example, the amount of the transaction is greater than your Max Ticket Amount (All Transaction Types).
- Amount: is the dollar amount of the transaction.
- Description & Comments:
- The name of the Cash Plan for this transaction along with the Cash Plan payment option is displayed if the payment was processed with the Cash Plan Auto-Debit Scheduler™.
- Comment: All comments that are auto generated or typed in the Description field are displayed when your mouse is held over the word comment.
- Type, Tool & Tries
- Type: Indicates the transaction type.
- New: Indicates a non-scheduled transaction. This occurs with the Simple Swiper™, Virtual Terminal or from the Initial Payment made with the Cash Plan Auto-Debit Scheduler™.
- Sch: Indicates the transaction occurred from the processing of a Scheduled Auto-Debit
- Rep: Indicates a repeated transaction. This occurs when a previously declined transaction gets reprocessed.
- Test: Indicates the transaction was done in Test Mode.
- Tool: This indicates which of the payment tools were used to process the payment.
- SS: Simple Swiper™
- VT: Virtual Terminal
- VT-S: Virtual Terminal Swiped Transaction
- ADS: Auto-Debit Scheduler™
- ADS-S: Auto-Debit Scheduler™ Swiped Transaction
- CPADS: Cash Plan Auto-Debit Scheduler™
- CPADS-S: Cash Plan Auto-Debit Scheduler™ Swiped Transaction
- Tries: Indicates the number of times a declined transaction has been re-attempted.
- Type: Indicates the transaction type.
- View: This column displays different buttons, depending on the type of transaction processed.
 -View or print the original copy of the client’s cash plan from this button.
 - View or print the client’s full billing history from this button.
 - View or print a receipt for the transaction.
 - View or print the current payment authorization and payment schedule from this button.
- Action: This column displays different buttons, depending on the result of the transaction.
 - This allows you to make an internal note.
 - This button opens the Email Alert Sender. The Email Alert Sender allows you to send an email receipt of that transaction to the client and insert a custom note.
 -This button appears when a payment is declined or returned. It allows you to edit the payment and set it to reprocess.
  -This button appears when a payment is declined, returned or pending (Only cancel a payment if you are collecting payment some other way i.e., cash).
 - This button voids a payment. The voiding button is only available in the first until the system auto-batches.
 -This button refunds a payment. You may do full and partial refunds.
 -This button allows you to immediately process a payment. If a payment is set to pending it processes automatically when the system batches itself.
The entire process of Exporting Posted Payments from CashPractice.com to ChiroTouch takes less than a couple of minutes.
Export Your Posted Payments
- Log in to your CashPractice.com account:
- Prior to exporting, make sure each of your client's accounts have their ChiroTouch account number entered. This is the first field on the Add New Client or edit client pages. Only clients with a ChiroTouch account number have transactions exported to the download report.
- Go to the Auto-Debit System>Posted Payment Report Generator™.
- Click the Search Button (With any search parameters).
- Once the results appear, click the Download Report button in the top left corner of the report. This generates the download file.

- The downloadable report is created and the page is reloaded with a result box telling you the results of the export. Click the [HERE] link to save the exported file to your computer's hard drive. It is a good practice to create a folder on your hard drive in which to save these files. Example, C:\CashPractice_Exports.
- After clicking [HERE], either the file opens or a dialog box appears asking you to [Open] or [Save]. If the dialog opens, click [Save]. If the file just opens in a program like NotePad or Excel, click File>Save As. Either way, save the file to the folder you created in the prior step. The file name looks similar to the Transaction_Report_213055_1238803890.log.

- Once the file is stored on your hard drive, you're ready to import it into ChiroTouch.
Import Saved Export File to ChiroTouch
- ChiroTouch has created a Cash Practice Systems Import Utility called the Cash Practice Transporter. To open it, go to your Start Menu>Programs>ChiroTouch>Utilities>Cash Practice Transporter.
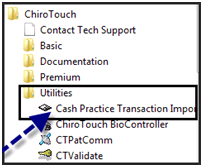
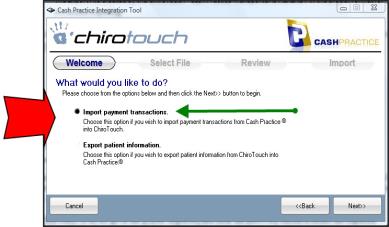
- Once the Cash Practice Transporter opens, click the "Next" button.
- Browse your hard drive and locate the saved Cash Practice Export File. Select the file and click the "Open" button.
- Click Next>Next>Report>Finish. The Cash Practice transporter imports a transaction into a patient's ledger only once so you do not have to worry about accidentally importing the same transaction multiple times.
- Once you import the file, it is also a good practice to delete the file from your hard drive. There's no need to save it.
- You can now log in to the ChiroTouch>Front Desk and view a patient ledger. The Transaction Detail for all imported payments says "Cash Practice".
To auto sync your auto-debited transactions, you must first update to ChiroTouch version 6.6. Click here to schedule your update.
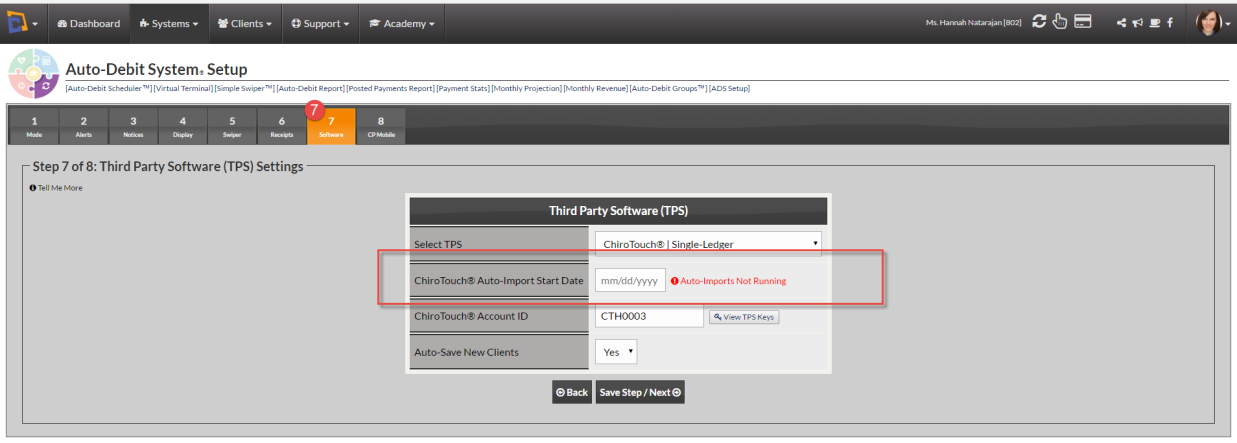
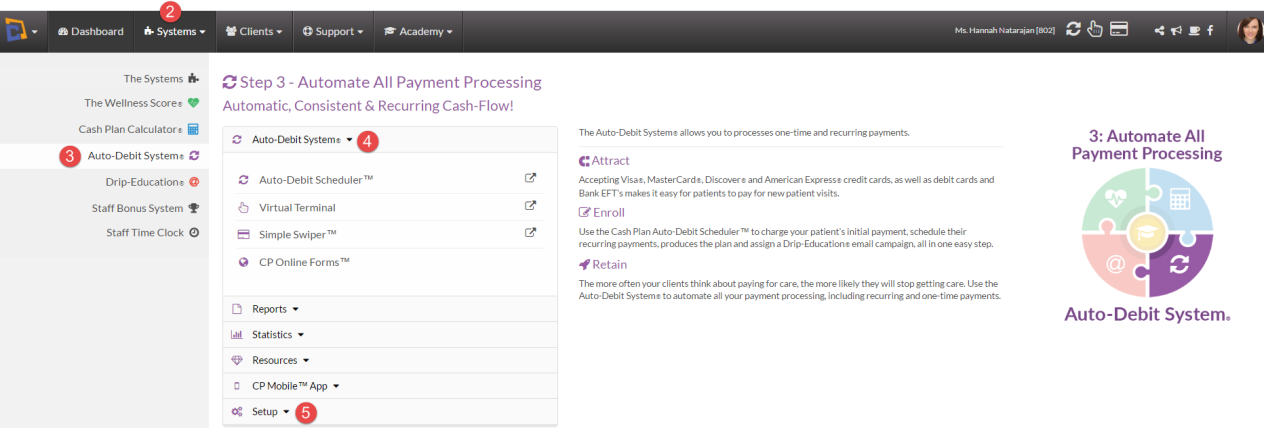
Once you have updated your software, enter your Cash Practice portal and indicate that you would like to use the Auto Debit automated processing feature by following the steps below:
- Log into CashPractice.com
- Click Systems.
- Click Auto-Debit System.
- Open the Auto-Debit System drop-down.
- Click Setup.
- Log into the Auto-Debit System using your CashPractice.com Member Login Password.
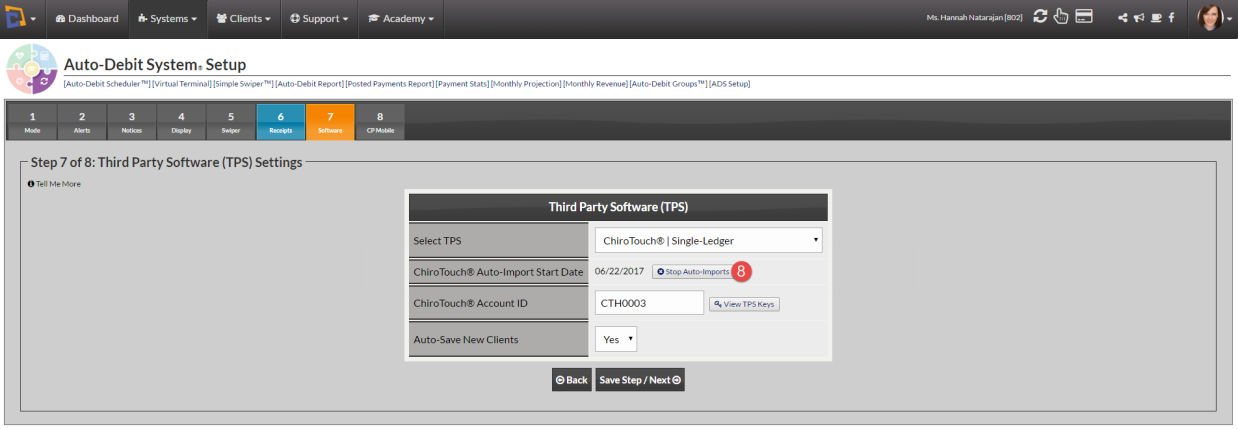
- Once in the Auto-Debit System Setup, select the 7 Software tab, and enter a ChiroTouch Auto-Import Start Date to enable auto imports.
- To stop auto imports in the future, return to this screen and click Stop Auto Imports.

