Objective 3: CPOE for Medication, Lab and Radiology Orders
What is CPOE?
Computerized Provider Order Entry (CPOE) – A provider's use of computer assistance to directly enter medical orders (for example, medications, consultations with other providers, laboratory services, imaging studies, and other auxiliary services) from a computer or mobile device.
NOTE:
You will use the existing CTRx service to fulfill Measure 1 under Objective 3.
For Stage II, we have introduced a new CPOE service, LifePoint CPOE Connect, which you will use to complete Objective 3, Measures 2 and 3. This service allows you to select a patient in the Patients application and seamlessly place a lab or radiology order for that patient.
- Open the Patients application from the CT Launcher. If you do not see the Patients icon, enable the application from the ChiroTouch Launcher Options window.

Search for a patient for whom you prescribed medication during an appointment that took place during your reporting period.
To search for a patient, select either the Last Name, First Name, or Phone Number radio button, enter appropriate text in the Find field according to the radio button you selected, and click Find.
Alternatively, click Today's Patients to generate a list of all patients seen in your office today.

- Load a patient record into the Meaningful Use Portal by double clicking it from the search results.
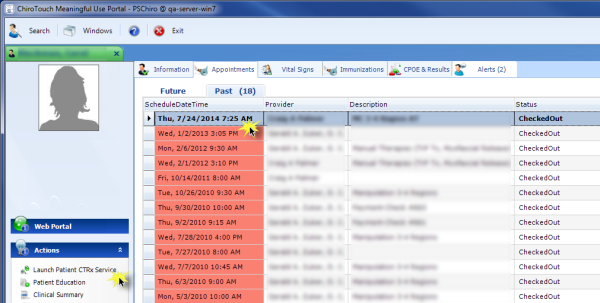
- Click the Appointments tab.
- Click the Past tab.
- Select the appointment that took place during your reporting period when you saw a patient for whom you are prescribing medication.
- Click Launch Patient CTRx Service from the Actions menu.
- The software will perform synchronization (this may take a moment). The software will open the CTRx Service window. Click Prescribe in the navigation bar.

You must have the prescribing version of CTRx in order to prescribe medications. The Prescribing Version of CTRx costs $795.00/yr.
To prescribe medication, follow these steps.
- To prescribe a medication, first ensure that the correct pharmacy is selected in the Pharmacy drop-down.
- To edit selected pharmacy information or to select a new pharmacy, click Change.

- To edit other pharmacy information, enter some of the existing pharmacy information to be edited in the fields under the Patient Pharmacy Information heading and click Find.
- To add a new pharmacy, click Add a new pharmacy to the practice list.
In the Edit Pharmacy Data fields, enter new pharmacy data and click the Register this Pharmacy button.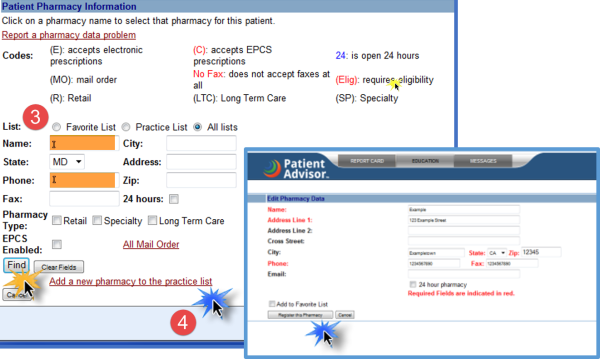
There are four ways that you can select medication to prescribe to a patient in the Prescribe window of the CTRx service.
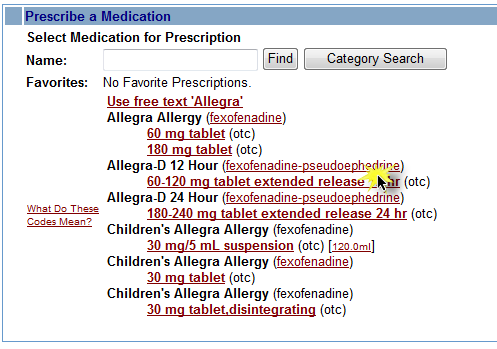
- Enter drug search criteria in the Name field under the Prescribe a Medication heading. Less is more—enter only the first few letters of the drug name.
- Click Find.
- The software will list search results. Click the form and strength of the drug you wish to prescribe.
NOTE:
Capitalized medication names are the proprietary "brand name" versions of a drug. Medications in all lower case are generic.
The designation (otc) next
to the strength indicates that this medication does not need a prescription and can be
purchased over the counter.
Formulary information may or may not be present.
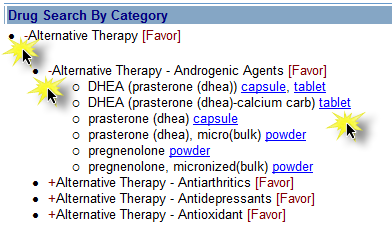
- Click Category Search. This allows you to look up all medications within a specific therapeutic class.
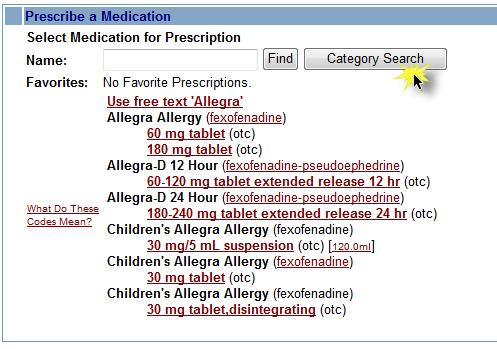
- Click the + controls to expand each drug category until you find the desired form of the drug.
- Click a drug form to prescribe it.
This method can only be used if you have designated certain medications as Favorites.
- Select the desired prescription from the Favorites drop-down list.
- Click the Use button.

This method can only be used if the patient has an active medication history.
- Find the desired medication in the patient’s active medication list on the Patient Summary screen.
- Click Prescribe.
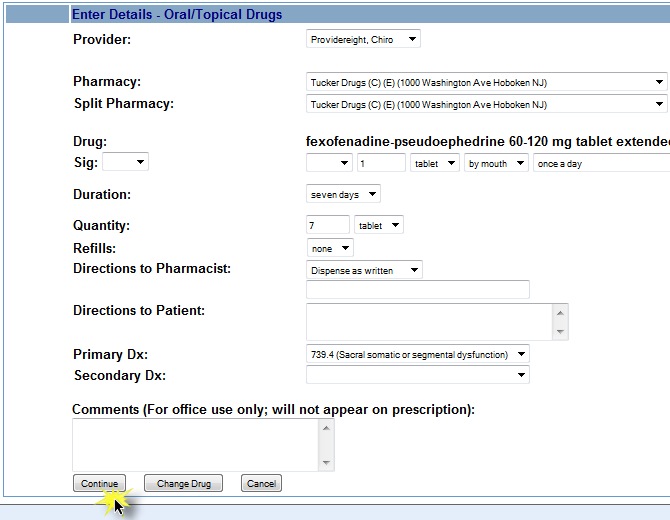
- After you select medication to prescribe, the software will open the Enter Details window.
- Verify the provider and pharmacy fields are correct and verify or select the appropriate values from the drop-down lists for the Sig (instructions) details.
Click Continue.
Alternatively, click Change Drug to change the drug; or, click Cancel to cancel creating the prescription.
- The software will present your prescription for you to review.
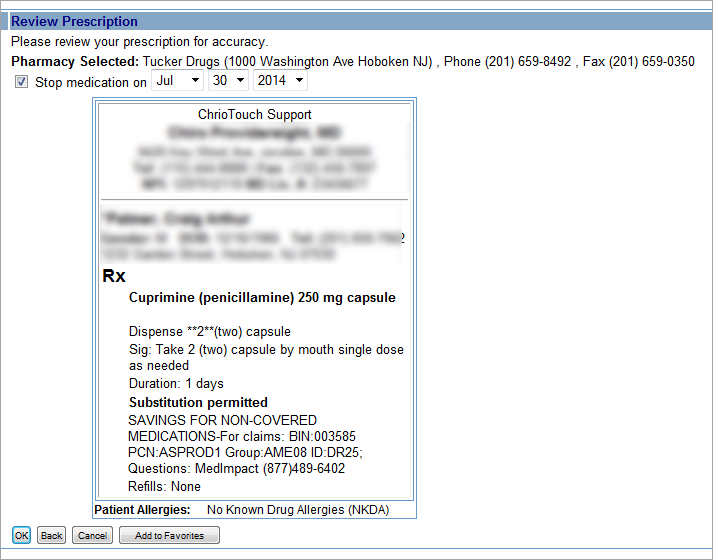
- When you click OK after reviewing your prescription, the software will display your new prescription below the Pending Prescription heading.
- Select the check box next to the serial number of the prescription(s) you wish to complete.
- Enter your signature password in the Signature Password field.

- Finally, click one of the four buttons below the Signature Password field to complete your prescription order.
- Send—Transmits the prescription to the pharmacy electronically.
- Send and Print—Transmits the prescription to the pharmacy electronically and prints out a copy of the prescription for your records.
- Print w/o sending—Prints the prescription without sending it to the pharmacy. This is useful if the patient is unsure which pharmacy he or she would like to use or for controlled substance prescriptions.
- Sign w/o sending—Adds the medication to the patient’s active medication list. This is useful if you gave the patient a sample.
NOTE:
For this activity to count toward your compliance with Objective 1, you must sign the prescription order. Clicking any one of the four buttons above will result in your signature being applied to the prescription order.
In addition, clicking either the Send button or the Send and Print button will also count this activity toward your compliance with Objective 4: Electronic Prescribing (eRx).
Close the CTRx service. When you click the Calculate button in the EHR Dashboard application, the software will reflect your progress toward Measure 1 under Objective 1 compliance on the EHR dashboard under CPOE—Medication Orders.
- Open the Patients application from the CT Launcher.
- Search for a patient for whom you are creating a lab order.
- Load a patient record into the Meaningful Use Portal by double clicking it from the search results.
- Click the CPOE & Results tab. In the Actions menu, click Launch CPOE.
- The software will launch the CPOE Connect service.
- Click the Diagnosis tab.
- Enter text (at least three characters) in the Search for a Diagnosis field. The software will display a list of diagnoses. Click your diagnosis to select it.
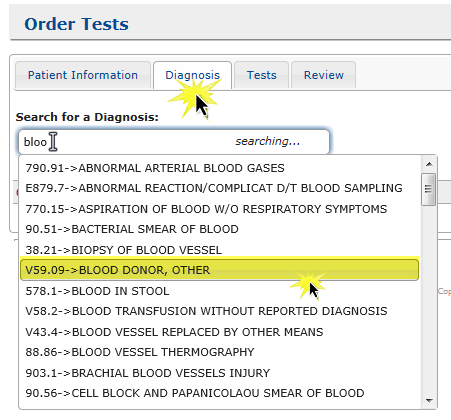
- Alternatively, select a diagnosis from the Commonly Selected Diagnosis Codes list.
- N O T E
You can add diagnosis codes to the Lifepoint CPOE Connect Commonly Selected Diagnosis Codes list through Administer CPOE. - Open any patient record in the Patients application.
- Click CPOE & Results.

- Click Administer CPOE in the Actions list.
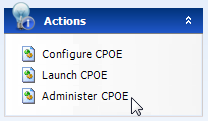
- The software will open the CPOE window. Click the Common Diagnosis tab.
- Enter text in the Select Diagnosis field. The software will display a list of diagnoses. Click the diagnosis that you wish to add to the Commonly Selected Diagnosis Codes list and click Add.
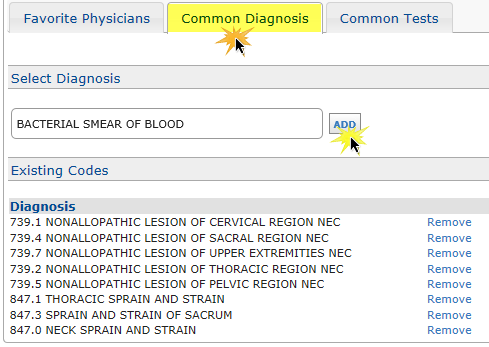
- The software will return a confirmation message indicating that the diagnosis was successfully added.
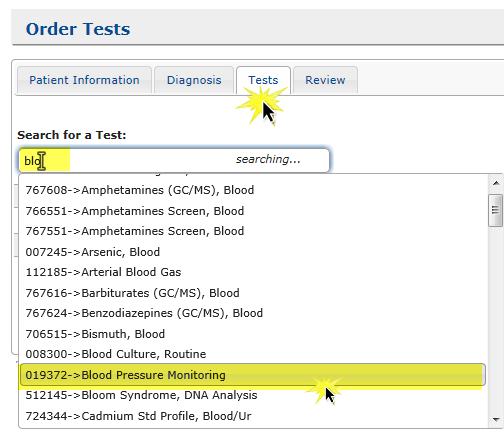
- Click the Tests tab.
- Enter text (at least three characters) in the Search for a Test: field. The software will display a list of tests. Click your test to select it.
- Open any patient record in the Patients application.
- Click CPOE & Results.

- Click Administer CPOE in the Actions list.

- The software will open the CPOE window. Click the Common Tests tab.
- Enter text in the first Name field to create a new Test Category. The text you enter will be the title of your new test category. Click Update.
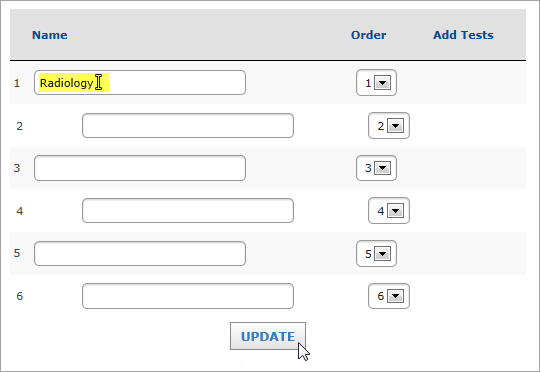
- The software will display an Add Tests to Group link next to your new Test Category. Click Add Tests to Group.

- The software will display a Select Tests field. Enter text (at least three characters). The software will display a list of tests. Click the test that you wish to add to your new test category and click Add.
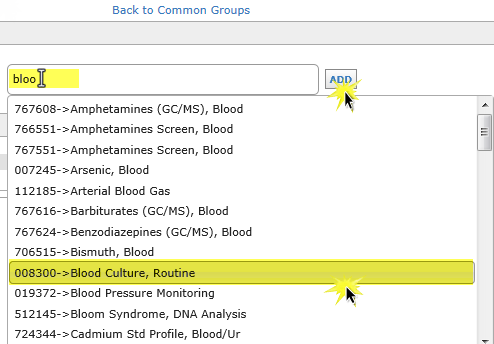
- The software will return a confirmation message indicating that the diagnosis was successfully added.
- Click the Review tab.
- Select a provider from the Requesting Phys: drop-down menu.
- Verify that all information under the Additional Information heading is correct, make any changes necessary, and click Order.
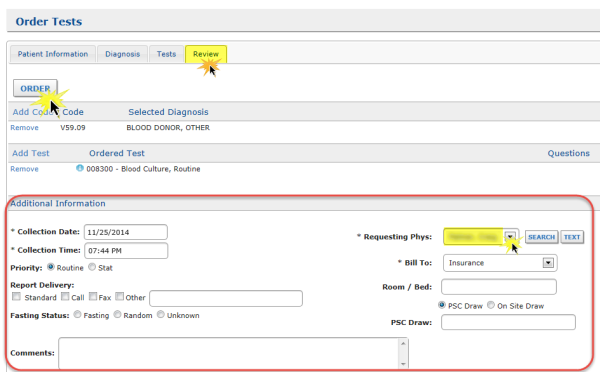
- The software will open a web browser window showing your order in .pdf format. The software will also display the order in the Pending Orders tab on the Patient History page. Click Close to exit the Lifepoint CPOE Connect service.
Alternatively, select a test from one of the lists below. If you have not configured Lifepoint CPOE Connect, the software will not list any tests in the Tests tab.
Manage the tests that appear in the Tests tab:
Add more tests to your new group or click Back to Common Groups.
- Launch the Lifepoint CPOE Connect service from a record belonging to a patient for whom you placed an order.
- Click Order History.

- The software will display the order on the Patient History page.
- Open the Patients application from the CT Launcher.
- Search for a patient for whom you wish to place a radiology order.
- Load a patient record into the Meaningful Use Portal by double clicking it from the search results.
- Click the CPOE & Results tab.
- In the Actions menu, click Launch CPOE.
- The software will launch the CPOE Connect service.
- Click the Diagnosis tab.
- Select a diagnosis. There are 2 ways to do this: by searching or selecting from the Commonly Selected Diagnosis Codes list.
- The software will return a confirmation message indicating that the diagnosis was successfully added.
- Select a test.
 Learn how
 - Click the Review tab.
- Select a provider from the Requesting Phys: drop-down menu.
- Verify that all information under the Additional Information heading is correct, make any changes necessary, and click Order.

- The software will open a web browser window showing your order in .pdf format. The software will also display the order in the Pending Orders tab on the Patient History page. Click Close to exit the Lifepoint CPOE Connect service.
- Open any patient record in the Patients application.
- Click CPOE & Results.

- Click Administer CPOE in the Actions list.

- The software will open the CPOE window. Click the Common Tests tab.
- Enter text in the first Name field to create a new Test Category. The text you enter will be the title of your new test category. Click Update.

- The software will display an Add Tests to Group link next to your new Test Category. Click Add Tests to Group.

- The software will display a Select Tests field. Enter text (at least three characters). The software will display a list of tests. Click the test that you wish to add to your new test category and click Add.

- The software will return a confirmation message indicating that the diagnosis was successfully added.
Add more tests to your new group or click Back to Common Groups.
The software will display your order in the Labs & Rads list under the CPOE & Results tab in the patient's record in the Patient Portal.
The software will display tests whose results are returned against a light green fill and with a value of F in their ResultStatus column.
The software will display tests that you ordered but whose results are still unknown against a white fill.
- Launch the Lifepoint CPOE Connect service from a record belonging to a patient for whom you placed an order.
- Click Order History.

- The software will display the order on the Patient History page.
Medication, radiology and lab orders that are not created electronically (that is, orders that are created by hand such as handwritten prescriptions) should be tracked using the Non-CPOE Orders interface in the Meaningful Use Portal in the Patients application.
CRITICAL:
Any order entered in via the Non-CPOE process will not count towards your compliance, as CMS requires that orders be entered in through an electronic system. Non-CPOE orders will show up in the denominator for this measure, but will never show as compliant in the numerator.
- Open the Patients application from the CT Launcher. If you do not see the Patients icon, enable the application from the ChiroTouch Launcher Options window.

- Search for a patient for whom you prescribed medication during an appointment that took place on a date that was within your reporting period. Use the Find button to search by patient last name, first name or phone number; or, click the Today's Patients button to generate a list of all patients seen in your office today.

- Load a patient record into the Meaningful Use Portal by double clicking it from the search results.
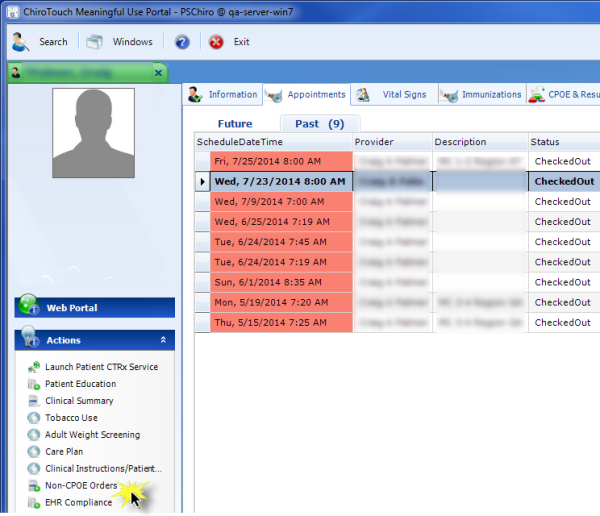
- From within the Appointments tab, click the Past tab. Click to select the appointment that took place on a date that was within your reporting period during which you prescribed medication. In the Actions menu, click Non-CPOE Orders.
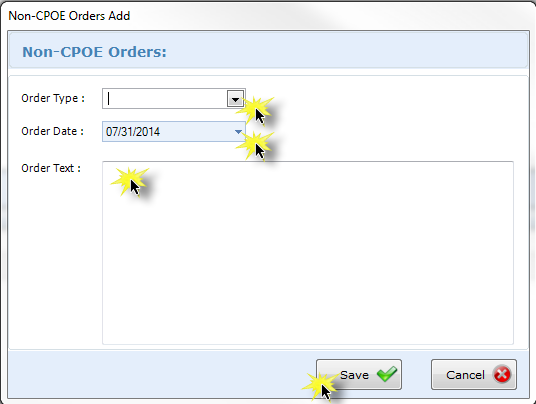
- In the Non-CPOE Orders Add window, select the order type from the drop-down menu. Click to set the Order Date value and to enter text in the Order Text field. Finally, click Save.
- Your new Non-CPOE order appears in the Non-CPOE Orders window.
- To remove an order, click Delete at the top of the Non-CPOE Orders window.
Use these equations to determine whether you meet the attestation requirements.
Medication
| Numerator | ÷ | Denominator | = | Result |
|---|---|---|---|---|
| Number of orders in the denominator recorded using CPOE. | Number of medication orders created by the EP during the EHR reporting period. | The resulting percentage must be more than 60% in order for an EP to meet this measure. |
NOTE:
You can claim an exclusion if you write fewer than 100 medication orders during the EHR reporting period.
Radiology Orders
| Numerator | ÷ | Denominator | = | Result |
|---|---|---|---|---|
| Number of orders in the denominator recorded using CPOE. | Number of radiology orders created by the EP during the EHR reporting period. | The resulting percentage must be more than 30% in order for an EP to meet this measure. |
NOTE:
You can claim an exclusion if you write fewer than 100 radiology orders during the EHR reporting period.
Laboratory Orders
| Numerator | ÷ | Denominator | = | Result |
|---|---|---|---|---|
| Number of orders in the denominator recorded using CPOE. | Number of laboratory orders created by the EP during the EHR reporting period. | The resulting percentage must be more than 30% in order for an EP to meet this measure. |
NOTE:
You can claim an exclusion if you write fewer than 100 laboratory orders during the EHR reporting period.
The provider is permitted, but not required, to limit the measure of this objective to those patients whose records are maintained using certified EHR technology (CEHRT).
The CPOE function must be used to create the first record of the order that becomes part of the patient's medical record and before any action can be taken on the order to count in the numerator.
However, in some situations it may be impossible or inadvisable to wait to initiate an intervention until a record of the order has been created. For example, situations where an intervention is identified and immediately initiated by the provider, or initiated immediately after a verbal order by the ordering provider to a licensed healthcare professional under his/her direct supervision. Therefore in these situations, so long as the order is entered using CPOE by a licensed healthcare professional or certified medical assistant to create the first record of that order as it becomes part of the patient’s medical record, these orders would count in the numerator of the CPOE measure.
Any licensed healthcare professionals and credentialed medical assistants, can enter orders into the medical record for purposes of including the order in the numerator for the objective of CPOE if they can originate the order per state, local and professional guidelines. Credentialing for a medical assistant must come from an organization other than the organization employing the medical assistant.
Electronic transmittal of the medication order is not a requirement for meeting the measure of this objective.
CPOE is the entry of the order into the patient's EHR that uses a specific function of CEHRT. It is not how that order is filled or otherwise carried out.
In order to meet this objective and measure, an EP must use the capabilities and standards of CEHRT at 45 CFR 170.314(a)(1).
