Entering Chart Notes
ChiroTouch gives you multiple options for completing your chart notes accurately and quickly. You can use only one or a combination of the following techniques to document your patients’ visit.
- Type notes using your keyboard
- Copy notes from any previously documented visit
- Auto SALT (Same as Last Time) to automatically SALT the notes section with every visit
- Use Voice Dictation
- Use ChiroTouch Macros
Floating subjectives allow patient self check-in subjectives to be used by any provider. This allows providers to use the subjective even if they are not the appointment provider.
To use floating subjectives, you must enable the option in the Maintenance application.
Enable floating subjectives
- Open ChiroTouch Maintenance.
- Click Options.
- Select the Allow patient self check-in subjective to be used by any provider option.
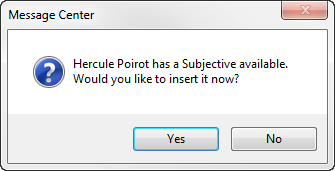
- Once a patient fills out a subjective at self check-in, it will be available to any provider viewing the patient's file. When you open the Chart Note editor, the following dialog box appears:

- Decide whether you want to insert Subjective data.
- Click the Yes button to insert the subjective data into the chart note. If you are using a single note, it will be inserted at the top. If you are using a SOAP note, it will be entered in the Subjective portion.
- Click No to open the Chart Note Editor without using the subjective data. You will still be able to insert the data at a later time.
- N O T E
Floating subjectives are available to providers for 3 days after being filled out, regardless of whether they have been inserted into a provider's chart notes.
- If a patient subjective is available when using the Chart Note Editor, you will see a Pat. Subjective button in the lower section of the Chart Note Editor. Click the Pat. Subjective button to insert the subjective data into the chart note.

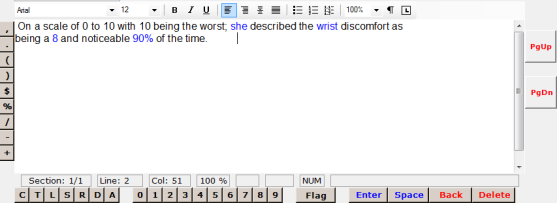
Type your notes in the chart note text field. Click macro text buttons to enter the macro text in your chart notes. Format the text using the formatting buttons above the text field.

The chart note editor has spell-check built in, using a medical dictionary. You can customize the dictionary by adding words to it.
Add a word to the dictionary
Right-click a red underlined word to see options for correcting the spelling or to add a word to the dictionary.

Edit the text of an inserted field
Click the blue text to bring up that field's dialog box and make a different selection.
You can also use the arrow keys on your keyboard to move the cursor into the inserted field and edit the text.
Update patient information fields
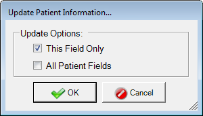
- Click the blue text of the patient information field. The Update Patient Information dialog box appears.

- Select either This Field Only or All Patient Fields and click the OK button.
Search for text in a chart note
- Right-click the text field and select Find. (Alternately, you can press CTRL + F when your cursor is in the text field). The Find dialog box appears.
- Type your search.
The data grid allows you to view all responses recorded for advanced macro questions. The grid links to each response, allowing you to easily edit the note.
Click the Data tab to view the data grid. If you are using SOAP format, the section of the SOAP note will be listed on the left in the data grid.

Edit a macro response from the data grid
Click the blue question text. The advanced macro command appears, and you can select a different response.
Click the  button to copy a chart note from a previous appointment. A list of your existing notes appears. You can view them by date or by doctor by clicking one of the option buttons. Click a date to view the chart note text.

Subjective, Objective, Assessment, and Plan check boxes appear below the list. Select the check boxes for the fields you wish to copy to the new chart note and click the OK button.

The chart note will be copied over as-is, and patient fields will reflect the same information as in the original chart note.
NOTE:
If you are copying a SOAP note into a single note, all portions will be added and combined. If you are copying a single note to a SOAP note, all fields will be entered in the Subjective portion.
Click the buttons to the left of and below the text field to enter characters. To hide the character buttons, right-click them and click Character Buttons. To view character buttons again, right-click below the text field and click Character Buttons.

Chart note flags can be used to highlight important notes. To flag your chart note, click the  button and select a color. The Flag button appears colored with the flag color, and your chart note appears colored in the Chart Notes list.


Delete - Click this button to delete the chart note. You will be prompted whether you are sure you wish to delete it. (Only appears if the note being views has already been saved.)
Sign - Click this button to add an electronic signature to your chart note. You can choose to provide a signature now if a signature pad is connected, or you can use a signature already stored on file. Enter a signature and click the OK button to close the signature capture.
When you print and/or export a chart note report in ChiroTouch, the system adds the digital signature to the document.
Save - Click the Save button to save and close the chart note.
Click the Close button to close the chart note. You will be prompted whether you wish to save the note before closing.