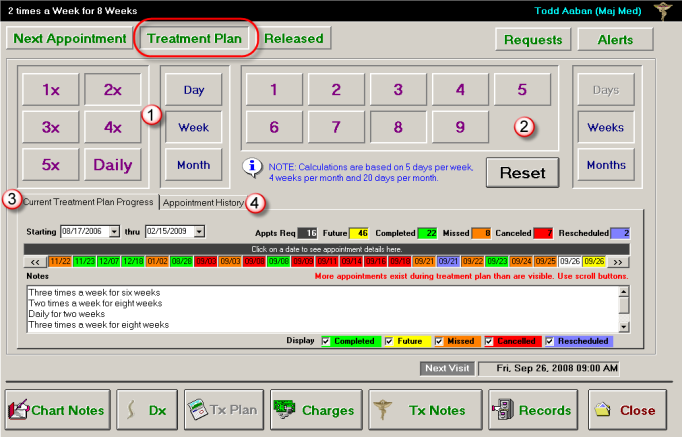
Treatment Plan Screen
The first screen you will encounter after clicking Tx Plan is the Treatment Plan screen. Use this screen to enter a treatment plan for your patient, and see how your patient is progressing with the treatments.
As you enter your treatment, you will see your choices appear as a sentence in the black information bar at the top of the screen. This sentence will be used to relay the treatment plan to the front desk staff in the Treatment Plan section of the Patient Checkout screen.

![]() Frequency of Treatment – The first section on this page allows you to choose the frequency of the treatment. Choose from one to five times a day, week, or month, or choose to prescribe the treatment daily.
Frequency of Treatment – The first section on this page allows you to choose the frequency of the treatment. Choose from one to five times a day, week, or month, or choose to prescribe the treatment daily.
Click the "Reset" button to reset both the frequency and length of treatment.
![]() Length of Treatment - This section allows you to choose the length of the prescribed treatment. Choose a number from one to nine, and select days, weeks, or months.
Length of Treatment - This section allows you to choose the length of the prescribed treatment. Choose a number from one to nine, and select days, weeks, or months.
NOTE:
Length and frequency of treatment calculations are based on a standard 5 day work week, 4 work weeks per month, and 20 work days per month.
Click the "Reset" button to reset both the frequency and length of treatment.
![]() Current Treatment Plan Progress – This area displays the progress of the patient’s current treatment plan. Use the drop-down menus to choose Starting and thru dates. This will set the time period for which you want to view treatment statistics. Click the "Refresh" button to refresh the statistics for this time period.
Current Treatment Plan Progress – This area displays the progress of the patient’s current treatment plan. Use the drop-down menus to choose Starting and thru dates. This will set the time period for which you want to view treatment statistics. Click the "Refresh" button to refresh the statistics for this time period.
The colored legend to the right of the drop-down menus shows you:

- Appts Req - The amount of future appointments you requested for this treatment.
- Future - The total amount of future appointments already scheduled for this patient during this time period.
- Completed - The total amount of completed appointments during this time period.
- Missed – The total amount of missed appointments during this time period.
- Canceled – The total amount of canceled appointments during this time period.
- Rescheduled - The total amount of rescheduled appointments during this time period.
Use the arrows to the left or right of the colored appointment blocks to view more appointments within your selected time period.
Click on any appointment block to see the details of the appointment in the gray information bar directly above these blocks.
Use the Notes field to Enter specific notes about the treatment. These notes are viewable by the front desk when checking out the patient. For more information on patient check-out, Check Out a Patient.
![]() Appointment History – This section displays the patient’s appointment history in a calendar format, including completed, future, missed, canceled, and rescheduled appointments.
Appointment History – This section displays the patient’s appointment history in a calendar format, including completed, future, missed, canceled, and rescheduled appointments.

Use the left and right arrow buttons to move through adjacent months.
Select or clear the "Display" checkboxes below the notes field to view only certain appointment types.
