Charges
You will use the “Charges” section to post charges to the patient’s account ledger.
 Posting Charges and Patient Check-In
Like the Diagnoses section, Charges is another section in CT Provider that affects the patient’s status. Posting a charge will automatically check in the patient, even if the patient has not yet arrived. Likewise, you will be prompted to create an appointment if you post a charge and the patient has no scheduled appointment for that day.
NOTE:
You cannot return a patient to an “arrived’ status once a charge has been posted. If you need to return the patient to an arrived status, you must first clear all posted charges.
Deleting Charges
- Click the charge in the section.
- Click the Delete button on your keyboard to remove the selected charge from the list. You can also delete charges by using the “Change” button in the Charges section.
Entering Charges
If you selected the Auto SALT option when specifying your setup options (Setup Options) the charges from the patient’s last treatment will be automatically loaded here when the patient is checked in using the “Next” button.
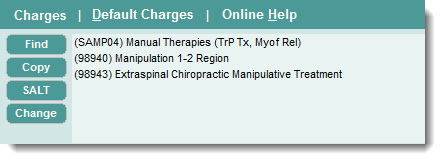
There is a column of buttons to the left of the Charges section, and each button represents a different tool to add charges. Similar to the functions within the Diagnoses section, click the Find, Copy, SALT, and Change buttons to:
- Find a charge, searching by name or by code
- Copy charges posted from any previous visit
- Manually SALT charges, carrying over charges from the patient’s last treatment
- Change the current posted charges
Find Charge
Use the “Find” button to scroll through your entire list of charges. The list can be sorted by Code or by Description. Click on a charge in your list, and then click the Select button to apply the charge to the current appointment. Select multiple charges by holding down the CTRL button on your keyboard while you select charges.

Type the Search field box, and the system will highlight the charge that matches your search entry. If you are sorting by Code, your search must be entered in numerical values. If you are sorting by Description, your search must be entered in letters.
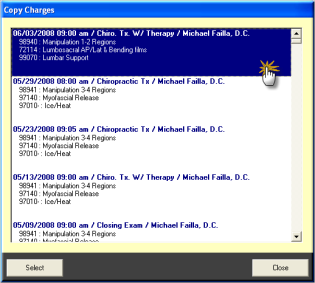
Copy Charge
Use the “Copy” button to copy charges from any previous visit. Scroll through a list of past appointments and their charges. Touch an appointment, and then click the “Select” button to apply these charges to the current appointment.
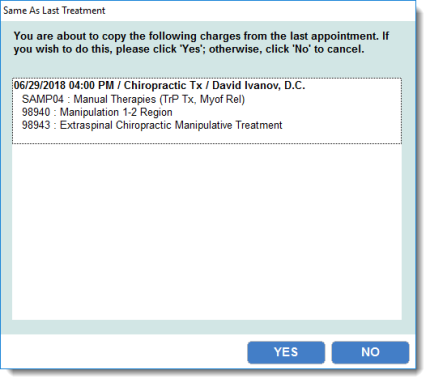
SALT Charge
Use the “Same As Last Treatment” (SALT) function to copy charges from the patient’s last documented visit. If the patient’s last visit contained posted charges, you only have the option to copy from the last appointment. Touch the “Yes” button to apply the previous charges to the current appointment.
Change Charge
Use the “Change” button to access the “Charges Entry” dialog box. You will use the “Change” button to:
- change the current charges displayed in this section
- add new charges to your current list
- post new charges as an alternative to the Find option
- point a charge to a specific diagnosis
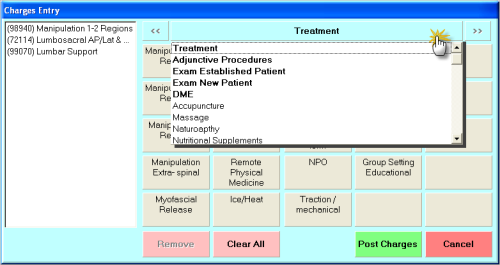
Above the charge buttons, the main heading represents the category for each group of charges. Click on this heading to access a drop-down menu of further categories. When you select a new category, the charges buttons associated with that category will display. Click a charge button to add that charge to the charge list.
To remove a charge, click the charge from the list and then click the “Remove” button. Click the “Clear All” button to clear the entire list.
After you add and/or modify charges, click the “Post Dx” button to save your changes and exit the dialog box. Click “Cancel” to cancel your changes and exit the dialog box.
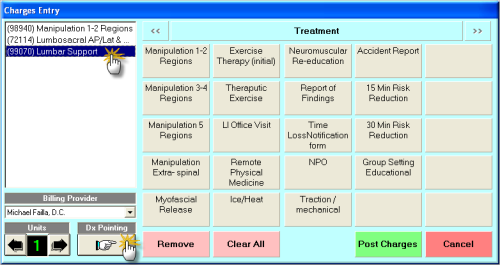
Below the list of charges in this Charges Entry dialog box, there are three additional options: Billing Provider, Units, and Dx Pointing.
- Use the drop-down menu to assign a billing provider to each charge separately. If you do not assign a billing provider, the system will automatically assign the patient’s default provider.
- Using the arrows, adjust the number of units for the charge.
- Use the “Dx Pointing” button to point a charge to a specific diagnosis.
Diagnosis Pointing
To point a charge to a specific diagnosis:
- Select a charge in the list column of the Charges Entry dialog box.
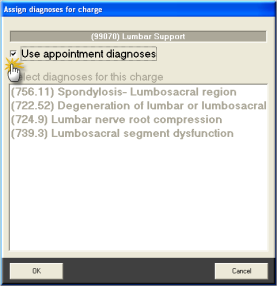
- Click Dx Pointing to find your diagnoses. The “Assign diagnoses for charge” dialog box appears.
- To point the charge to all diagnoses, select the option to “Use appointment diagnoses".
-
To point the charge to only a few selected diagnoses, clear the "Use appointment diagnoses" checkbox, and the click each diagnosis separately from the list.
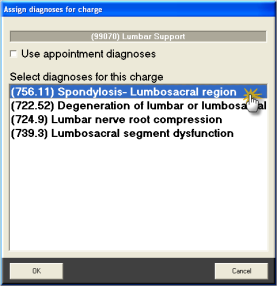
- Click OK to save your changes and exit the dialog box. Click Cancel to cancel the task.
When submitting your office’s claim forms, your charges will now be pointed in the appropriate direction and thus be clearly explained.
There are no setup functions for the Diagnosis and Charges sections in Provider All-In-One. To access setup functions, exit the application and open Provider (Basic). There, you can set up your category items and copy categories from other users.