Date Control
When a patient’s file is loaded on the screen, either by clicking the “Select” button, the “Next” button or any other manner; notice another change in the toolbar—the date button. The current date and patient appointment time now appears on this button.
You can use the Date Control button to toggle back to past appointments for the patient whose file you currently have loaded on the screen. You can toggle back to previous appointments to review any of that information, just as you would flip back in a patient’s paper file to review past documentation and notes.

NOTE:
Keep in mind that when you use the Date Control button to toggle back to a previous date, every section on the CT Provider screen adjusts to show that day’s information. If you toggle back to an appointment that occurred two weeks ago, your chart notes, diagnoses, charges, and treatment plan all show the entries from that date two weeks ago. To edit the current day's information, you must toggle back to the current date.
You can toggle to a different date in two ways:
- By clicking the arrows to the left and right of the button;
- By double-clicking this button to access a calendar box.
Using the Arrows
Click the left arrow to toggle back to past dates. The date shown on the button will change to the date you are toggling back to. If there is no appointment on a particular date, then the date button will not show an appointment time. The Patient Status Bar will display the patient’s name, case type and account number, but it will not display any appointment information.

If you toggle back to a previous scheduled appointment date, the date button will display the time of that appointment. The Patient Status Bar will contain details of the past appointment.

When you are finished reviewing documentation for a previous date, use the arrow to the right of the button to toggle back to the current date.
NOTE:
You cannot use the arrow to view dates ahead of the current date. To view a future date, you must first access the calendar by double-clicking the date control button. See the next section for more information on using the calendar.
Using the Calendar
Using the arrows to toggle back to a previous month may be time consuming. Likewise, finding a certain past appointment may be difficult. Instead of using the arrows, you can use a pop-up calendar to search appointment dates.
To use the Calendar:
- Double-click the date control button to access the pop-up calendar.
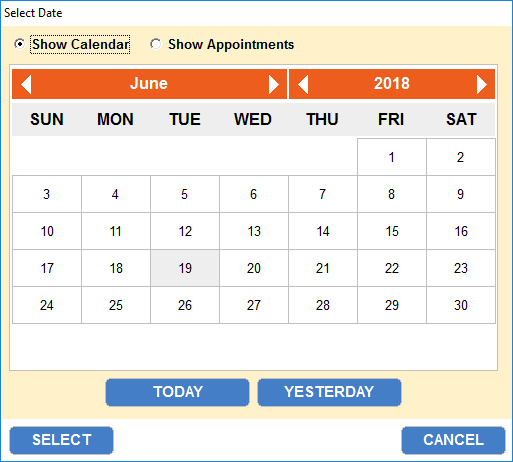
- Click the corresponding radio button to “Show Calendar” or “Show Appointments”.
- In the “Show Calendar” view, scroll through the calendar using the arrows on each side of the month and year. Click any date shown in the calendar; then click the “Select” button to close the calendar and review that date’s documentation. Click the “Today” and “Yesterday” buttons to quickly move to that date.
- In the “Show Appointments” view, scroll through the patient’s past appointment dates. The list will contain the patient’s current appointment, past completed appointments, and missed appointments. Click on any appointment date; then click the “Select” button to close the calendar and review that appointment’s documentation.
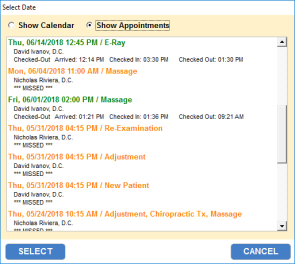
The patient’s appointment history is color-coded to correspond with the appointment history colors in the Treatment Plan section.