ePay – Online Statements and Payments
With the new ePay service, you can configure ChiroTouch so that your patients are able to receive their patient statements via text and email, and pay off their balance online using the Statements web site.
NOTE: Patients must either have cell phones or email accounts in order to take advantage of ePay.
Enabling ePay
IMPORTANT: Merchant Services must also be configured for CTPayments (Global Payments) in order for ePay to function. For CTPayments setup, see here.
To enable ePay in ChiroTouch:
- Open the Maintenance application.
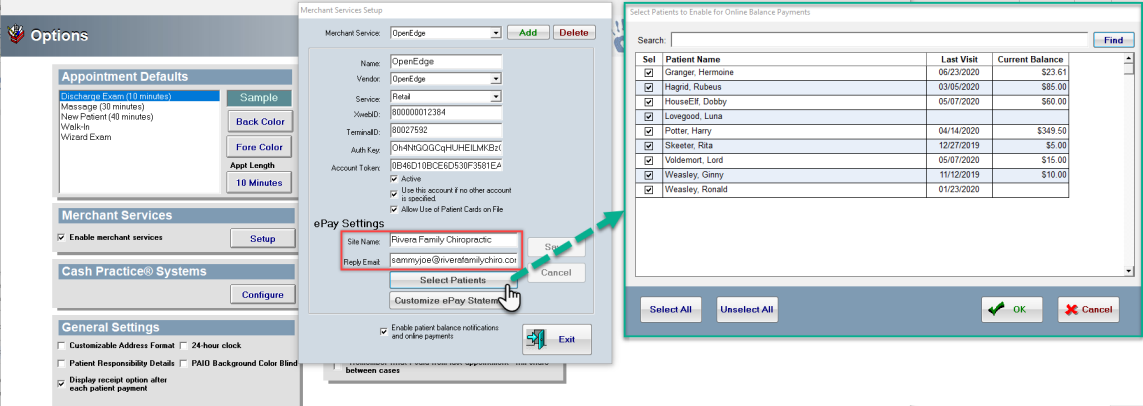
- Click Options.
- Under Merchant Services, ensure that “Enable merchant services” is selected. (It should have already been selected while enabling CTPayments).
- Click Setup.

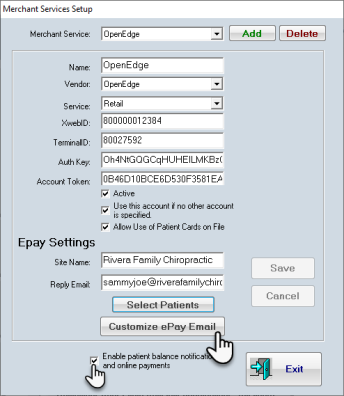
- In the "Merchant Services Setup" dialog, under "ePay Settings", click the "Enable patient balance notifications and online payments" checkbox.
- Enter a Reply Email for the emails to be sent out, if you want your patients to be able to reply to the emails. (Note that if left blank, the emails will be sent from "no-reply@...")
- Enter the Site Name. This can be your clinic's name or any other name you would like to use in correspondence. This name will appear as the "from" in emails and in the signature of the email and text notifications.
- Click Select Patients. This pop-out window shows list of patients. From this screen you can manage ePay for your patients globally and also view their last-visit and current-balance information. You can also quickly make ePay activation changes to specific patients from this window. When finished configuring patients, click OK.
- When finished with Merchant Services Setup, click Exit.
IMPORTANT: Before making changes to these patient ePay settings in Maintenance, you must first ensure that no Patient Information screens are open on any of your workstations. If a patient's information screen in Front Desk is open, changes made to ePay settings in Maintenance for that patient will not be saved.
Customize ePay Text and Email Statement Balance Notifications
Customize ePay statement and balance notices to give them a more personal feel when sent to the patient.
- Open the Maintenance application.
- Click Options.
- Under Merchant Services, ensure that “Enable merchant services” is selected. (It should have already been selected while enabling CTPayments).
- Click Setup.
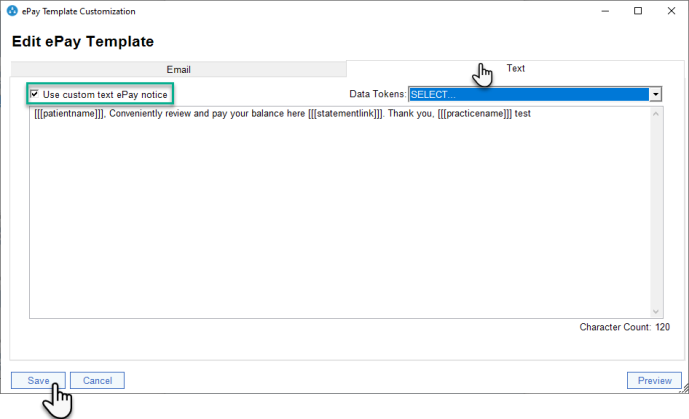
- Click Customize ePay Email
From the Edit ePay Template Screen you are able to customize the Email and Text notification that will be sent to the patient upon sending an ePay statement from the Front Desk or Accounting application.
Use the data tokens provided to auto populate text for the patient name and or practice name once the statement is sent.

Managing ePay through the Front Desk
You can also manage ePay for each patient from within their Patient Information in the Front Desk, shown below.
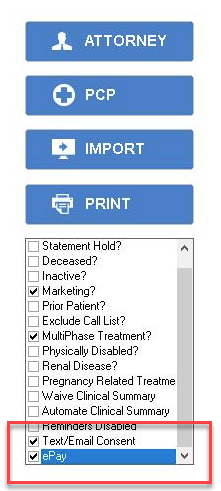
IMPORTANT: Each patient must also give their text and/or email consent for receiving information from your clinic, and this checkbox must be selected in order for ePay to work for them.
Additionally, ePay will not work for patients who have a Statement Hold: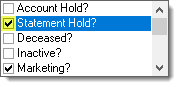
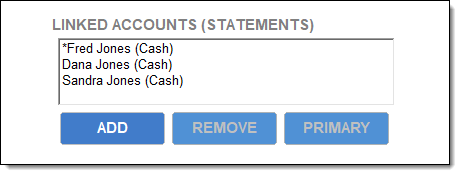
Linked-Statement Accounts
You can also create ePay statements for linked accounts. With linked accounts there is one primary account and one or more secondary accounts, as seen in the example below:
See here for more information on ePay for linked accounts.
Click here to learn how ePay works.