How to Create Reminder Campaigns
There are two ways to create a new Reminder Campaign:
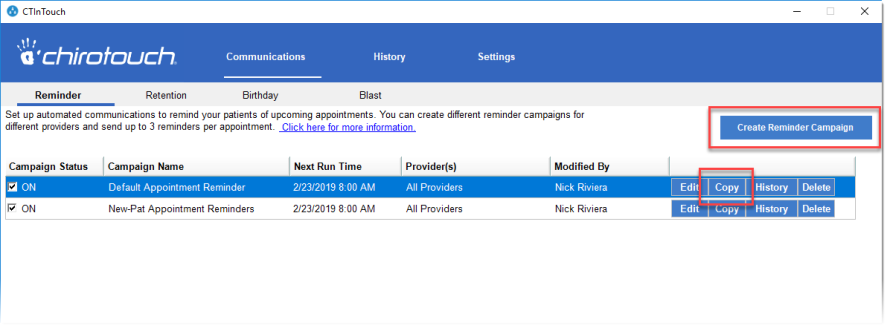
- By clicking Create Reminder Campaign to begin a completely new campaign.
- By clicking the Copy button to the right of an existing campaign. This is best if you want a head start on creating the campaign using some pre-existing settings in a campaign that you only need to modify slightly.
Reminder Campaign Creation – Step by Step
To create a basic reminder campaign:
- Click Create Reminder Campaign to open the Reminder Campaign dialog.
Note: Refer to this diagram below for all step-number references:

- Give your Reminder Campaign a meaningful name. For example, "Appt Reminders - New Patient- for Dr. Levin". InTouch accepts long names, so you can generally be as specific as you need to be with naming.
- Set the status to ON or OFF, depending on your schedule for beginning this campaign. Status of ON enables this campaign to run in accordance with the schedule you created; OFF keeps the campaign disabled until you are ready to use it.
- Select a case type , or types, for the campaign to target by clicking the Search button. If you make no selection, all case types are selected. y
- Select the provider(s) for which this campaign should apply. Either leave at "All Providers" or click Search to display a provider list and select all providers that apply. Then click Save.
- Indicate if this is campaign is to apply only to first-appointments or only not to first appointments.
- Set up the conditions for Reminder 1.
- Ensure that "Email" is selected if this is to be an email reminder, and that "Text" is selected if you want it also to be a text reminder.
- From the dropdown list, select the template you want to use. (Note that when using InTouch for the first time there will only be one template, the Default Reminder Template.)
- Set how long prior to the appointment you want this first reminder to go out.
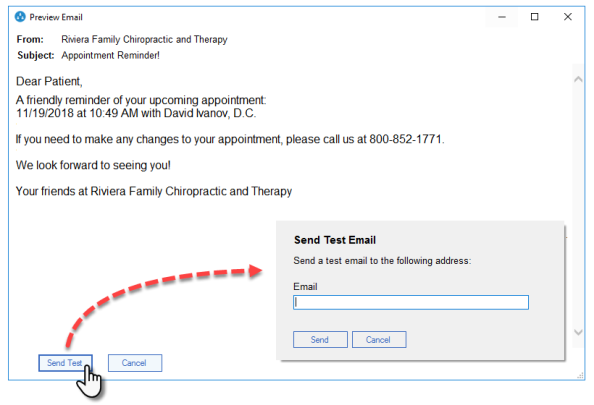
- Click Preview to see how this email and/or text will appear when using the selected template (see below). The default Reminder template may prove be sufficient for your needs. Otherwise, click Edit to make changes to it.
- Creating a new template is an optional step. If the default Reminder template is not completely sufficient for your Reminder 1 message, you can edit the template as needed. See Email Template Editing – a Quick Guide, below. For creating a new template, see here.
- Create Reminder 2, beginning with selecting the checkbox to enable the Reminder. Follow the same rules as above. You can use the same template as the for the one above or create a new one. This could be a reminder that goes out a day or two prior to the appointment.
- Create a Reminder 3 as needed. This could be a reminder to be sent out just a day or a few hours prior to the appointment.
- Once you are satisfied with the design of your campaign, click Save to save the campaign and close the dialog.
Your new campaign will now appear in the list of Reminder Campaigns.
Preview Email
You should preview your messages whenever creating or editing a campaign. You can also take it one step further by sending a test email to yourself. Note that when previewing a message, InTouch substitutes in sample data for some of the variables you are using:
Email Template Editing – a Quick Guide
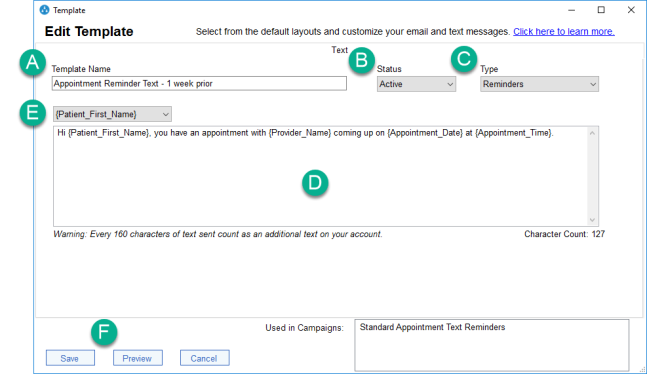
You can quickly check your selected template as follows (refer to the above diagram for order):
- Ensure that the basic information is correct: Template Name, From, Subject, and Email address.
- Ensure that the Status is Active.
- Ensure that the Type is set to Reminders. This is so the template will be made available for use in Reminder campaigns.
- Review the body of the message and make any wording changes necessary. You can also change the style of the wording, font, size, and so forth.
- Use the Variables dropdown selection to insert any additional variables necessary. When the email is generated the appropriate values will be swapped in at these locations.
- If you would like an image in the emails, such as your company logo, to appear, place the cursor where you want the image to go and click Insert Image.
- Once finished, click Preview to preview the results. If you have made changes and you're satisfied with the new look, click Save.
Reminder Texts
The scheduling for reminder texts is the same in principle as reminder emails.
Guide to creating a reminder text template:
- Give the reminder text template a meaningful name.
- Set the status.
- Set the type to Reminders.
- Write a simple, polite message that gets to the point, informing the patient of the appointment date and time, and with whom. Note that there is a 160-character limit, after which the cost of each text will double.
- Use the variables for info that needs to be message specific.
- When finished, you can preview the text message and if desired send a test message as well using the Preview screen. When satisfied, click Save.
IMPORTANT: You should only rely on the character counter as a rough guide. It counts the characters in the variables you include. However, their values, e.g. clinic name and office contact information, generated at runtime may be considerably longer and produce a message exceeding the 160-character limit that counts as a single text.