Verify: Insurance Eligibility Verification
Introduction
The Verify integrated insurance eligibility verification service from ChiroTouch provides real-time information about your patients' benefits. Let the Verify service instantaneously retrieve insurance eligibility information from both providers and payers with a click while you and your staff focus fully on serving your patients.
Getting Started
Sign up for Verify
You must sign up for the Verify service. For pricing information and to sign up, call (844) 307-4901 and press 6 for Sales, then 2 for Service Sales or email us at insidesales@chirotouch.com.
Receive Email With FTP Password and Instructions
The Verify service uses FTP (File Transfer Protocol) to facilitate the eligibility verification process. You will receive an FTP password which will enable this information transfer.
Please allow 7-10 business days from signing up to receive an email from the ChiroTouch Verify team with your FTP password. The email will contain your FTP password, a link to this documentation, and a training video to walk you through Verify setup in the Accounting application.
Retain your FTP password in a safe place. You will configure your ChiroTouch software with this password when you enable eligibility verification after you configure EDI as outlined in the following section.
NOTE:
Your FTP password is different from your password to log into the clearinghouse. You will receive an email from WayStar or Trizetto Provider Solutions with your FTP password.
Configure CTVerify in the Accounting Application
Your configuration will depend on if you are using Trizetto Provider Solutions or WayStar for submitting EDI claims.
If Your Designated Partner for Submitting Claims is with CTProClear (Trizetto Provider Solutions or WayStar):
You are ready to enable eligibility verification as explained below.
If You Use Another Clearinghouse for Submitting Claims:
If you bill EDI claims to a different clearinghouse, you must set up WayStar or Trizetto Provider Solutions as an Additional Trading Partner.
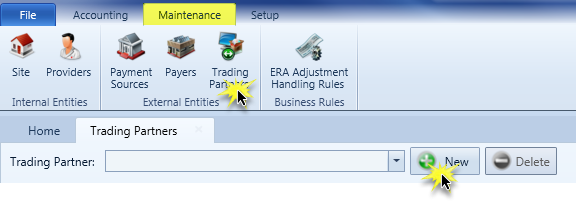
- Open the Accounting application and click the Maintenance tab.
- Click the Trading Partners icon from the External Entities group in the ribbon.
- Click the New button.
- Click the Name and Identifiers heading to expand the section. Complete the fields as described in the
| CTProClear - WayStar | CTProClear - Trizetto Provider Solutions |
|
|
|
Enable Eligibility Verification
IMPORTANT: Eligibility Request should only be selected under a single Trading Partner.
- In the Accounting application, click Trading Partners in the Maintenance tab.
- Click the Interchange Options heading to expand the content.
- In the EDI Transaction Options: pane, select the Enabled check box in the Eligibility Request row.
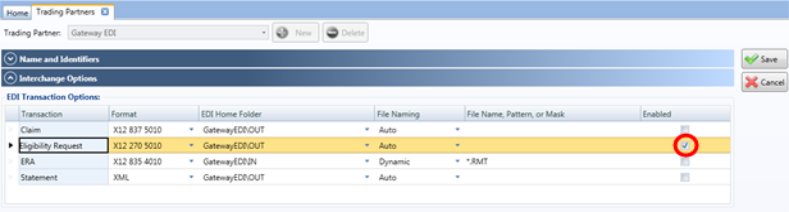
- N O T E
If you are using the WayStar or Trizetto clearinghouse as your Designated Partner to submit claims, your software will have the Enabled check boxes in the Claim and ERA rows selected; do not adjust this configuration. - In the Connection Options: pane, click Credential. The software will open a dialog box.
- Type your Site ID in the Site ID field.
- Type your FTP password in the Password field.
- Test your credentials by clicking Test.
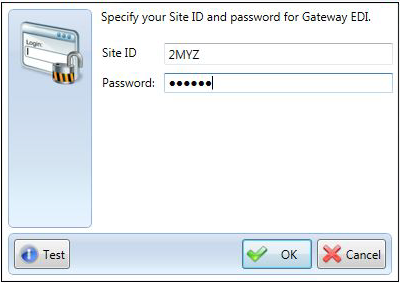
- Click OK.
- N O T E
Trizetto or WayStar will provide your Site ID during your enrollment process. If you do not have your Site ID, contact us by phone at (844) 307-4901 or by email at ctproclear@chirotouch.com. - Click Save.
Configure Provider and Payer Information
You must configure your ChiroTouch Accounting application to contain information for all providers and all insurance companies that you would like the Verify service to be able to confirm.
Configure Provider Information
Most users will have already configured their provider information in the Accounting application and can skip this section.
If you are new to ChiroTouch and have not yet set up your providers, you will need to follow these steps.
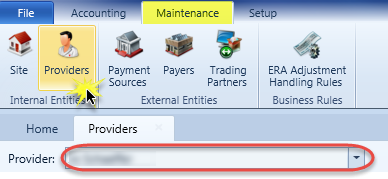
- In the Accounting application, click the Maintenance tab.
- Click Providers from the Internal Entities group in the ribbon.
- Select a provider against whom you will be verifying from the Provider: drop-down menu.
- N O T E
You can add more providers to your practice in the Providers module in the Maintenance application. - In the Details pane, you have two options.
- Click Add. The software will open the Billing Profile Wizard. The Wizard will walk you through creating the Billing Provider, Rendering Provider, and Service Location for the provider you selected. For help using the Billing Profile Wizard, click here.
- The software will populate the information you entered in the Wizard in the Selected Profile: pane in the Providers tab for the provider you selected and configured. Click Save.
You can select Substitute with Provider and click Save to complete the process.
Alternatively, select Use Information Defined Below and follow the steps outlined in the rest of this section below.
Configure Payer Information
If your designated partner for submitting claims is Trizetto,check the Payer ID value on the Trizetto website against the existing Primary Identifier value for each payer record in your software.
If your designated partner for submitting claims is WayStar, check the Payer ID value on the WayStar website against the existing Primary Identifier value for each payer record in your software.
- In the Accounting application, click the Maintenance tab.
- Click Trading Partners from the External Entities group in the ribbon.
- Select Trizetto or WayStar from the Trading Partner: drop-down menu.
- Click the Registered Payers heading to expand the section. For each payer you wish to register, click the + button and then complete the fields as described below
- Repeat steps 1-4 above for all insurance companies you wish the Verify service to confirm.
IMPORTANT:
If you use a clearinghouse that is not Trizetto or WayStar to submit claims, do not adjust any of the information in the Designated Partner column. Your designated partner is the clearinghouse you use to submit claims. Though the Primary Identifier may be different for CTVerify, keep the designated partner pointed to the clearinghouse used for EDI billing.

NOTE:
You must configure each payer using their respective Payer IDs for Trizetto or WayStar for use with CTVerify. Even if you already have these payers configured under another designated partner for EDI billing, you must configure them separately with the corresponding Trizetto or WayStar payer ID's in order to submit electronic patient eligibility.
Verify Patient Insurance Eligibility
Ensure Patient Information is Saved in Front Desk
For the Verify service to successfully verify a patient's eligibility, you must enter all of the required information into the patient's record in the Front Desk application.
- Open the Front Desk application and click Patient Management. Select a patient whose eligibility you wish to verify and click Insurance.
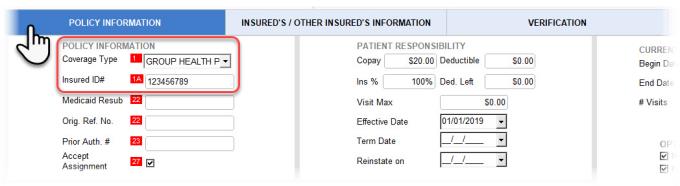
- Click Policy Information. Select a Coverage Type and enter an Insured ID# value.
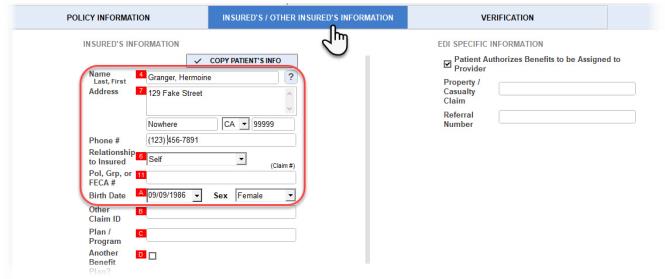
- Click Insured's / Other Insured's Information. Enter select values in the Name, Address, Phone #, Relationship to Insured, Pol, Grp, or FECA #, Birth Date and Sex fields.
Verify Patient Insurance Eligibility
Submit a new verification request, view and delete prior verification requests, and refresh data when more than one user is working with the patient insurance information in Front Desk.
To get started:
- Open the Front Desk application and click Patient Management.
- Select a patient whose eligibility you wish to verify and click Insurance.
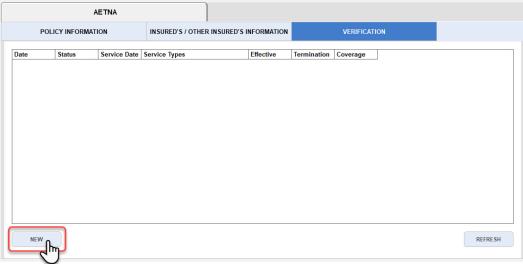
- Click Verification.

Submit New Verification Request
- Click New.
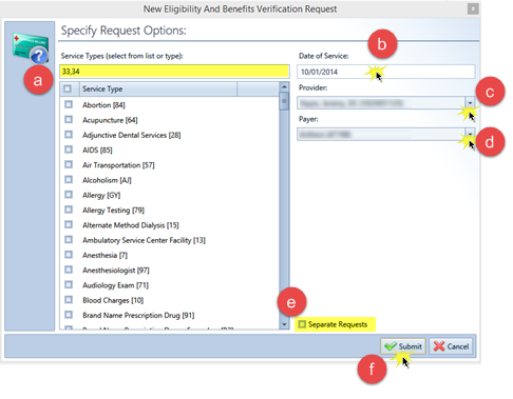
- The software will open a New Eligibility and Benefits Verification Request window.
- Select or type the Service Types you wish to verify.
- Click in the Date of Service: field and select a date of service.
- N O T E
Not all payers will accept a date other than the current date. Check with your payer to see if you are able to select a Date Of Service: value that is different than the current date. - Select a provider from the Provider: drop-down menu.
- N O T E
Depending on how you're credentialed with your payors, you may need to select a provider value containing a billing NPI. Check with each payor to see what NPI is acceptable. - Select a payer from the Payer: drop-down menu.
- If you have selected multiple service types, you can submit separate verification requests for each service type by selecting the Separate Requests check box.
- N O T E
Not all payers will accept multiple Service Type codes. Check with your payer to see if you are able to select more than one Service Type per request.
If your payer does not accept more than one Service Type code per request, select the Separate Requests check box and your software will automatically submit a separate request for each Service Type code selected (up to 30). - Click Submit.
- The software will display your submitted verification requests with request details including the status of the request. When the request has a Completed status, the software will display the patient's coverage status along with the coverage effective date and coverage termination date. If your request has a status other than "Completed," click here.
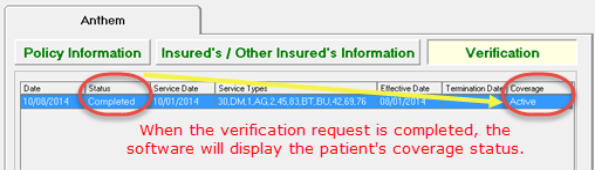
The service will send the eligibility verification request. The software will display the status of the verification, the date of the verification, the effective and termination dates, and the patient's coverage status. To view more details, click View. For more information on interpreting the status of the verification, click here.
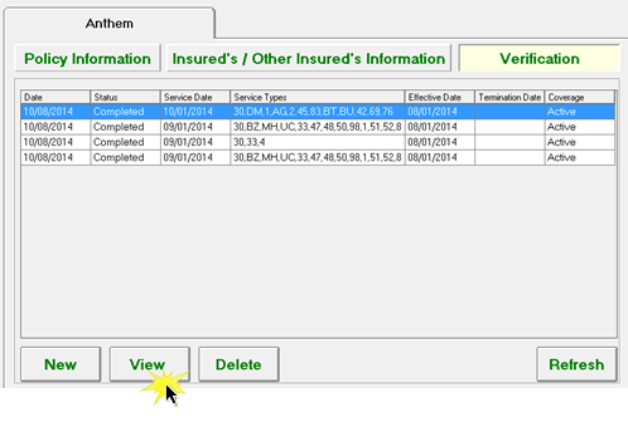
View Prior Verification Request
After you submit a verification request for a patient, the software will display your submitted verification requests under Verification in the Insurance window of that patient's record in Front Desk.
- Select a verification request.
- Click View.
- The software will open a Eligibility Response Viewer window. To print the page, click Print.
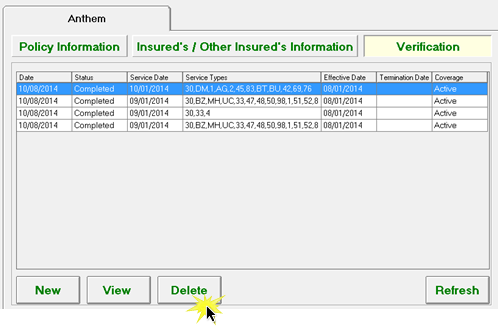
Delete Prior Verification Request
- Select a verification request.
- Click Delete.
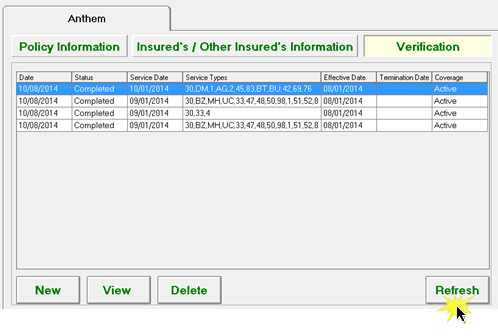
Refresh Data
If multiple users are accessing a patient's insurance information in the Front Desk application, refresh the data to view the most current information.
- Select a verification request.
- Click Refresh.
Interpret Verification Request Submissions
If the software displays a "Rejected" status, this indicates a problem with the your patient data or EDI credentials.
If the software displays a "Failed" status, this indicates a problem with the Verify service. Contact Support at (619) 528-0400.
For more information, see our troubleshooting guide and FAQ (these are in development and will be available soon).