Listings
The Listings section displays a visual reference of individual spinal segments, or a body image. You will create reference notes by inserting findings to the right and left of each segment. This section is designed to act as a virtual drawing board for posting notes on directions of misalignment and corrective adjustment.
When you select a segment it highlight in yellow. Once a note is made to a segment, it has a white background so as to stand out well, though this background color can be changed to anything else you prefer.
Add Listings
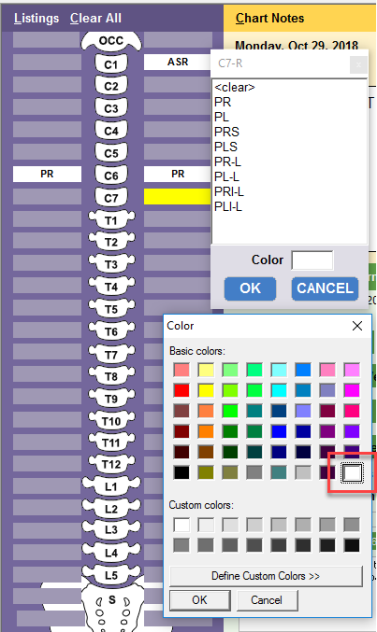
- Click the right and/or left buttons next to each spinal segment.
- A pop-up dialog box appears next to the segment, containing a list of values. Depending on which listings system you are using, these values may be different.
- Click a value to make a selection.
- (Optional) Click the Color box to pick a color to shade the listing.
- Click the OK button to exit the dialog box. The segment button now turns white and displays the new value.
Remove listings
- Click the segment that you want to change.
- In the dialog box, click <clear>.
- Click the OK button to exit the dialog box and clear the value from your segment.
Change listings values
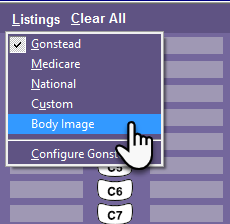
- Click the Listings heading to access a drop-down menu. The menu contains a list of the listings systems available to you.
- The system you are currently using will have a checkmark next to the name. To select a new system, click the name of the system you want to use.
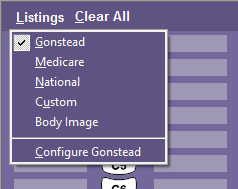
The section is configured to display Gonstead, Medicare, National and Custom listings systems, or you may choose to display body images. Each listing system will contain values specific to that system. You can change the system values, or select the Custom option to add your own listing values. Custom values should be used if you prefer to use your own codes for personal reference or to create new values based on other settings, such as Atlas or Diversified. You can thus easily recognize your own unique documentation techniques by customizing the values of the spinal segments.
Configure listings values
- Click the Listings heading to access the drop-down menu. A Listings Custom Setup dialog box appears. The dialog box is set up for whichever listings system you are using.
- The last menu item reads Configure along with the name of your current system. Click the Configure option to customize your listing values.
- Select a spinal segment using the drop-down Select Spinal Segment menu. The lists for the Right of Segment and Left of Segment will reflect the spinal segment you selected from the drop-down menu.
- Type a new value in the white box above each list.
- Click the Add button to add your new value to the list.
- To move values, select the value and click the Move Up and Move Dn buttons. Use the Remove button to remove a selected value or values. To make a selection, click a value in the list. To make multiple selections, click values while pressing the Ctrl button on your keyboard.
- To copy values from the Left of Segment to the Right of Segment and vice versa, use the Copy buttons.
- Use the Copy From button to copy the entire list of right/left values from one segment to another.
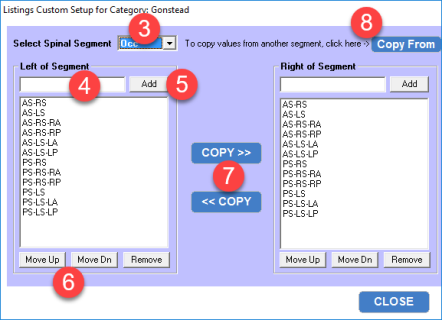
- A new Copy from segment dialog box appears. From the drop-down menu, choose the segment from which you would like to copy values.

- Click the OK button to exit the dialog box and copy the values.
Adding Listings to Chart Notes
You can create a macro button that will import your selected Listings settings into Chart Notes by using the advanced-macro CURR_LISTINGS command (for horizontal orientation) or CURR_LISTINGS_VERT (for adding each on its own line). This capability works for the following Listings types:
- Gonstead
- Medicare
- National
- Custom Listings
NOTE: The Listings will always appear in the chart notes arranged in correct order from top to bottom, regardless of the order in which they were created. This is also true when updating the field.
See Advanced Macros for instructions on creating a custom button to invoke this command.
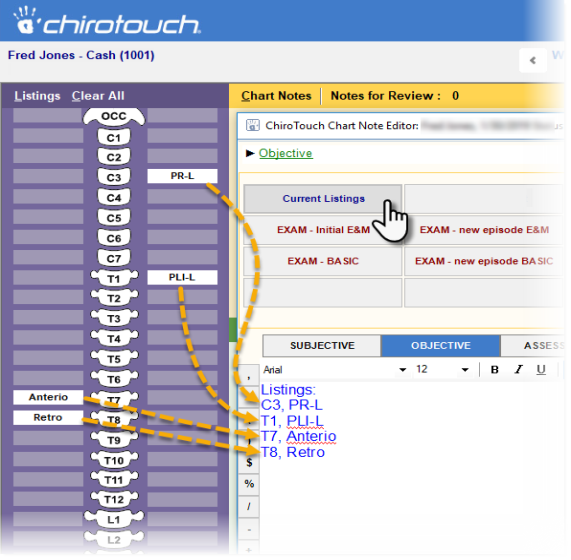
Here is an example, adding Listings using a custom button (and CURR_LISTINGS_VERT) created for the Objective macros:
Markup Body Images
- Select Body Image from the Listings drop-down menu. The body image gender displayed reflects the gender assigned in the patient's account.
- To edit the body image, click the Open Editor button below the images.
- Use the tools in the Body Editor to mark up the image with circles, rectangles, a free-form pen, lines, and custom labels. Click OK to save your changes.
- To remove your last markup, click Undo.
- To rotate the image, click Rotate Image.
- To reset the image and remove all markup on the view displayed, click Reset Image.
- To reset all body views, click Reset All. This action cannot be undone.

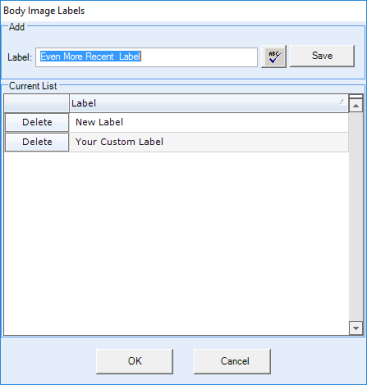
- To add a custom label, select "Text" from the Tooldrop-down menu.
- To edit custom labels, click Edit Custom Labels. Enter your custom label in the Label text field and click Save. Delete custom labels from the list below by clicking Delete.