Advanced Macros
You can insert advanced macro fields in your macro text buttons that prompt you for information based on the patient you are seeing. You can also have the system save default answers to the CHOOSE ONE/CHOOSE ANY questions.
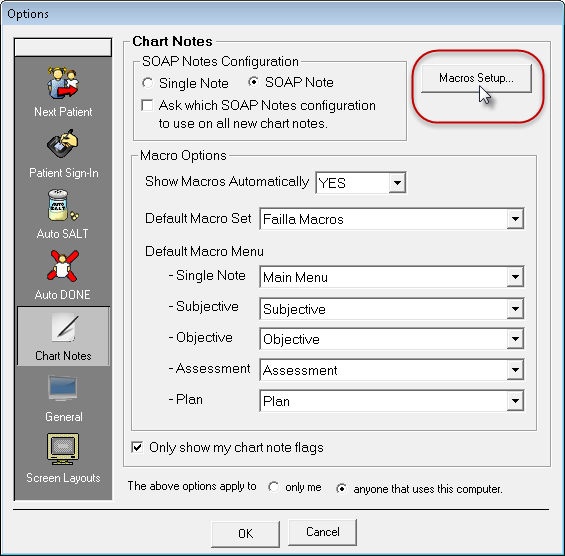
You can create new macro sets in the Macro Setup Tool. To open the Macro Setup Tool, click the  button in the Chart Note Editor. Creating Macros for information on creating basic macros.
- Go to CT Provider > Chart Notes > Macros Setup.

- In the text field, click where you would like the field to be inserted. Think of this as putting your cursor down where you want to start editing.
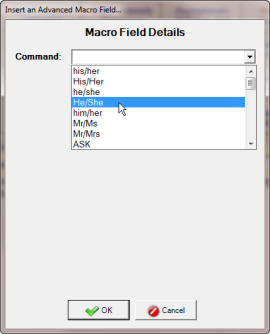
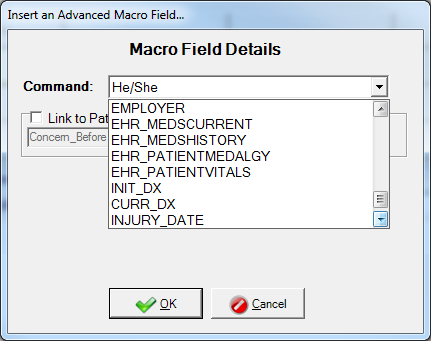
- Click Advanced in the left navigation pane. The Macro Field Details list appears.
- Choose the command that you want to insert into this macro. See Available Macro Commands for details on each command.
- Click OK.
When you create an advanced macro, there are lots of variations you can use to get just the wording you want. Each heading below represents an option in the Command drop-down. Click a heading to expand its definition and to learn more.
his/her, His/Her, he/she. He/She, him/her, Mr/Ms, Mr/Mrs
These commands insert the appropriate term into the chart note based on the patient’s gender and marital status.
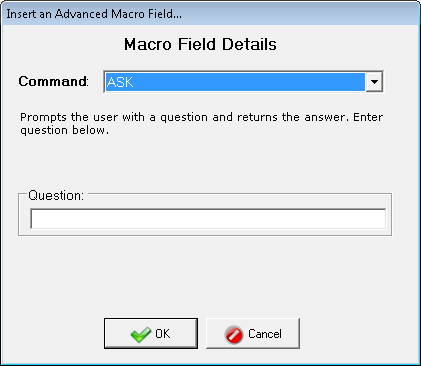
This command prompts the provider with a question and asks the provider to enter the answer. Type your question in the Question text field.
This command prompts the provider with a multiple choice question and enters the selected answer into the chart note. Type your question in the Question text field and select from a list of choices from the drop-down menu.
If you would like the system to save default answers for this question, check the boxes for the answers you wish to be selected by default.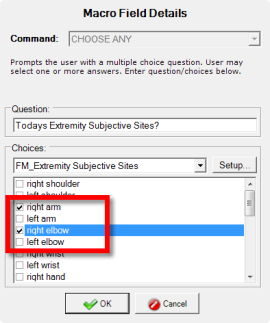
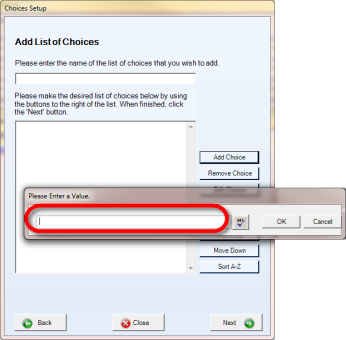
 Create a new list of choices for a question
Edit an existing list of choices for a question
Delete a list of choices
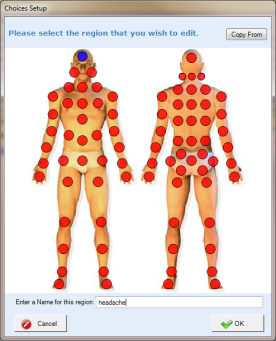
Edit the description of a region
When finished inserting fields in your macro button, click Save and then click Close to return to the Chart Note Editor screen.
This command prompts the provider for a date and enters it in the chart notes. Type the question text that prompts for a date and click OK.
This command prompts the provider for a number and enters it in the chart notes. Type the question text that prompts for a number and click OK.
This command prompts the provider for a region of the body and enters the region in the chart notes. Type the question you would like to be presented with and click OK.
This command prompts the provider for a spine segment and enters the segment in the chart notes. Enter the question you would like to be presented with. When clicking this macro in your chart notes, a Macro Input dialog box appears prompting you to click the spinal segments to add them to your chart note.
This command is similar to the SPINE command. It prompts the provider to select a left, right, or complete spine segment and enters the segment in the chart notes. This command is helpful if you want to be precise about the location of spinal subluxations when you are reporting your findings. Enter the question you would like to be presented with.
The following commands prompt the provider to enter specific patient information into the chart notes:
Standard Commands:
- FIRST_NAME - first name
- LAST_NAME - last name
- BIRTH_DATE- birth date
- AGE - age
- SEX - sex
- ADDRESS - address
- PHONE - phone number
- EMAIL - email address
- MAR_STATUS- marital status
- EMP_STATUS - employment status
- OCCUPATION - occupation
- EMPLOYER - employer
- INIT_DX - initial diagnosis
- CURR_DX - current diagnosis
- CURR_TX - current treatment
- INJURY_DATE - date of injury
- REFER_PHYS - referring physician
- PCP_OFFICE_NAME - primary care physician office name
- PCP_NAME - primary care physician name
- PCP_DEGREE - primary care physician degree
- PCP_SPECIALTY
- PCP_NPITYPE1
- PCP_ADDRESS
- PCP_PHONE
- PCP_EMAIL
- PCP_FAX
Advanced Commands:
- INIT_NECKSCORE - oldest Neck Pain Disability Index Score. (Only available if there is a Neck Pain Disability Index assessment available on the patient account.)
- CURR_NECKSCORE - newest Neck Pain Disability Index Score. (Only available if there is a Neck Pain Disability Index assessment available on the patient account.)
- INIT_LBSCORE - oldest Lower Back Revised Oswestry Score.(Only available if there is a Revised Oswestry assessment available on the patient account.)
- CURR_LBSCORE - most recent Lower Back Revised Oswestry Score. (Only available if there is a Revised Oswestry assessment available on the patient account.)
- FOA_NECKTEXT - Neck Pain Disability Index Questionnaire
- FOA_LBTEXT - Low Back Disability Questionnaire (Revised Oswestry)
- CURR_DATE - insert the current date
- CURR_TIME - insert the current time
- CURR_USER - insert the current user's name
- CURR_WELLNESS - inserts the user's current Wellness Score
- PREV_WELLNESS - inserts the user's previous Wellness Score
- WELLNESS_CHANGE - insert's the user's % change between their current and previous Wellness Score
- FOA_NECKCHANGE - Neck Pain Disability Index Questionnaire produces a % change, calculated by: (initial score - current score) / (initial score*100)
- FOA_LBCHANGE - Low Back Disability Questionnaire (Revised Oswestry) produces a % change, calculated by: (initial score - current score) / (initial score*100)
- FOA_UPPEREXCHANGE - Upper Extremity Functional Index produces a % change, calculated by: (initial score - current score) / (initial score*100)
- FOA_LOWEREXCHANGE - Lower Extremity Functional Scale
- CURR_SMARTFIT_RX - inserts the patient's current SmartFit prescription plan
- CURR_LISTINGS - Inserts Listing selections from Gonstead, Medicare, National, and Custom Listings into a chart note.
- CURR_LISTINGS_VERT - Inserts Listings selections as above, but with each listing on its own line.
Advanced Commands available exclusively on EHR enabled versions of ChiroTouch:
- EHR_MEDSCURRENT - patient's current medication
- EHR_MEDHISTORY - patient's medication history
- EHR_PATIENTMEDALGY - patient's medication allergies
- EHR_PATIENTVITALS - patient's vital signs
You can automatically post charges and diagnoses by adding them to macro text buttons.
To add charges to a macro text button:
- Click the macro text button to which you would like to add charges. The Macro Charges list appears.
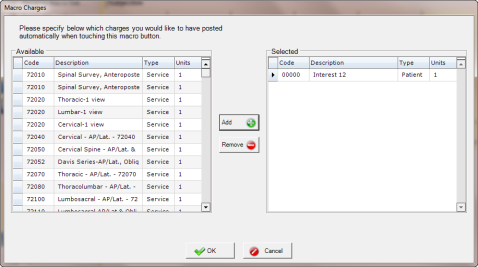
- In the Macro Charges list, click the charge and click Add to move it from the Available column to the Selected column. You can also double-click a charge to add it.
- To remove a charge from the Selected list, select the charge and click Remove.
To add diagnoses to a macro text button:
- Click the macro text button you would like to add diagnoses to. The Macro Diagnoses list appears. You can view ICD-9 codes, ICD-10 codes, or both, by selecting the options below the list.
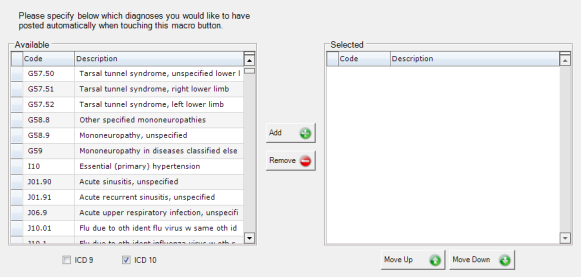
- In the Macro Diagnoses list, click the diagnosis, and then click Add to move the diagnosis from the Available column to the Selected column. You can also double-click a diagnosis to add it.
- To change the order in which a diagnosis appears, click the diagnosis, and then click Move Up or Move Down.
- To remove a diagnosis from the Selected list, click the diagnosis, and then click Remove.
When finished adding charges and diagnoses, click Save.
To save time, you can copy macro text from one macro set into another macro set. When copying macro text containing an advanced macro field, the macro choice list will be copied to the new set. If you change the macro choices in either the original or the target macro, both instances of the list will contain the revised version of the list.
TECHNICAL NOTE:
Before version 6.3, if you create a new macro by using the Macro Manager or copying a set with advanced links from patient intake (CTIntakePremium), the advanced links may not copy correctly. This functionality is slated to be changed in 6.3.
Using the Macro Manager
The Macro Manager allows you to drag and drop macro buttons from one menu to another and from one set to another. Macro Manager for more information.