Opening a Patient’s File
In Provider All-In-One, there are many ways to bring up a patient’s information, or open a patient’s file on the screen. You can open a patient’s file on the screen without checking the patient into the room, or open a patient’s file while simultaneously checking that patient into the room. You can also require the patient to sign in through CT Provider after entering the treatment room.
Depending on how you open a patient’s file, the system will do one of two things:
- Open the patient’s file without checking in the patient right away by clicking Select Patient.
- Open the patient’s file and check-in the patient immediately by clicking Next Patient.
Once the patient’s file is open onscreen, you have access to the patient’s entire record.
 The Select Patient option
Click the Sel. button to find a patient and open a patient’s file on the main screen without checking in that patient. If the patient does not have an appointment, click this button open a patient’s file onscreen. You can also use this button to circumvent the self check-in that occurs when clicking Next button. You can therefore view a patient’s file at any time, regardless of an appointment.
When you click the Sel. button on the toolbar, the Select Patient dialog box appears. Various display options are shown at the top. Click the radio buttons to view those patients who are scheduled for the current day, those who have arrived, those who have checked in or checked out, or all other patients.
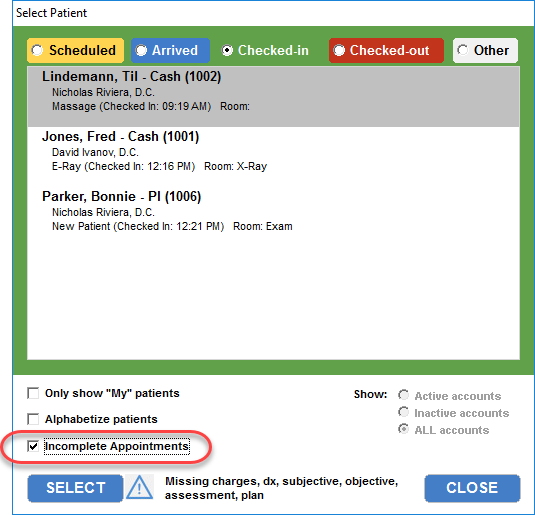
Select Incomplete Appointments to view patients whose appointments are incomplete. An incomplete appointment includes those that are missing charges, diagnoses, or treatment plan, or that have missing/incomplete chart notes.
NOTE: This incomplete-appointments option is only available for the Checked-in and Checked-out categories.
Choose to show only active accounts, only inactive accounts, or all accounts.

The Other list gives you an entire list of patients. It also gives you a search function to find a patient quickly. To search for a patient, type the patient’s last name in the search field box. The system will highlight the closest match as you type.
In the Scheduled list, there is an additional button located next to the Select button. As you select a scheduled patient, you have the option to check in the patient immediately after you select them here. This will prompt CT Announcer to call that patient back to the treatment room; however, it will not produce a self check-in screen for the patient.
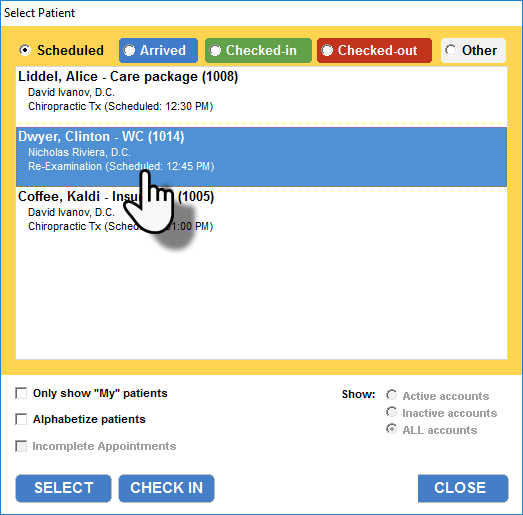
Select a patient
- Click a radio button to select a list of only scheduled patients, patients who have arrived and are waiting to be seen, patients already checked in, patients who have been checked out, or a list of all patients.
- Click a patient name.
- Click the Select button to select a patient without checking them in, or click the Check In button to check in a patient while simultaneously opening their file. The screen will load with the patient’s information. Click the Close button to cancel this task.
Patient Check-In
You may select patients who are scheduled but have not yet arrived or marked as arrived by the system; however, the system will check in the patient if you add new charges and/or diagnoses. Whenever you open a patient’s file using the Sel. button and you add a new charge or diagnosis, a dialog box tells you that the patient’s appointment status has been changed to “checked in”.
Because the system is forcing the checked in status, it will not complete any Auto-SALT functions that you have set to happen at check-in (Options for information on setting up the Auto-SALT feature).
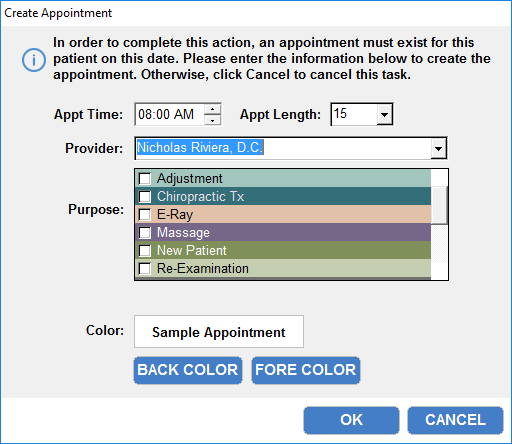
Creating an Appointment
You may select any patient regardless of an appointment; however, you will also have to create an appointment if you add new diagnoses and/or charges. You can add chart notes, change the current treatment plan, add treatment notes, or view the patient’s records without requiring an appointment. However, when you add any charge and/or diagnosis, a pop-up box automatically appears prompting you to create an appointment for the patient so that they may be simultaneously checked in to a treatment room.
Removing the Patient’s Information from the Screen
You can only use the Return button if the patient has a scheduled appointment, and if there are no diagnoses or charges added.If you have reviewed the patient’s information on the dashboard screen and want to return the patient’s status to “arrived”, remove any posted diagnoses and charges and click the Ret. toolbar button.
You can use the Delete button regardless of whether the patient has a scheduled appointment. If the patient has not been checked in, or if the patient does not yet have an appointment scheduled, click the X button to remove the patient’s file from the screen.
If the patient has been checked in, you can use the X button to remove the patient’s file from the screen, even if you have charges and/or diagnoses posted; however, the patient’s status is not returned to “arrived”. If the patient is checked in and you have completed all Auto-DONE tasks, clicking the X button will change the patient’s status to “done”. For more information on Auto-DONE options, Add a Patient as Checked-In.
The Next Patient option
The Next button is an alternative to the Sel. button. You will use the Next button to open a patient’s file on the main screen, but note that its primary purpose is to notify the system that you intend to check in a patient. Before opening the patient’s file, the CT Provider screen will display a sign-in screen for the patient to complete. Therefore, the Next button will change the patient’s status from “arrived” to “checked in”.
Based on the settings you created in the Options dialog box; when you click the Next patient button, the system will respond in one of two manners:
- By automatically selecting the next patient in line, or
- Wait for any arrived patient to sign in to the treatment room.
Automatically Selecting the Next Patient in Line
If you have configured CT Provider to automatically select the next patient in line:
- The system will select the first patient who is marked as “arrived” by the system. The next arrival will be selected next, and so on.
- The system will immediately mark that selected patient as “checked in”.
- CT Announcer will broadcast an announcement, directing the patient to proceed to the treatment room.
- CT Provider will display a patient-specific sign-in screen.
Checking In the Patient
If you have configured CT Provider to automatically select the next patient in line from the arrived list, the system sends back the patient who arrived first. It also updates the patient’s status to “checked in” immediately.
The system sees patients as waiting in line according to their time of arrival, regardless of their appointment time. Let’s say that Patient 1 has an appointment for 9:00 AM, while Patient 2 has an appointment for 9:15 AM. Patient 2 arrives before Patient 1. When you click the Next button, the system will call Patient 2, because Patient 2 is the next patient waiting in line.
As long as your patients’ assigned providers and appointment purposes are included in the Options settings, CT Provider will recognize those patients. For example, let’s say that you have five patients waiting to be seen. They have all been marked as “arrived”. Two patients are waiting for another doctor. Three patients are waiting for you. If you included the other doctor in the Next Patient section of the Options dialog box, then CT Provider will recognize that five patients are waiting. If you only included yourself in the Options dialog box, then CT Provider will only recognize three patients waiting.
For another example, let’s say that you included all doctors in the Options box, but you did not include “massage” as an appointment purpose for your CT Provider application. Of the five patients waiting, one has an appointment for massage. Therefore, CT Provider will only recognize four patients waiting.
For these reasons, it is important that you understand the implications of your Options settings.
Response from CT Announcer
The Next button will prompt CT Announcer to direct the next patient in line to the treatment room with a broadcast announcement. When you configure the system to automatically select the next patient in line, the system knows which patient it is being checked in and to which room.
CT Provider Sign-In Screen
If you have configured CT Provider to automatically select the next patient in line, and CT Provider will display a sign-in dialog box that greets the patient by name. If you have your patient’s picture on file and stored in their electronic filing cabinet, the picture will be displayed in the dialog box. It also mentions the specific provider who is assigned to the current appointment. Only the specified patient is allowed to sign in.
The sign-in process is similar to the CT Sign-In application, with a few exceptions. The patient will sign in using one of the four methods. The same methods that you set up for CT Sign-In will be displayed in CT Provider. The subjective complaints screen, if selected in the Next Patient section of the Options dialog box, will follow. Any linked accounts will not be shown, because the system knows exactly who should be signing in at this computer. Enabling self check-in applies to the CT Sign-In application only; if you have disabled a patient from processing self check-in, the patient will still be able to sign in using CT Provider.
After the patient has finished signing in, the system opens the patient’s file onscreen.
Waiting for Any Patient to Sign In
If you have configured CT Provider to wait for any patient to sign in:
- CT Provider waits for any patient to walk back to the treatment room to sign in; it will not select a specific patient.
- The system will mark the patient as “checked in” immediately after:
- The patient is checked in using the Front Desk application of ChiroTouch, or
- The system identifies which patient just signed in using CT Provider.
- CT Announcer will not broadcast an announcement unless someone checks in the patient through the Front Desk application.
- CT Provider will display a generic sign-in screen.
Checking In the Patient
If you have configured CT Provider to wait for any patient, the system will not send back any specific patient. If you want CT Announcer to broadcast an announcement to your patient, you must check in the patient manually through the Front Desk application of ChiroTouch. Because CT Provider does not see patients as waiting in line, it accepts any patient to sign in. You may still send back patients according to their arrival time, but this setting will not automatically call patients by their arrival time.
The system does not bother to recognize providers and appointments, as it does when automatically selecting the next patient. When the system waits for any patient, it will accept that patient, regardless of an appointment purpose or assigned provider.
If you do not manually check in the patient through the Front Desk, the patient’s status won’t update to “checked in” until after the patient successfully signs in at the CT Provider computer.
Response from CT Announcer
In order for CT Announcer to respond to the Next button, it needs to know first who is supposed to proceed to the treatment room. The Announcer application will respond only if someone checks in a patient using the Front Desk application of ChiroTouch. The system is not yet aware of which patient is heading to the treatment room. As soon as the front desk checks the patient into a room, CT Announcer is updated immediately with this information, and it then broadcasts an announcement, directing the specified patient to proceed to the treatment room.
If you are allowing any patient to come back to the treatment room to sign in and do not manually check in the patient through the Front Desk, the patient should instead be directed back to the treatment room by staff. The system doesn’t know who is coming back until after that patient has signed in, so it can’t tell the Announcer application which patient to call.
Because the patient has already entered the treatment room and signed in, CT Announcer will not broadcast an announcement. When the patient signs in using CT Provider, the Announcer application recognizes that the patient has been checked in to the treatment room and doesn’t bother announcing to the patient, as the patient is already in the treatment room.
If you have configured the CT Provider application to wait for any patient to sign in, CT Provider will display a generic sign-in dialog box. The patient is shown a greeting that reads: “The doctor will be with you shortly” along with the available sign-in methods. Any patient is allowed to sign in.
Although linked accounts are not shown with the automatic selection option, linked accounts are displayed with the Any patient option. Because the CT Provider sign-in screen is configured differently when it waits for any patient, it needs to show linked accounts to be sure of the correct identity of the patient, including all case types and family members linked to the account. When the correct name is selected, CT Provider can then correctly identify the patient. The sign-in process concludes with a subjective screen, if selected. When finished, the patient’s files opens.
Using the Next Button in Error
If you click the Next button in error, simply press the Esc button on your keyboard. This will lock the screen and the pop-up sign-in screen will disappear. After entering your provider password, CT Provider will revert back to its original blank screen.
Returning the Patient after Entering Diagnoses and/or Charges
If you have included diagnoses and/or charges in your Auto SALT functions, once the system has added a diagnosis and/or charge for the patient, the system will not allow you to return the patient to an “arrived” status without removing the diagnoses and/or service charges.
If you do not wish to remove the automatic postings, select the “X” button to clear the patient view from the provider screen. If you need to return the patient to the waiting list, however, you must first remove the diagnoses and/or charges before returning the patient.
Patient Status Bar
If patients have been marked as “arrived” and are waiting to be seen, and if their assigned provider and appointment purposes are included in your automatic selection criteria (Setup Options), the Patient Status Bar notes the number of patients waiting to be seen.
As an alternative to the Next and Select patient buttons, you can check in a patient using the patient status bar. You may want to use the patient status bar for these reasons:
- If you would rather select your next patient, but you don’t want the system to select the patient for you when using the Next button;
- If you want to select a patient but, unlike the Select button, you also want to check in the patient.
- If you want to select a patient to check in, but you also want the patient to sign in and enter subjective complaints.
Select a patient using the Patient Status Bar
- Click once in the Patient Status Bar.
- A Patients Waiting dialog box appears, containing the patient’s name and appointment information.
- Click the name of the patient you want to check in.
- Click the Select button.
- The sign-in screen now appears and waits for the patient to sign in.
Even if you have configured CT Provider to wait for any patient and display a generic sign-in screen; if you select a patient using the Patient Status Bar, CT Provider will display a patient-specific screen. This is because the system now knows who should be approaching the treatment room to sign in.
