General Tab
The General tab shows all of the patient’s general information. This includes the patient’s address, e-mail address, phone number, referral information, provider information, employment information, fee schedule, linked accounts, patient photo, and attorney information.
Some of the fields on this screen have red numbers to the left of them. These numbers indicate where this information is automatically entered on your HCFA forms.
Areas of the General Tab
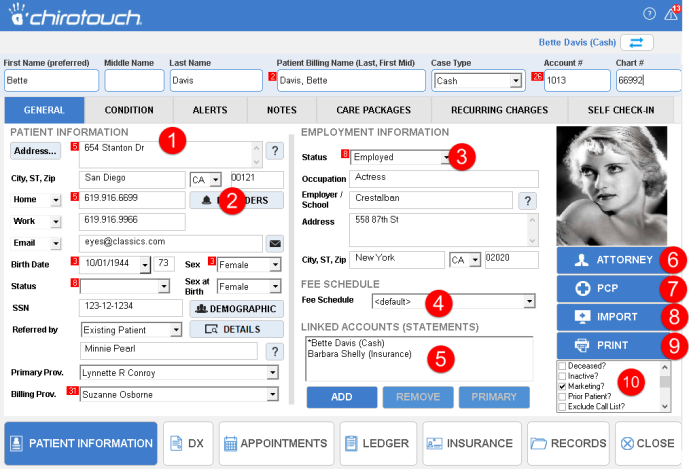
1. Patient Information - Enter basic patient information here, including patient address, social security number, referral information, primary provider, and billing provider. If you would like to copy another patient's address into this screen, click the question mark button to the right of the address field. Click Address... to enter additional address information such as county and country.
2. CT Reminders and E-mail - Send an e-mail or set up CTReminders for your patient here.
3. Employment Information – Enter patient employment information here, including employment status, occupation, and employer address. To search for an employer or school, click the binoculars icon to the right of the Employer/School field. The list you see is created dynamically from all employers and schools entered in all patient information screens in the ChiroTouch system.
4. Fee Schedule – Choose pre-configured fee schedules from the Fee Schedule drop-down menu.Fee Schedules to maintain your list of fee schedules.
5. Linked Accounts – You may link accounts in this area. When accounts are linked, a single statement is produced for all of the accounts linked together. Linking accounts is an ideal feature for families.
Add a linked account – Click the Add button to add a linked account. This takes you to a screen where you can select a patient from the list. Select the patient you would like to link, and click the Next button. This patient is now linked, and appears in the Linked Accounts area of the General tab. Remove a linked account - Select the patient in the linked accounts list, and click the Remove button.
Set an account as primary – Select the patient in the linked accounts list and click the Primary button. This patient will now be shown with an asterisk beside them. Printed statements for this group will reflect the primary patient's information.
For ePay accounts – In order to use ePay for linked accounts, all members must be ePay enabled.
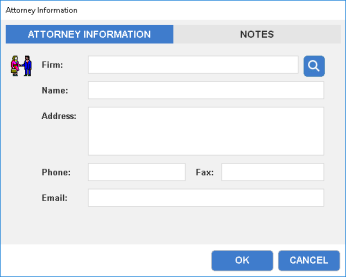
6. Attorney Information – Click the Attorney button to open up the Attorney Information dialog box. Here you can enter your attorney information. Click the Notes tab to add notes about this attorney. To choose from a list of firms, click the binoculars icon to the right of the Firm field.
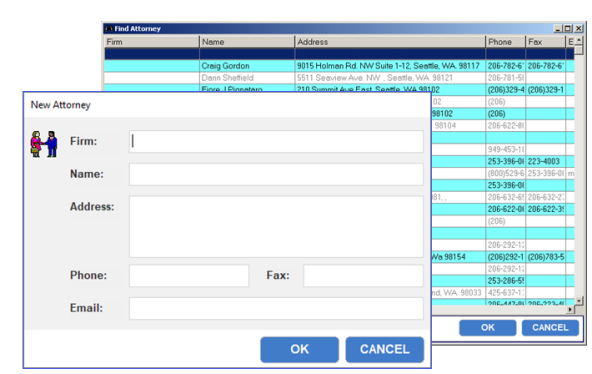
Clicking the binoculars icon opens the Find Attorney pop-up. Choose an attorney from the list, edit attorney information, or enter a new attorney. To add a new attorney, click the New button, enter the attorney’s information in the New Attorney dialog box, and click the OK button.
7. PCP - Click to set the patient's Primary Care Physician information. Complete the information and click OK. There is a Notes tab available for you to add any applicable information. Click the Notes tab to add notes about this physician. To choose from a list of physicians, click the binoculars icon to the right of the Office Name field.
Clicking the binoculars icon opens the Find Primary Care Physician pop-up. Choose a physician from the list, edit physician or office information, or enter a new doctor. To add a new PCP, click the New button, enter the information and click OK.
8. Import – Click Import button to import the patient’s information from their web intake form. In the Patient Intake form (patient name) dialog box, choose whether to download the patient’s previous intake files, or all available downloaded files. For more information on CTIntake, click here.
9. Print - This printer button prints basic patient information. For help on printing or exporting patient information, Printing and Exporting.
10. Additional Information – Check the boxes below the patient’s photograph to add information about the patient’s account, such as whether the patient is active, on hold, or a prior patient.

- Account Hold - Select this option to stop the patient at the patient self check-in station. You may want to hold an account in this manner to retrieve information from the patient before they are checked in. This option instructs the patient to see the front desk when they are checking themselves in.
- Statement Hold - Select this option to keep from sending this patient a statement during a batch print.
- Patient is deceased - Select this option if the patient has passed away.
- Patient is inactive - Select this option to place this patient on an inactive patient list.
- Marketing - This option is selected by default. Clear this checkbox if you do not want to market to this patient.
- Prior Patient - Select this option to mark this patient as a prior patient. This is helpful if you have newly added a patient to the system, but do not want this patient to receive any new patient alerts. This box auto-selected if you cleared the New Patient? checkbox when adding a new patient to the system.
- Exclude Call List - Select this option if you wish to exclude the patient from the call list.
- MultiPhase Treatment - Select this option to use a multi-phase treatment plan for the patient.
- Physically Disabled - Select this option if the patient is physically disabled.
- Text/Email Consent- Select this option if the patient has given consent to receive text and email messages.
To add a photograph of your patient, click in the box with the smiley face for instructions, or do the following:
- Click the "Records" button at the bottom of the screen to go to your patient's records screen.
- Add the photo file into the patient's records. An easy way to accomplish this is to click the "New" button>"File" button>"Import File" button.
- Name your patient photo file
Patient.JPG.