ChiroTouch Automated Update
Please be aware that ChiroTouch has moved to an all automated-update process. Once you have opted in to the Automated Update feature, you will receive automated updates for all future releases.
Who Must Opt In to Automated Update
You must opt in to Automated Update if you:
- Have ChiroTouch Version 7.0.252 or later installed, and
- Have an active Maintenance and Support Agreement with ChiroTouch
IMPORTANT: Your ChiroTouch server and workstations must also meet the software specifications defined in the ChiroTouch System Requirements in order to be eligible for Automated Update.
IMPORTANT: If your ChiroTouch software is on a version earlier than 7.0.252, ChiroTouch will need to perform an initial manual update to the latest version in order for you to be able to receive automated updates for future releases.
Exceptions
Be aware that practices falling into any the following categories cannot opt in to Automated Update and will still require manual software updates:
- Those who maintain multiple physical locations, or
- Are outside the USA, or
- Do not have an office computer network that meets the ChiroTouch System Requirements
NOTE: Clients who do not have an active Maintenance and Support Agreement with ChiroTouch should consider enrolling, in order to take advantage of the many ChiroTouch enhancements to come.
Choose the most convenient day(s) of the week for the Automated Update tool to run overnight on your server, which will happen whenever a new release is available to your practice. This is so you will be prepared to complete the remaining few steps on your workstations the next morning.
NOTE: Automated Update refers to the process of how the update takes place when the release is available to your practice. You will be notified of release availability via the CTMessages feature in your ChiroTouch software prior to your update.
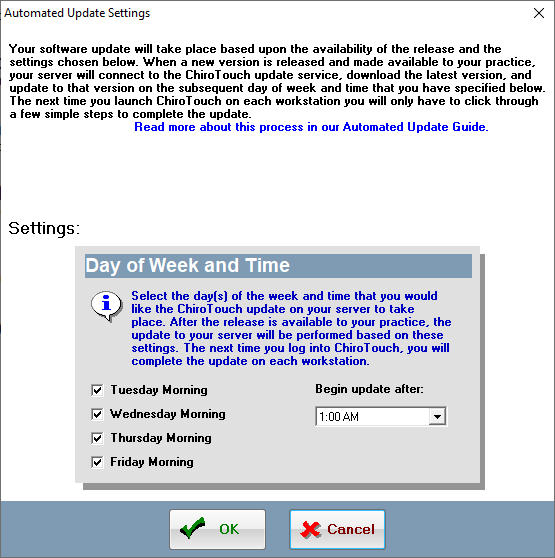
You can even select multiple days of the week, which enables you to get the latest update more quickly after it is made available to your practice. You can change these settings at any time:
- Open the ChiroTouch Maintenance application.
- Click Automated Update. (See the critical notice below)

- Select your preferred day(s) of the week and time for the update to run on your server. Then click OK:
CRITICAL: If you do not see day and time options in the Automated Update Settings, you are not opted in for Automated Updates. To opt in, please start a live chat session from your CTLauncher, create a case in CTCommunity or call into support and a representative will enable Automated Updates for you.

IMPORTANT: If you see the following message after clicking Automated Update, it means that you do not have permission to make changes to this schedule. Contact your clinic's ChiroTouch administrator about setting up your update day & time schedule.
After your server is updated on the day of the week and the time you’ve selected in the Automated Update Settings section of the Maintenance application, you will be prompted to go through a few simple steps to complete the process on your workstations:
- Right-click the CT Launcher icon and select Exit ChiroTouch.
- Re-open the CT Launcher and click Yes on the message that pops up asking if you would like to install the update.
- Another window will pop up with the following message: “Do you want to allow the following program from an unknown publisher to make changes to this computer?” Click Yes.
- Once you have completed Step 3, another window will appear asking if you’d like to perform the update. Click Yes.
- Next, you will click through the steps in the InstallShield Wizard. This process typically takes a few minutes and the Status bar will update to show progress accordingly. (See the following examples.)
- When you click Finish the InstallShield Wizard will close and you will simply open the CT Launcher and log in to experience the brand new version of ChiroTouch.


To restrict certain users or user groups from modifying Automated Update settings:
- Open the ChiroTouch Maintenance application.
- Click Users.
- In System Users, click Security.
- Select your preferred user group from the drop-down, or create a new user group as in the example below.
- Under the Actions section, expand the Maintenance section and select the Change Automated Update Settings listing. Add this action to the Restricted Actions column.

- When finished, click OK:
- Once you have finished updating restrictions, click Exit:


For more information on setting user restrictions, see Modify Security Settings.